Search for:

Performance and Load Testing

A second theme of interest that came up repeatedly at STAR Conference last week was Performance and Load testing. Many of those raising the question, had mobile applications or some form of mash-up or worked in Agile environments were performance and functionality were important.

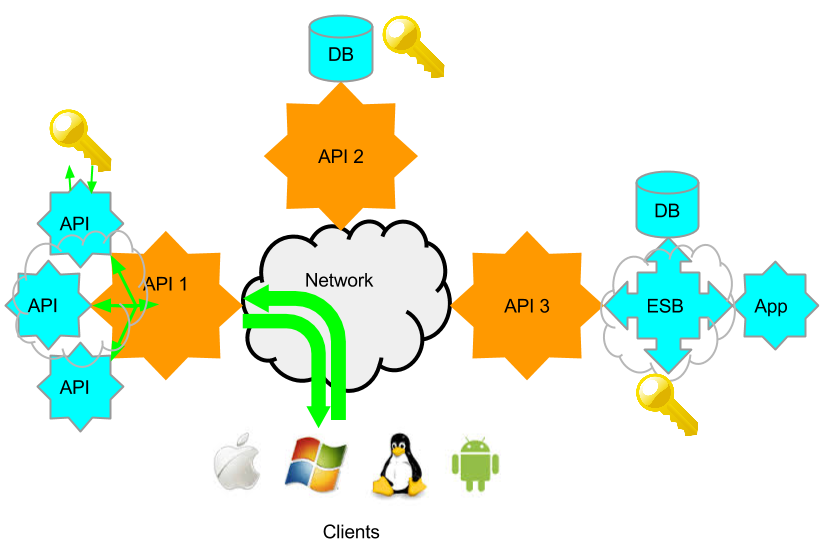
In the SOA or API world, when I refer to Performance, I am referring to a single functional service request to response time taken. The performance of the service as part of the API or web service itself. In the below diagram, it would the time it leaves the client to the time a response is received. The additional API and Identity requests that happen behind the API 1, included. These I refer to as enablers. API 2 has a DB and its identity system, and API 3 is on a Enterprise Services Bus, and has multiple enablers on the bus. Each API may have a number of services associated with it, and each of these may require different enablers, or complete different functions, and so will have different performance characteristics. Granular performance information is therefore important for troubleshooting.

Load Testing, is the performance group of services at a given load. Modelled, using expected behaviour. If function 1 in API 1 is expected to be accessed 5 times that of function 1 of API 2, then the model needs to load Function 1 in API 1 5 x that of function 1 API 2. Load testing can either be throttled to evaluate performance times at a planned TPS or simply increased till errors start occurring, to understand maximum TPS possible.

User experience performance is the perceived performance via a given client. Here we add the performance of a given client to that of the network, API and enabler. User experience does not embrace device / client diversity. Caching, partial screen refreshes, and a variety client tweaks, may hide some perceived performance issues. That said, unless the API performance is know, a poorly performing client can be difficult to identify.

Performance

The most common performance issues that tend to come up, are problems not with the API themselves, but with the enablers. Some back-end database, identity system or ESB that may have some other process running on it at a given time (e.g. backup), has a network issue or requires tuning. Often these issues are due to changes in the environment or only at a given time. A single load or performance test run, a few days before final acceptance, often fails to identify these issues, or the issues occur in production at some later date.

I previously wrote a long multi-part series about performance troubleshooting in mobile API and I have no intent to repeat that. The constant surprise however, when I show a shared test case being used for functional and performance testing, is why  wanted to add some clarification. Usually I get a blank stare during a demo for a few minutes before a sudden understanding.  So many QA testers have being trained to think of different tools and teams for functional and load testing, that the concept of a integrated tool can be difficult to grasp at first, requiring some adjustment in thinking.

After the adjustment occurs, I consistently get the same 2 questions

  1. “Does that mean you can define performance as a function of success criteria?” Yes, each test case for each service in each API, can have a minimum or maximum response time configured in success criteria. Say you set that value as 1 second along with any other criteria for success. If at any time later on that test is run, including load testing, the test case will fail. There is no need  to create new test scripts, data sources, variables etc for load testing in a separate tool. If its a new team, just give them the test case to run.
  2. Does that mean you can do continual testing or regression testing, on production system and identify any changes in functionality AND performance at the same time?  Yes. If the value is set at 1 second response in success criteria, and  you configure a automated regression or functional test every hour/day/week/ whatever. If at any point, performance or functionality changes, the test case would now fail as the response would be different than expected or previously. There is no need to run 2 separate applications to continually test service for changes in functionality and performance.

At this point I usually point out the benefit of physically distributed load agents vs. just virtual users.  The ability to trigger a central test from multiple locations in your network and compare response times, allows not only the simulation of Server, but also the Network. Larger companies often break out network performance turning into another team, and don’t consider it an “application issue”. I believe any performance issues is functionally important. Smaller companies, and senior executives, are however quick to the benefits or consolidating this into a single tool and report.

Conclusion

Regardless of if your performance/load team is a separate group or part of your role, sharing a test case, and actually building performance in to the success criteria in the same tool can offer huge benefits in time savings and in identifying performance issues earlier in development cycle and during maintenance. Why not try it yourself? Here is a two tutorials on Load Testing and Geographically Distributed Load Testing.


3 Ways to Get Started with CloudPort – Capture

This is part of a 3 part series on creating simulated services. CloudPort comes with a proxy capture tool to Capture and then replay a simulated version of the service that currently exists. A simulated, response will remain static, and not effect data integrity of the enablers, but can be load or otherwise used for testing. Workflow and tasks allow for some additional intelligence, but we keep this about getting started.
Lets use iTunes RESTful JSON service. Since I have this song in my head, and the documentation for how to use this service is available. As you will see, the response can be quiet lengthy.

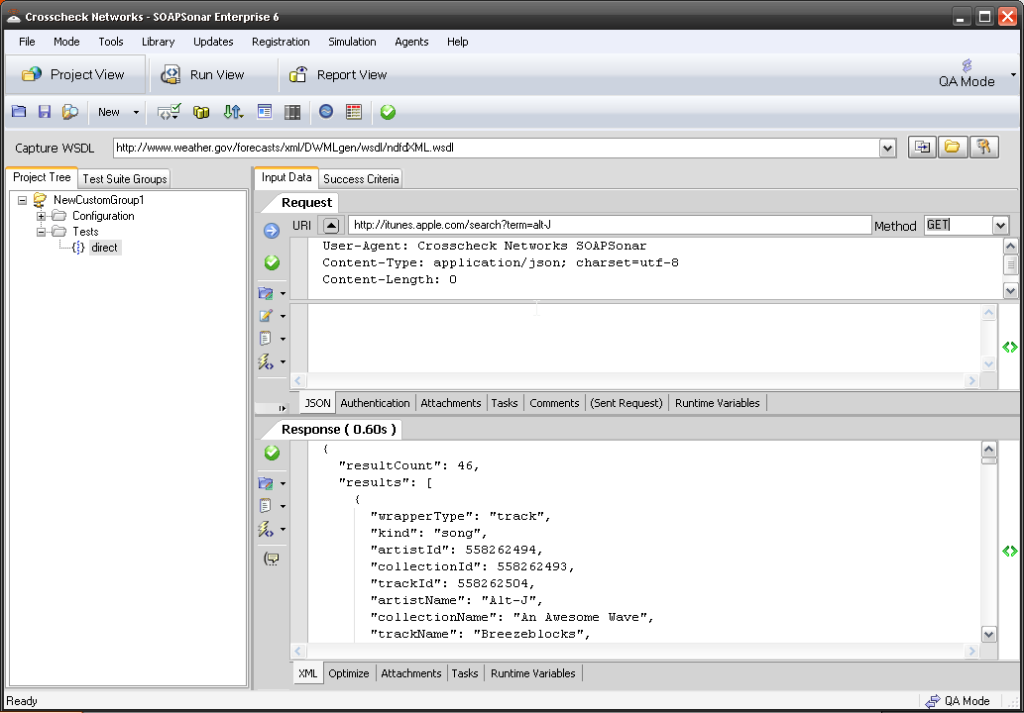
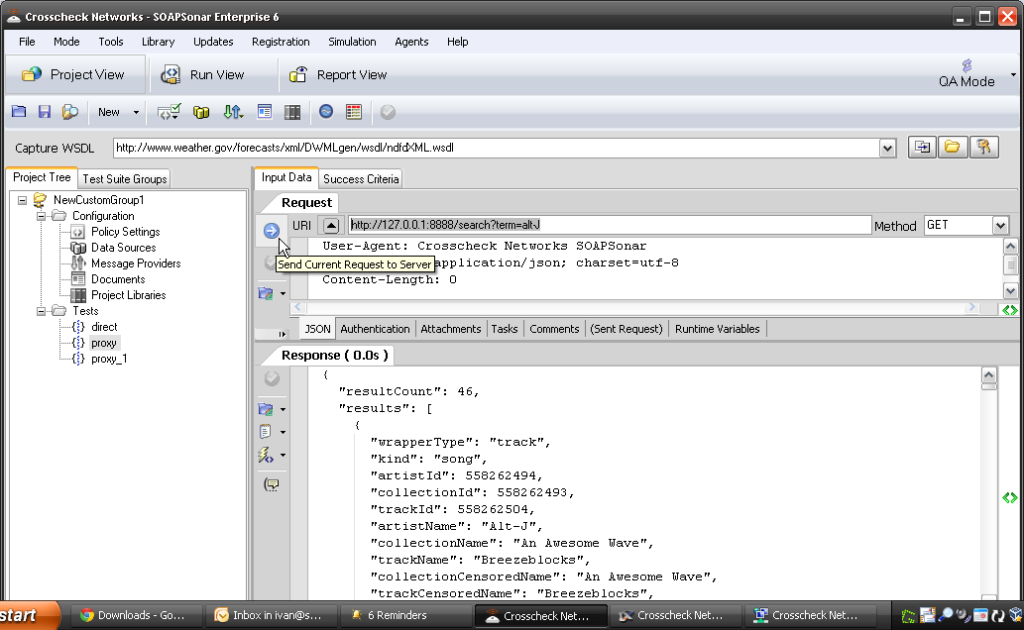
1. Lets test the actual service first. Open SOAPSonar, and File, New Test Group, right-click, New JSON Test Case, and rename it Direct. Paste

http://itunes.apple.com/search?term=alt-J

into the URI and method as GET. Commit and send.

1 direct

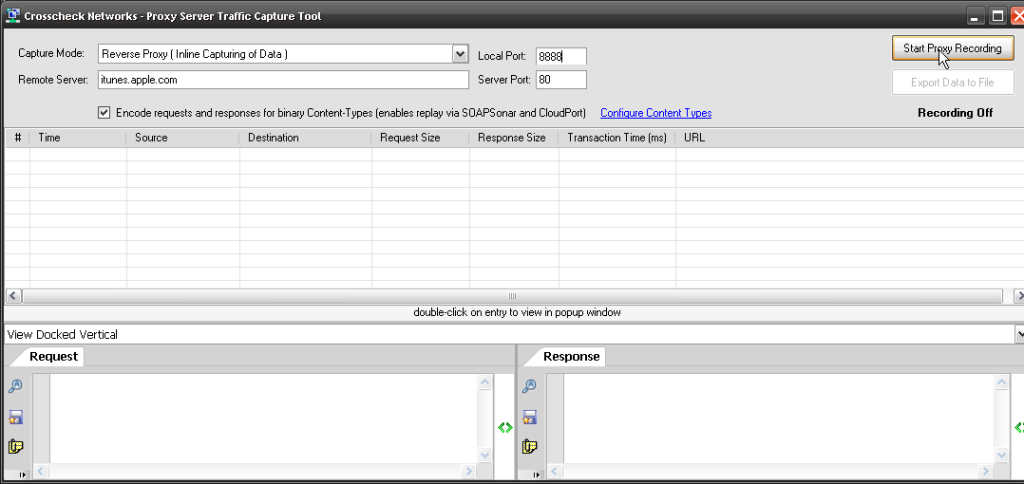
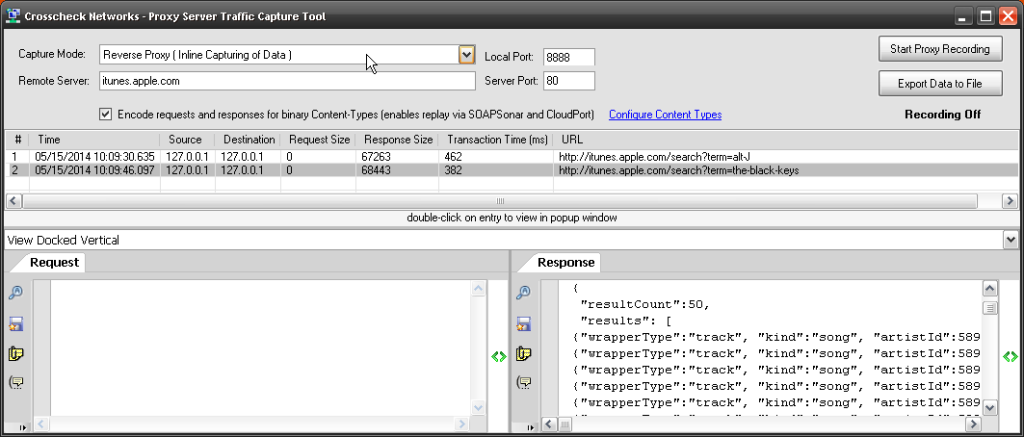
2. Now in CloudPort, select Tools from the menus bar, then Proxy Server Traffic Capture Tool.  Make the local port 8888 (easy for me to remember) and then paste itunes.apple.com into the remote server and Start Proxy Recording. You now capturing all requests made to your local machine on port 8888, which is then forwarded to itunes.apple.com.

2 Proxy

3. In SOAPSonar now, lets send the request to be captured. Clone Direct test case and rename it Proxy. Now change the URI from itunes.apple.com to 127.0.0.1:8888 which is your local machine running CloudPort on port 8888.  The entire query will look like

http://127.0.0.1:8888/search?term=alt-J.

Commit and send.

3 Capture

4. You can send as many queries to that domain to capture as you need to match with your test cases you will run. Lets add a second. Clone proxy and change the URI to  

http://127.0.0.1:8888/search?term=the+black+keys.

Commit and send.

7 Rename

5. You can see the request (header) and the response in the capture tool. Stop the Proxy and Export Data to File. Give it a name you remember and save it. The close the Proxy tool.

5 export

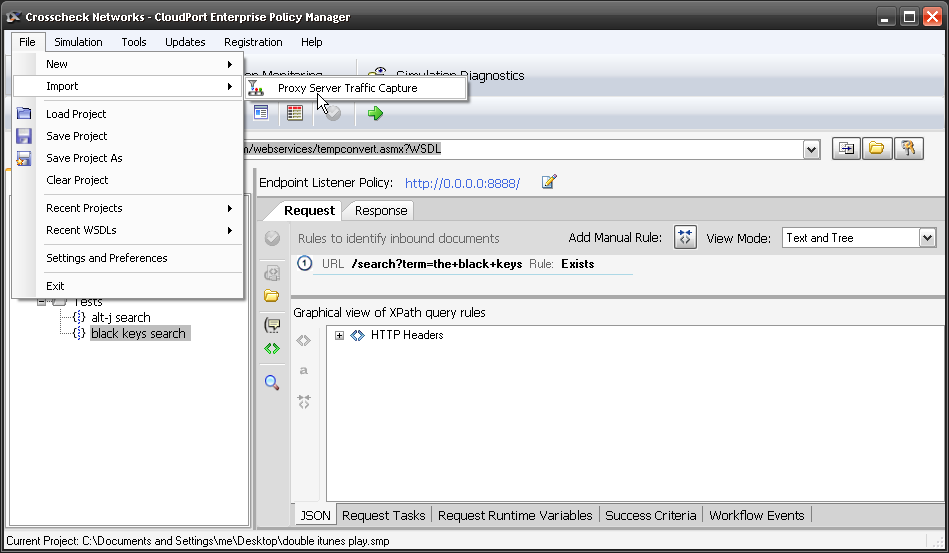
6. Now we need to import the captured file. File, Import, Proxy Server Traffic Capture. We know its JSON, so lets select that vs. leave as auto detect. Either should work, although some services dont always adhere to all standards. Find your captured file. When you import, CloudPort asks if you would like to keep response timing. If you say yes, the new simulated services will perform at the same response times. Select No.

6 import

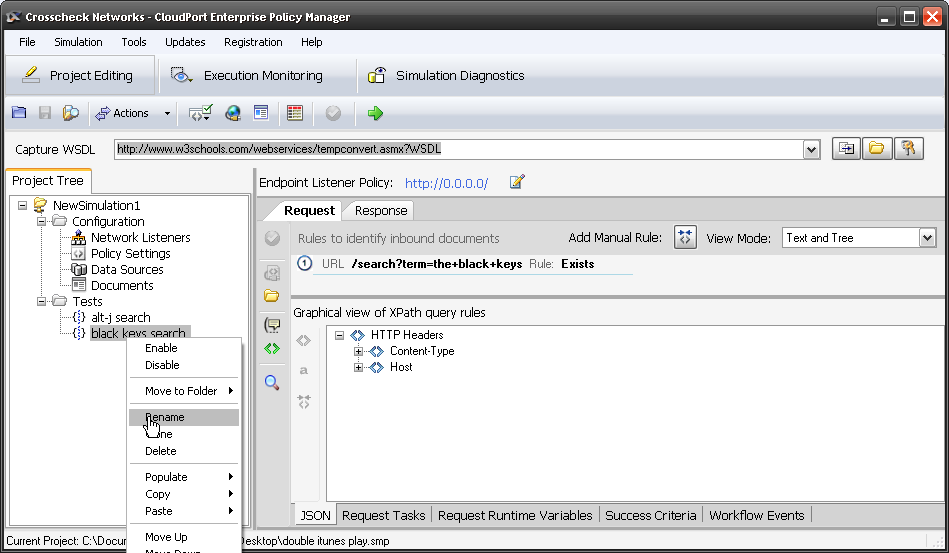
7. Now you should have a NewSimulation1 with 2 Tests. If you select the first, you see in the Request tab,  URL /search?term=alt-J Rule: Exists as 1st rule. The second test URL /search?term=the+black+keys Rule: Exists. Rename your Tests to alt-J search and Black_keys search.

7 Rename

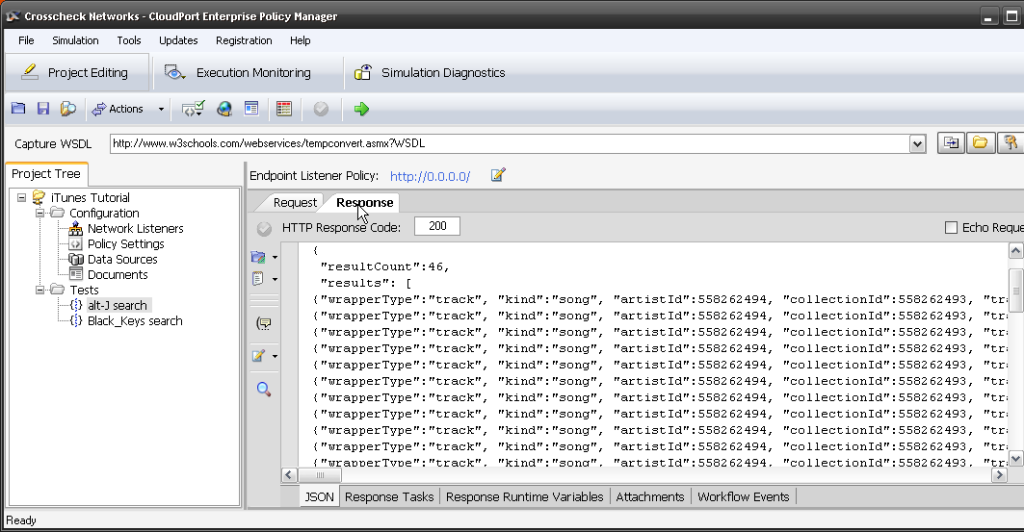
8. If you select the Response tab, you can see the JSON response captured. If you wanted to make any changes you could could just edit it here.  At the bottom is a tab for the JSON, but you can also see the Response Runtime Variables in much the same way you see them in SOAPSonar.

8 response

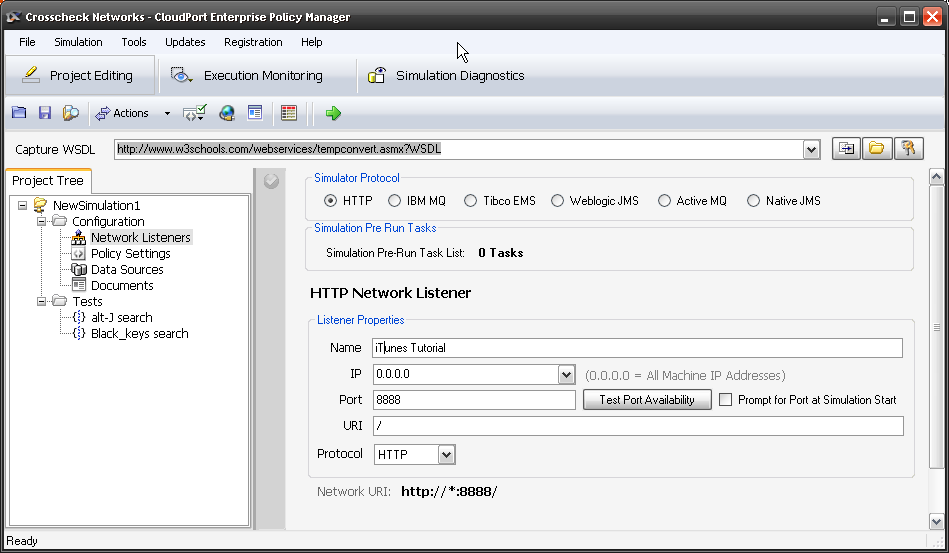
9. lastly, we can set the network listener location and port. Lets name this Listener iTunes Tutorial, leave the IP as 0.0.0.0 (all machines) and change the port to 8888. Lets leave the URI / and commit. Now the simulated service will run on localhost or http://127.0.0.1:8888/

9 listener

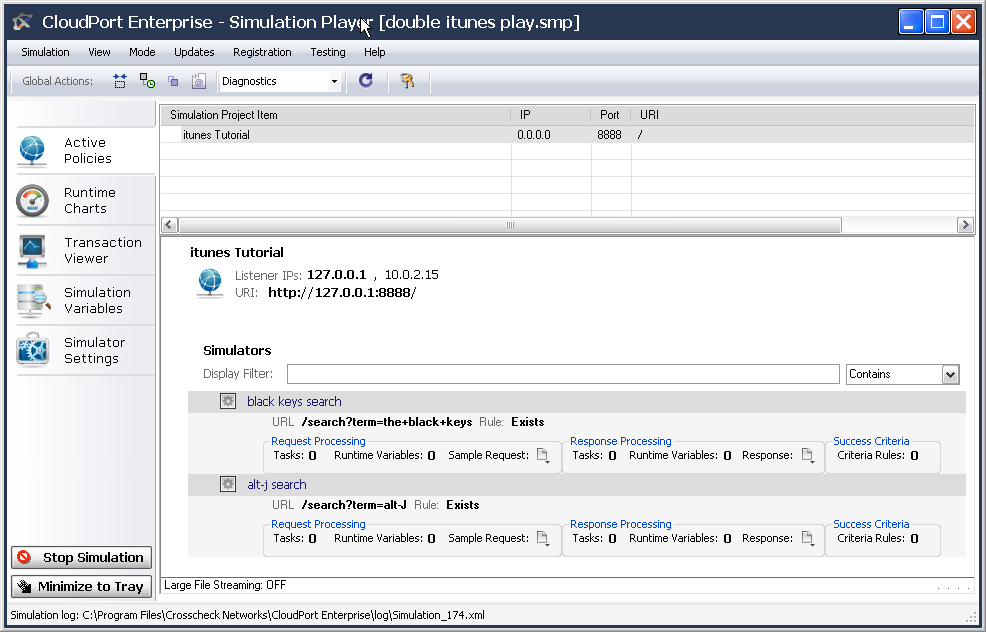
10. Now lets run the simulation in the realtime player. Select Start Local Simulation by clicking on the green arrow icon. The Free Simulation Player launches and you can see the iTunes Tutorial Simulated service. Below are the 2 services we captured. Copy the URI.

10. player

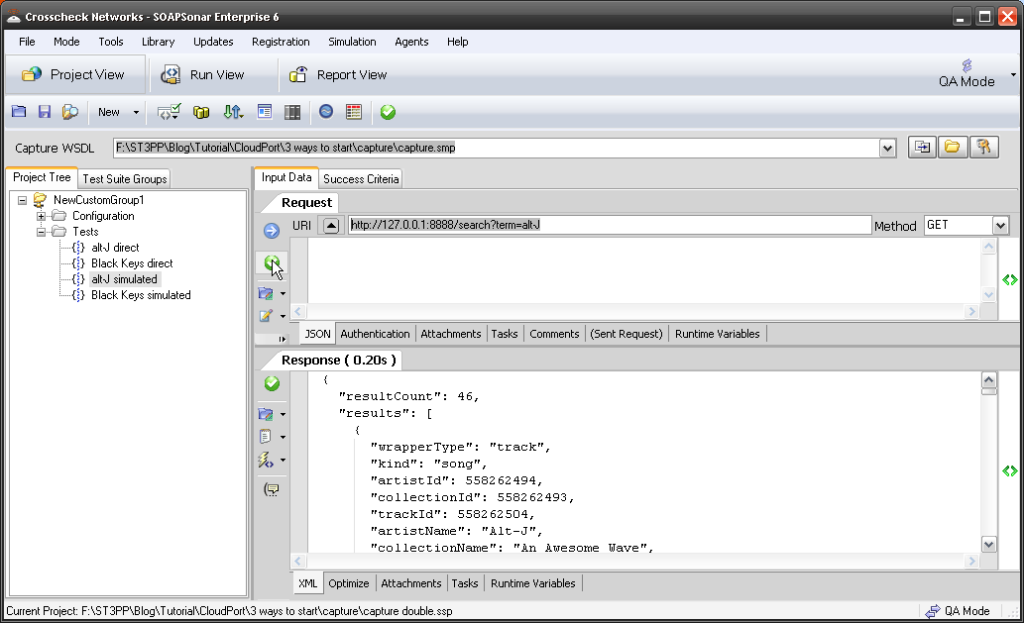
11. Now lets “test” these new simulated services. Clone or add 2 new services and use http://127.0.0.1:8888 and then the query for

  • http://127.0.0.1:8888/search?term=alt-J and GET
  • http://127.0.0.1:8888/search?term=the+black+keys and GET

Commit and send each one.

11 Simulated

Did you get a response? Can you tell it is different? Perhaps I need to do another tutorial showing a regression test of a real service vs a virtialized?

Comments/ questions?

5. SOAPSonar – Defining Success Criteria


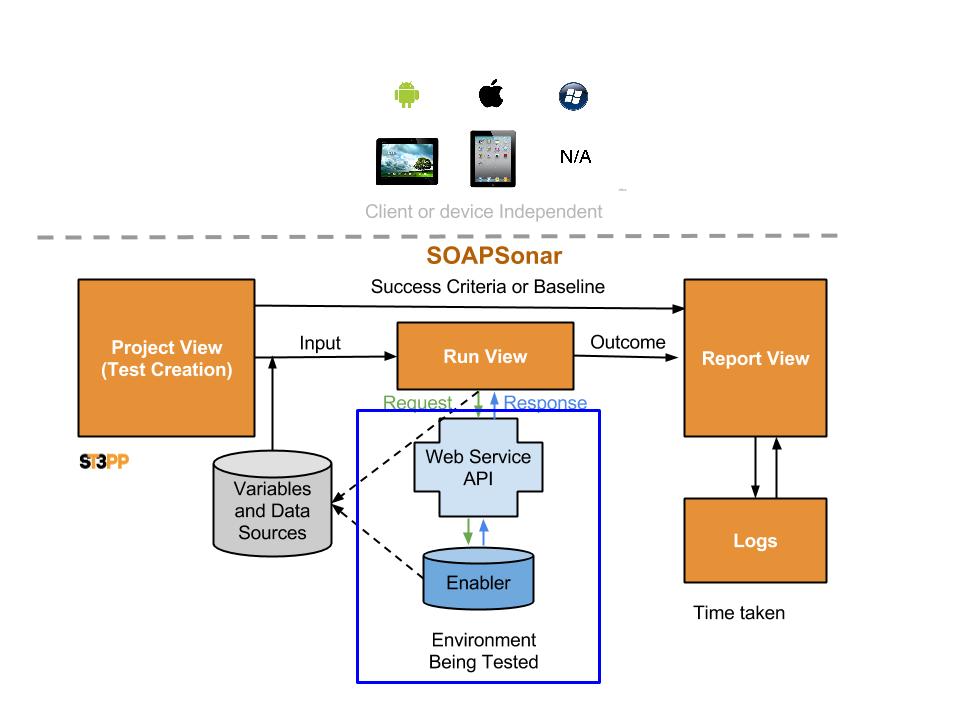
Just because a response code is response code is 200 range or not in the 400 range, does not meant that the test met with with the business requirements a tester is required to test for. For a list of Status Codes look here. This is represented by the Success criteria or Baseline arrow vs Outcome.

SOAPSonar Test Cycle

Perhaps your test case requires a specific code, value, response time or some other form of validation. Responding with a fax number instead of phone number, or the wrong persons number, is still a defect. For this reason, SOAPSonar offers a variety configuration options, to define what is indeed a successful test case and what is not. Lets start again with our SOAP example we used in Tutorial 4, and use the same .csv data sources for calculate and maps

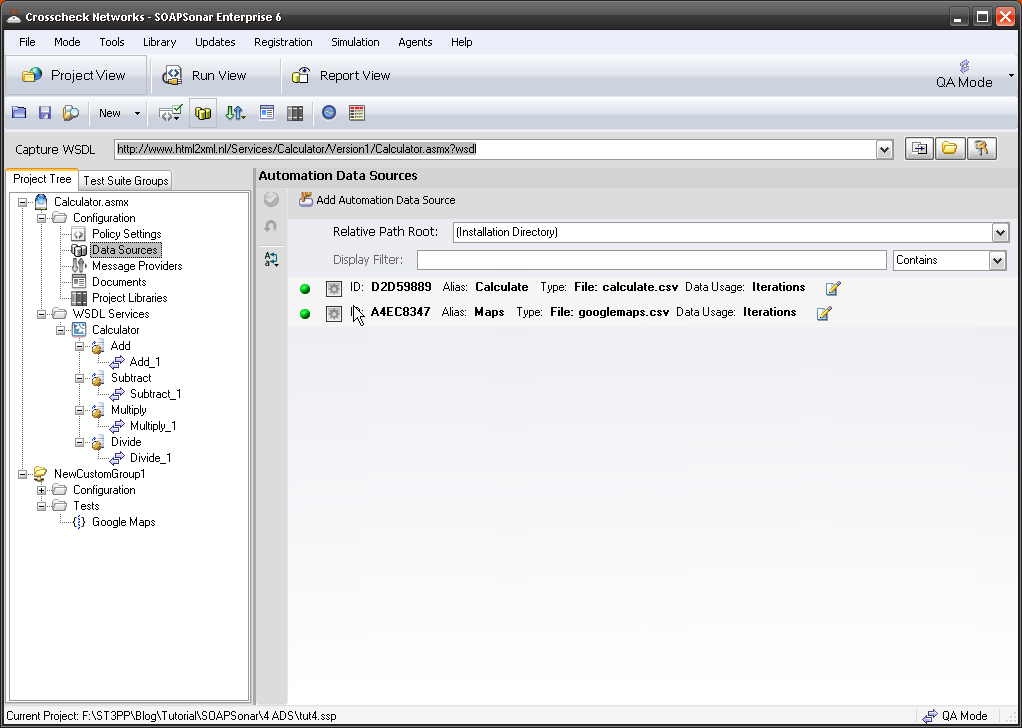
1. Launch SOAPSonar and Open the test case from Tutorial 4. If you did not do that tutorial, now is a good time. Check that you have both Automation data sources under Configuration, Data Sources by going and in checking the columns. Check also you have our SOAP calculate Service and JSON Google Maps service.

1 check ADS

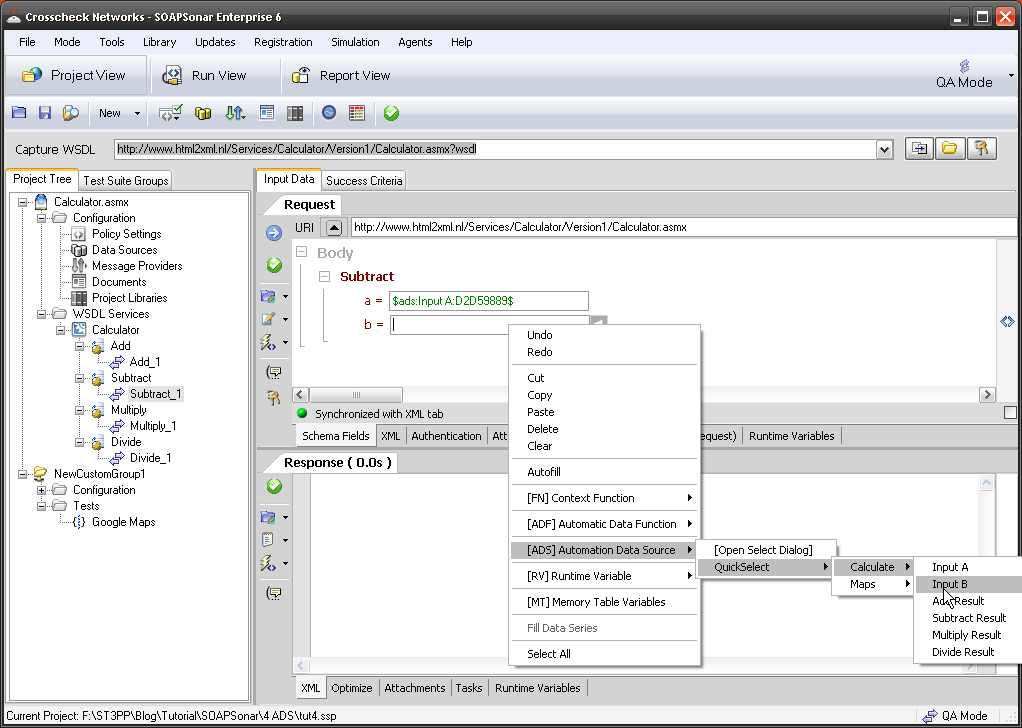
2. Lets use Subtract_1 service. Select it,. then in a= right-click and select [ADS] Automation Data Source, Quick Select, Calculate, Input a. Then in b= select [ADS],Input bCommit.

2. Subtract

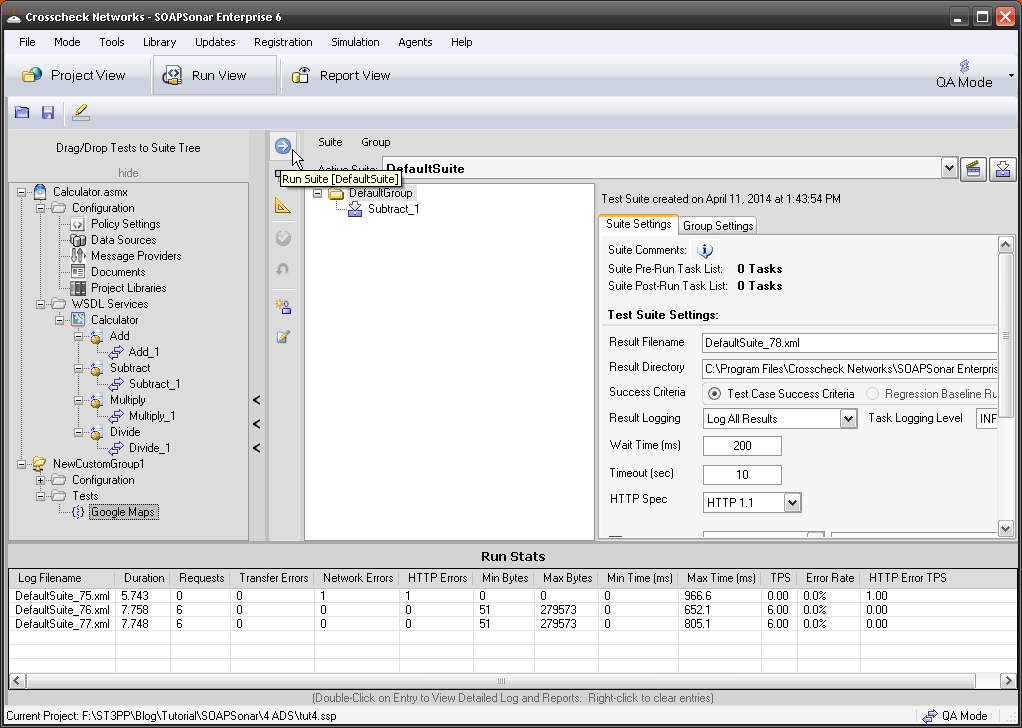
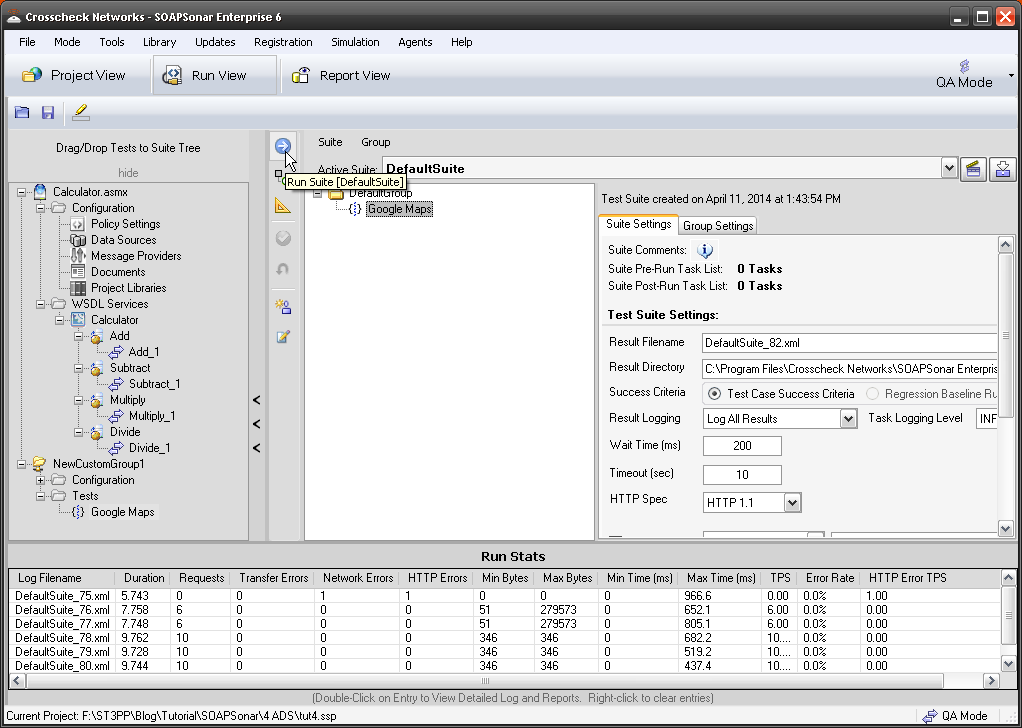
3. Lets run this in run view. Select Run View, delete any existing test cases and drag Subtract_1 under the Default Group. Commit and Run Suite. How many test cases did you run and how many passed? I had all 10 pass.

3 Run suite

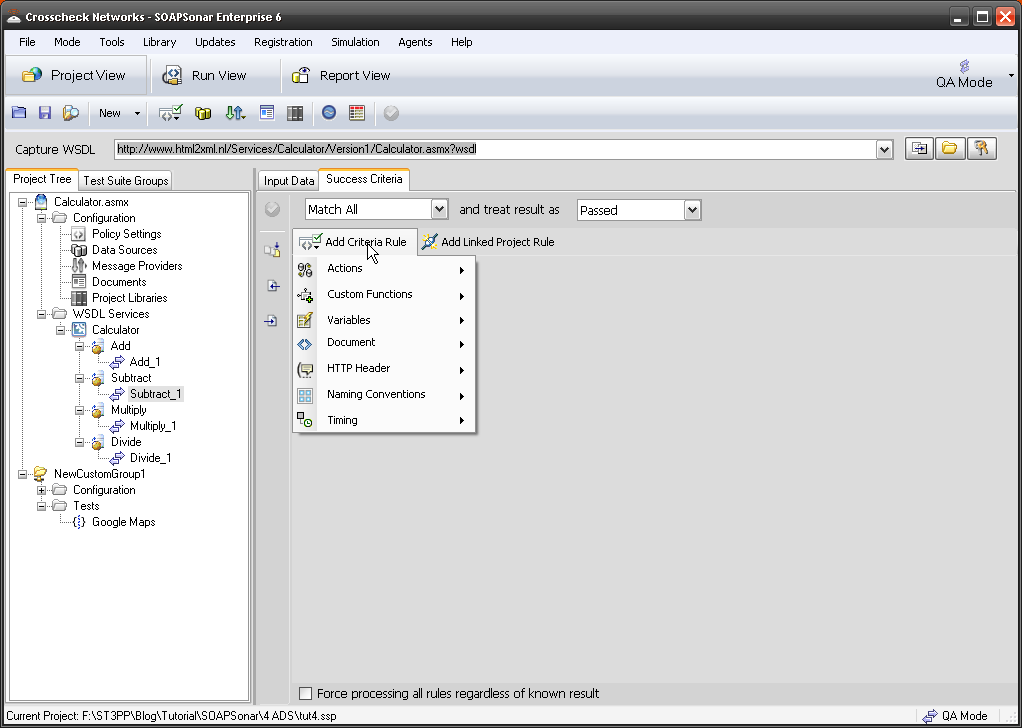
4. Now lets go back to Project View and define some additional success criteria. Select Subtract_1 and next to the Input Data tab, is a Success Criteria Tab. Select Success Criteria Tab and Add Criteria Rule.

4. Add success

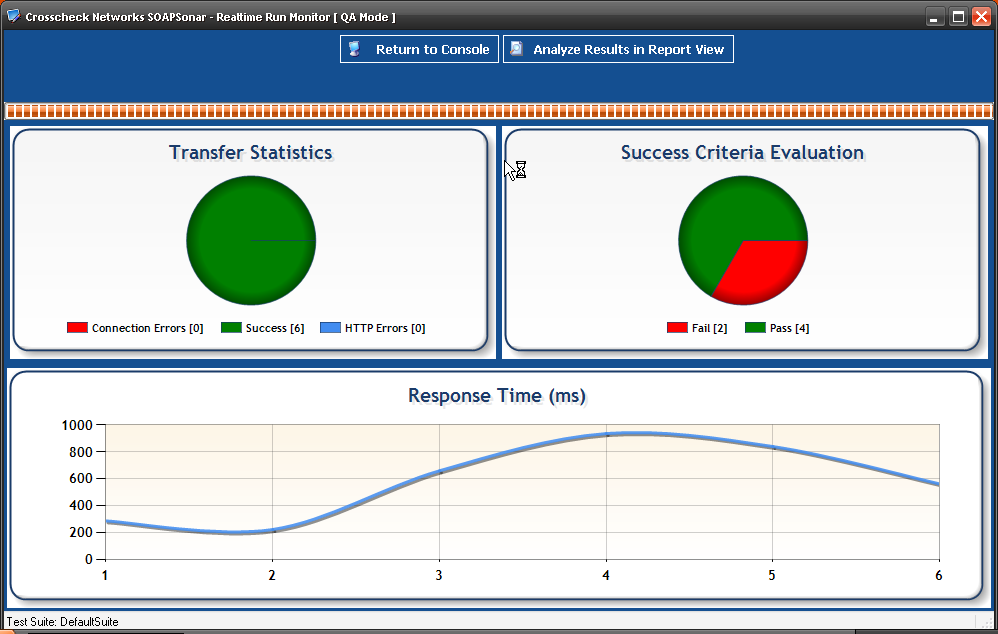
5. Lets first add a rule for Response Time. Performance is after all a functional requirement and so should be part of functional testing. Lets just say 1 second as max value.
5 Timing

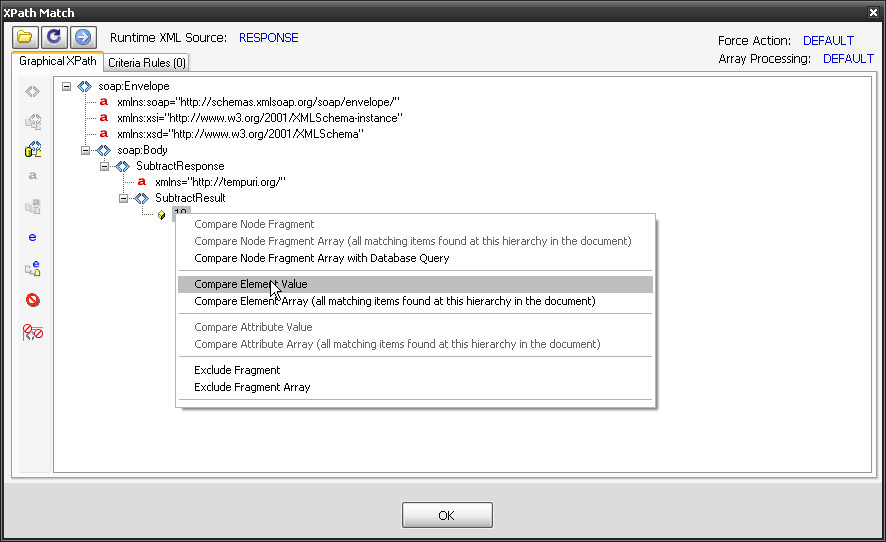
6. Now lets compare the result in column 4 of our .csv. Add Criteria Rule, Document, XPath Match. Then select your new rule and refresh if you need to. Look for SubtractResult parameter and right-click on it. Select Compare Element Value. Notice the Criteria Rules tab changes.

6. XPath

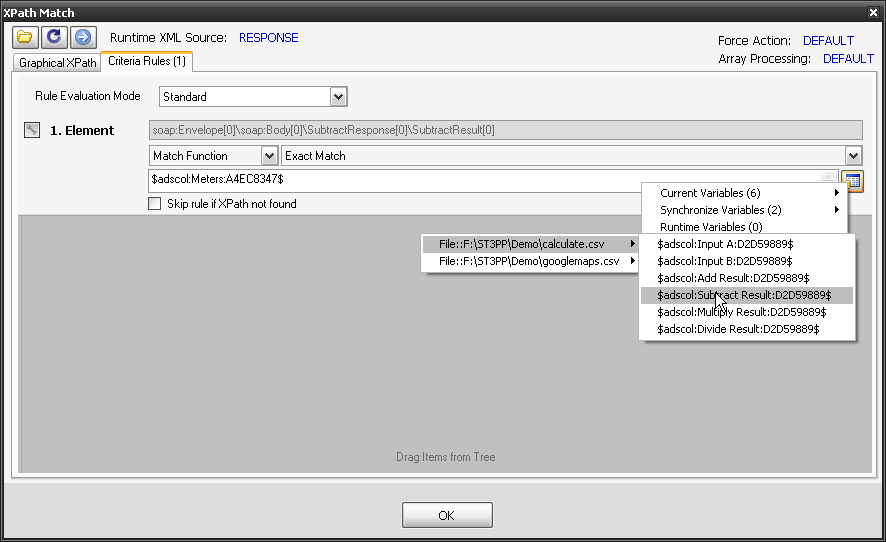
7. Select The Criteria Rule tab, then set match function to Exact Match. Then Choose Dynamic Criteria, Independent Column Variables, Calculate.csvSubtract Result Column from our [ADS]. Ok Commit.

7 Dynamic

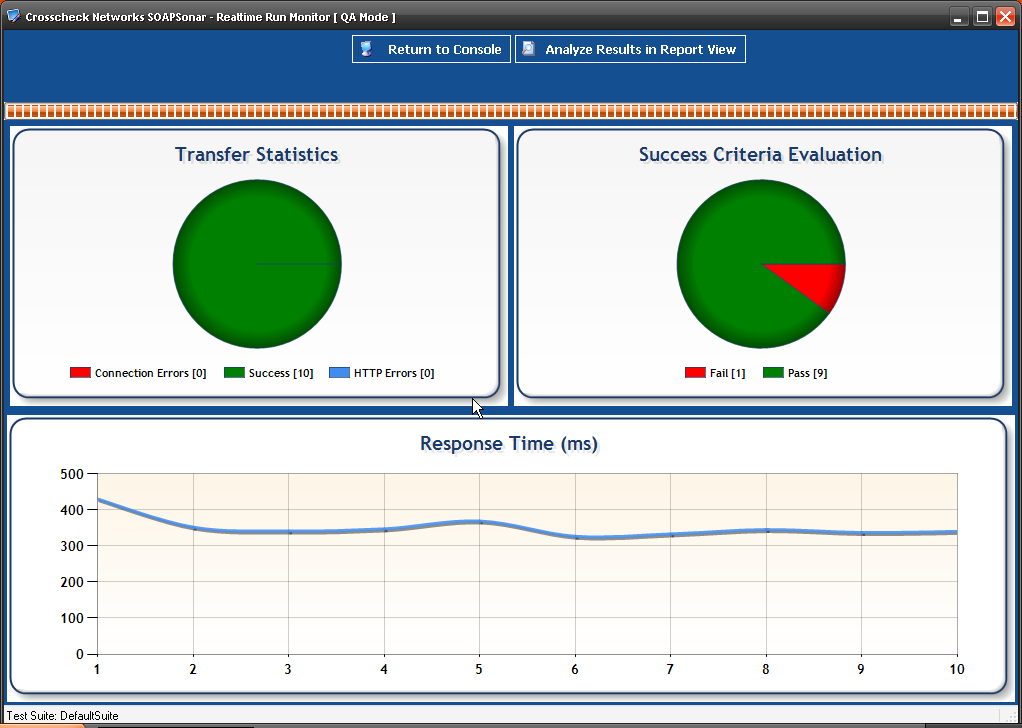
8. Switch to Run View and lets run this test again. Commit, Run Suite. This time 9 passed and 1 failed. If you check that .csv file, line 3 subtract value answer column is wrong. The result being 10, yet the expected value being 5. Without defining Success criteria, this would have being missed. Performance wise I had no failures and responses were good.

8 Run

9. Now lets see if we can do this with JSON. Select Google Maps test, in Run View, clear the DefaultGroup, drag Google Maps over and Commit and Run Suite to make sure it is working. All 6 of mine passed.

9 Maps

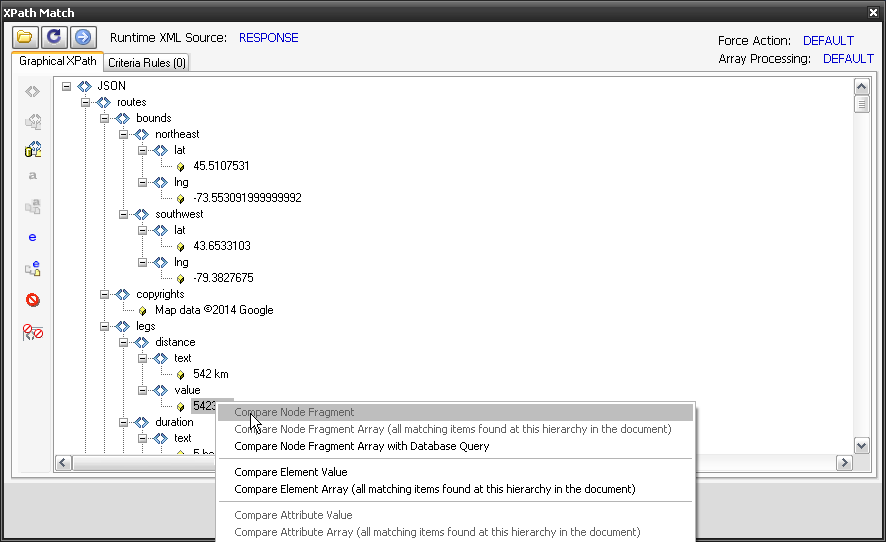
10. Back in Project View. Select The Success Criteria Tab, and Add Criteria Rule, Timing, for a maximum response of 1 second.  Then Add Criteria Rule, Document, XPath Match. Select it and look for the distance, value. Right-click on it and Compare Element Value.

10 Google

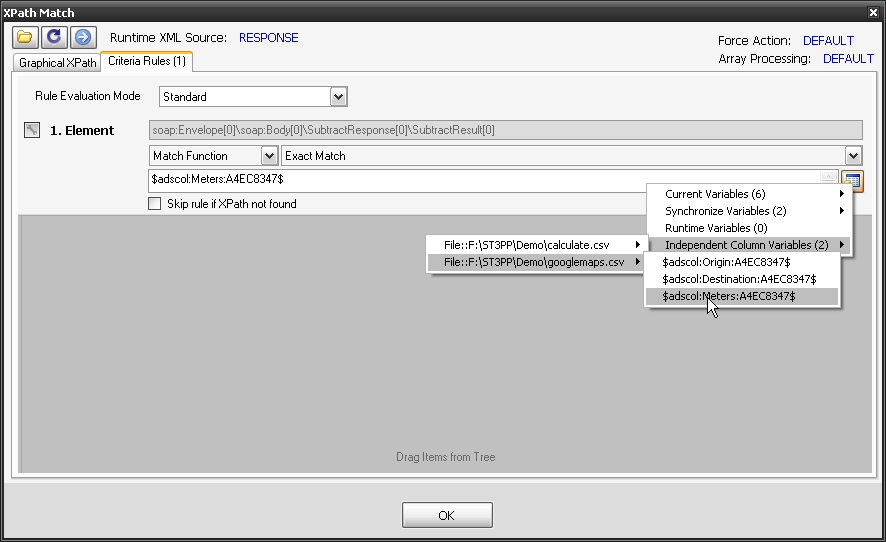
11. Select the Criteria Rules, set Match Function to Exact Match and select icon Choose Dynamic Criteria, Independent Column Variables, your googlemaps.csv, Meters column. Ok, Commit.

11 Exact

12. Run Default Suite. This time 2 of the 6 test cases failed for me, although the time was near, in both cases, it was because my csv had a different value. We will look into report view in our next tutorial.

12 Report

Conclusion

Being able to mix performance, and various header and message requirements into a multiple rule set to define success criteria, allows for automation to reflect business requirements. This helps ensure that you are not just testing Status codes, or incorrect functionality, but the full response. Taking the time to define each test case with the right success criteria initially ensures that your baseline, performance and other systems tests are more accurate.

The arrow from the enablers to the data sources in the diagram at the top of the page, indicates the ability to use direct SQL or other calls to enablers to compare the values with those found in the response. Allowing success criteria to include validating the service is selecting the right value from the enabler.

Comments?

Continuous Testing in Agile

Along with performance testing, there were 2 other themes that continually came up in conversations during STAR Canada.

  1. How should QA integrate in a Agile environment
  2. The need for “Continuous Testing”.

While there are thousands of articles about Continuous Testing, and hundreds of thousands on Agile, there seems little on both. Perhaps due to some apparent conflicts.

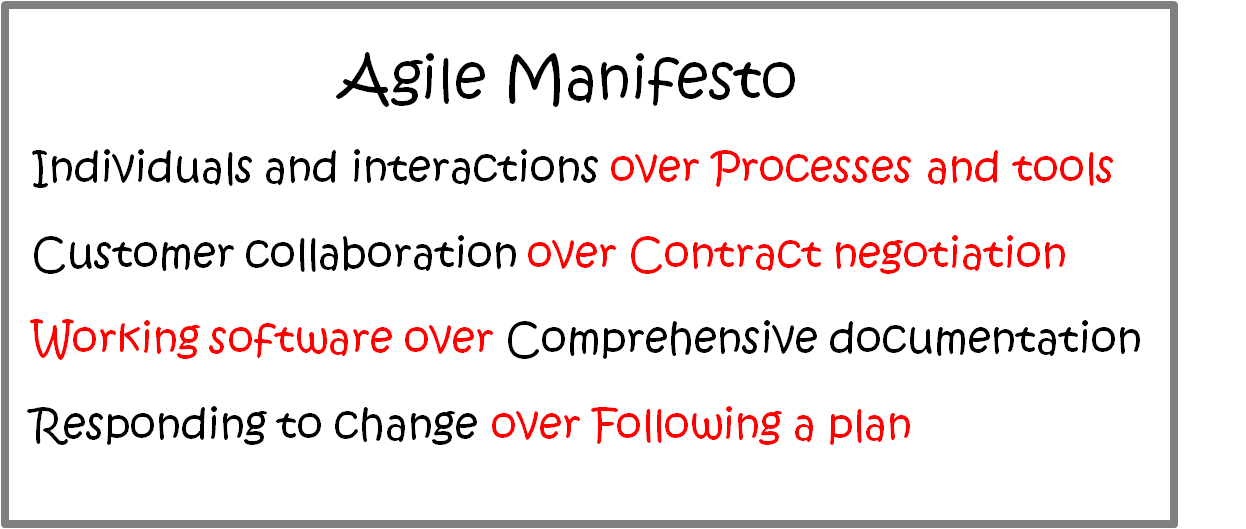
Lets look at a theoretical QA in an agile environment. Say your organization Sprints are 2 weeks in length, each scrum having 8-10 members for manageability. Due to project time constraints,  there are 5 scrums working concurrently, each focussed on a different component of development of your application. What test cycles are done as part of the sprint and what cycles are done outside or as cross functional teams?

Agile Testing Levels

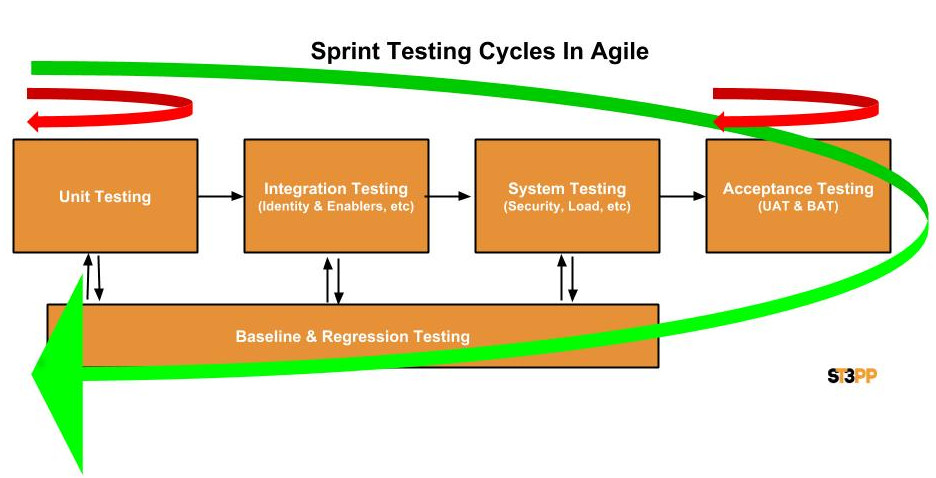
It was pointed out that although common, doing only unit tests and integration testing on your Sprints code, then jumping to acceptance testing of that sprint, is not Agile. Agile should in fact have all test stages built into the Sprint. Many companies ignore various test cycles like load, integration and security testing of the end to end system as there simply is not time in each Sprint.

An alternate approach is to created independent teams outside of the Agile development. Their role is to test integration, load, security and systems in integrated environments. Defects identified are then fed back into the scrum meetings and allocated to particular Sprint. This also is not really Agile, falling into some kind of hybrid. The challenge here is that issues are often identified after sprints are finished and so not really continuous testing either.

A second approach, was to create cross functional roles were the scrum masters and one or more members of each sprint were allocated to doing systems level testing and possibly fixes. These cross functional teams, would near the end of each sprint, break out of their old scrum into the new role. The challenge with this approach is that on shorter sprints, and large systems, they can land up spending more time in the cross functional role than in their own scrum.

Continuous Testing

Continuous Testing is somewhat the same as Baseline and Regression Testing, but need not only testing against a Baseline. Its about continually testing while developing through the entire SDLC. The benefit that issues can be identified far earlier (Shift Left approach) resulting in lower costs to address. Agile environments at first glance, seem to favour continuous testing, but does that include, regression, integration and systems testing across Sprints? If each test case takes 9 minutes to complete, 1 tester can only run 53 test cases in a day or 533 tests in a Sprint. This is simply not enough coverage to test all systems and other tests continuously. The result, is partial or low test coverage.

Enter Automation

If as part of each Sprint, a fully developed set of test cases are developed by each Sprint in the same application (eg SOAPSonar) covering their development efforts. The incremental work to role these up into test cases for integration, load etc would be minimal. Each sprint then shares a set of Integration, performance, load and regression etc tests that they simply run as part of their sprint. Being automated, these can even run after hours. The result is continuous testing of both at the Systems level and the Sprint level, without the heavy resource requirements of manual testing. issues be the system wide, or sprint level can then be addressed in Sprint.
Conclusion

The concern with this is the same as with any automation project, “Will The Development of the Automation Scripts Not Take More Time than the Resulting Benefit.” This is a tool selection question. Finding the right tool for your team to use to minimize the time taken developing and maintaining various test cases from function through load and regression, to acceptance testing.
Would you like to weigh in with your thoughts or comments on the subject?

4 SOAPSonar – Using Automation Data Sources

In Tutorial 2 we got started with REST and SOAP service, using design view and doing a unit test. In Tutorial 3 we chained the response from one service to be a request for a second service, creating a mash-up test between REST and SOAP services to run in Run View. In this tutorial we going to show how to use an external source like a .csv file for automating a range of values. This is represented in the test cycle by variables and data sources. 
Why use Automation Data Sources? Well lets say you need to test a range of users, or values. Take Canadian postal codes as an example. There are 845,990 Canadian postal codes. Yet when testing, you may not need to test all of them. However each province, has 1 or more letters that start the postal code for the region. All BC postal codes starting with V. There is 18 possible start letters, each mapped to a given area. If your percentage coverage requires validation of address by checking postal code to province and includes testing negative scenarios, you could be required to run the same test case through 20 or more unit tests. If you have read more detailed service plan costing, you can see that 20 unit tests through many test iterations can add significantly to testing costs. The challenge however is to do this, without spending too long on the test creation or maintenance. If each release requires new scripting, the value of automation greatly decreases.

I am going to first use the SOAP calculate service, but show a JSON service example afterwards.

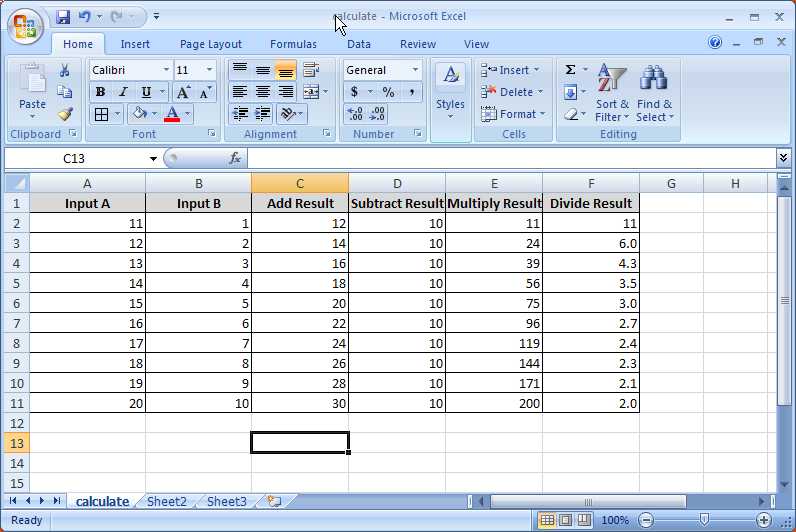
1. Lets first create our data source. There are many places on the web to find already created data sources, but in this case, I will use MS Excel to create one and save it as a CSV. I created 6 columns, input A, Input B and then the expected results for each service. I have only 10 lines, but you can make these much longer. Here is the calculate csv file for you to download.

1 Create csv

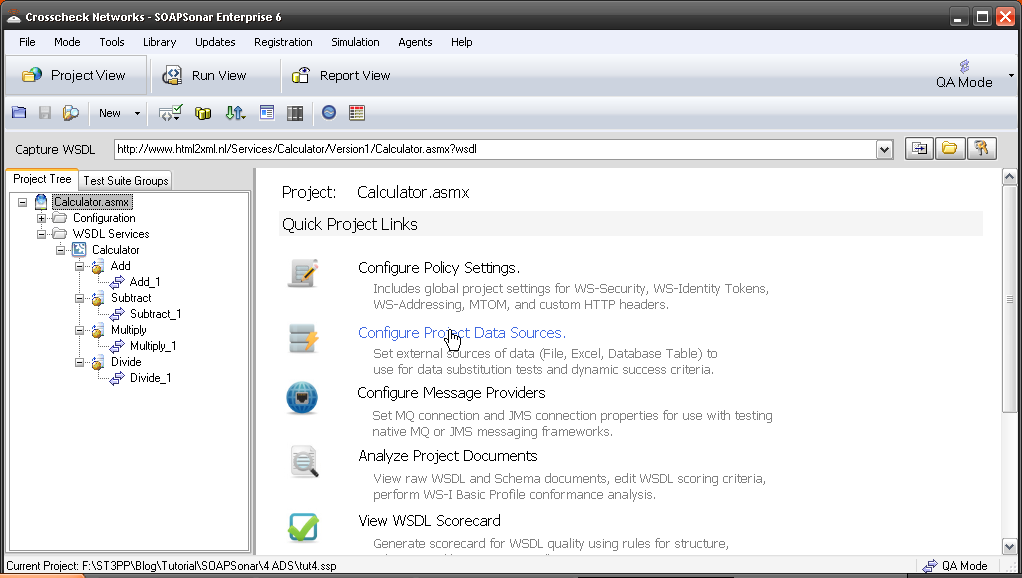
2. Run SOAPSonar (with Admin Rights) and in the capture WSDL bar paste http://www.html2xml.nl/Services/Calculator/Version1/Calculator.asmx?wsdl. and press enter. Select Configure Project Data Sources. Here we define any Automation Data Sources we may use.

2. Config data sources

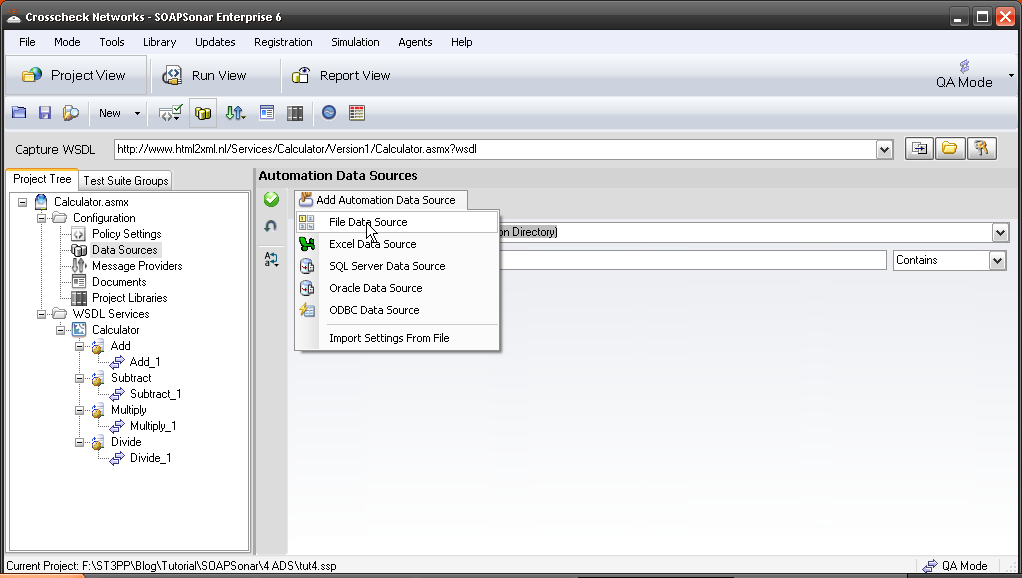
3. Now select Add Automation Data Source. You can see that ODBC, SQL, Oracle, Excel or File bases data sources are supported. Select File Data Source for .csv.

3 Add data souce

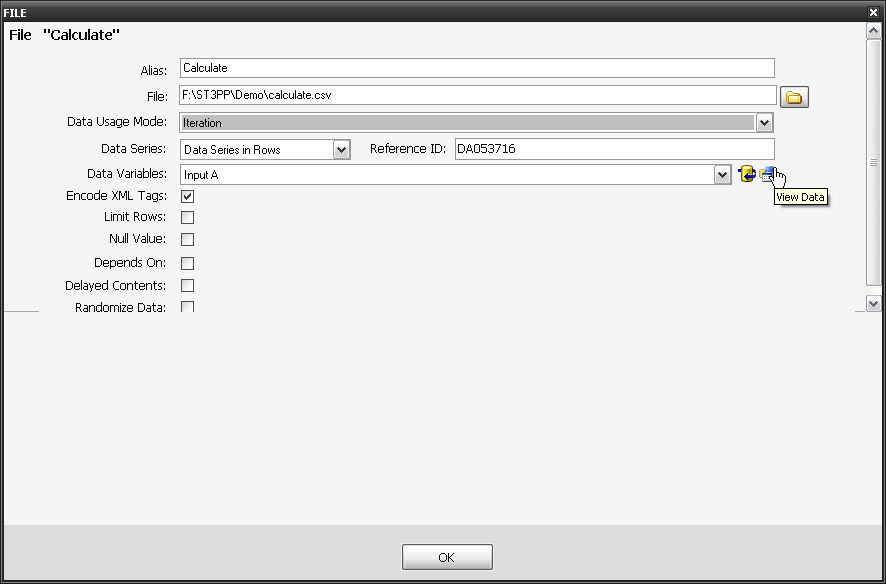
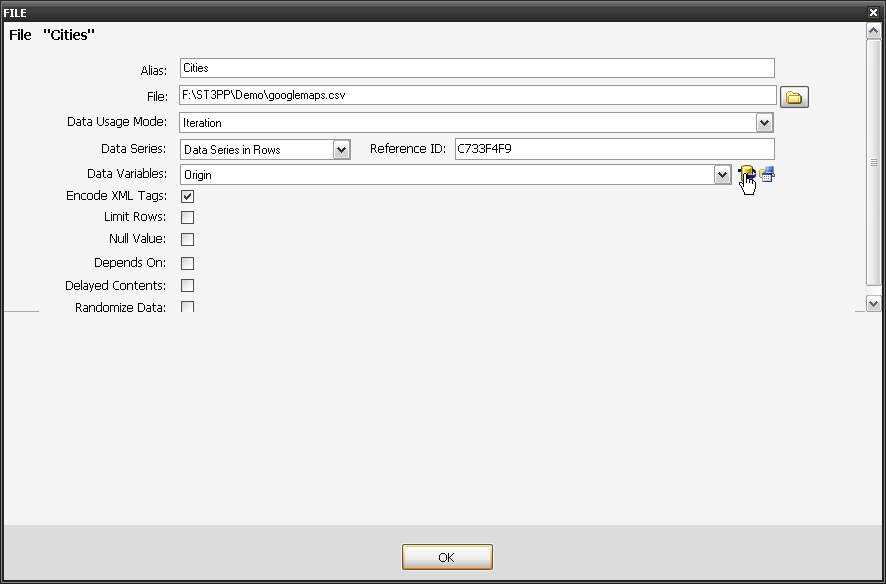
4. Give your Data source a Alias, Locate the .csv file you downloaded and ensure its still Iteration, and Data Series in rows. On the right of Data Variables field (were my curser is), select the option to refresh data and view data. Do you now see your .csv file? Select OK.

4. Refresh

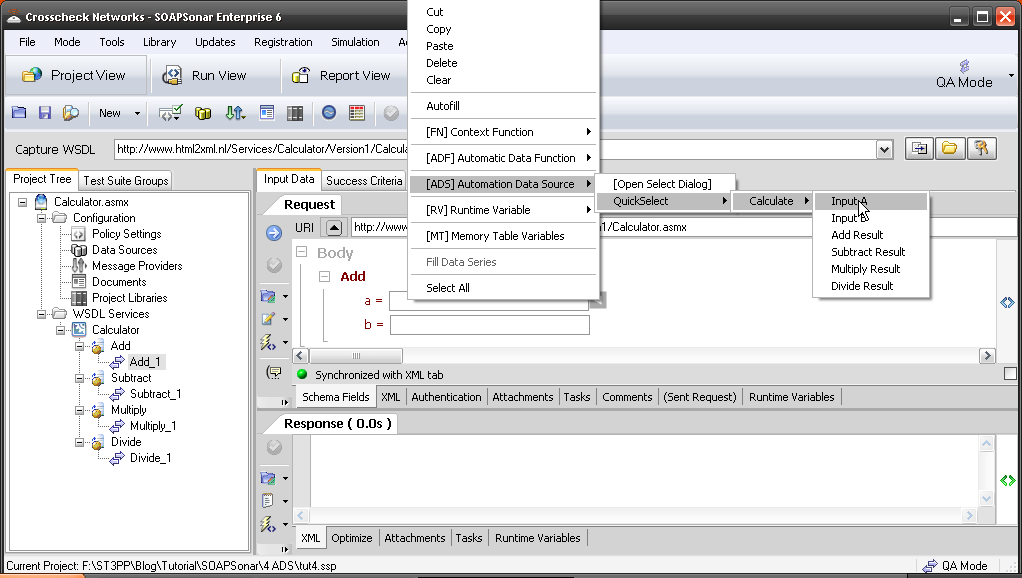
5. Now lets use that Data Source on the Add_1 function. Make sure you are in Project View, and QA mode and Select Add_1. Right-click in a= field and select [ADS] Automation Data Source, Quick Select, Your Alias (mine is calculate), Input A column. do the same in b= field selecting Input B. Commit the test settings.

5. Project view

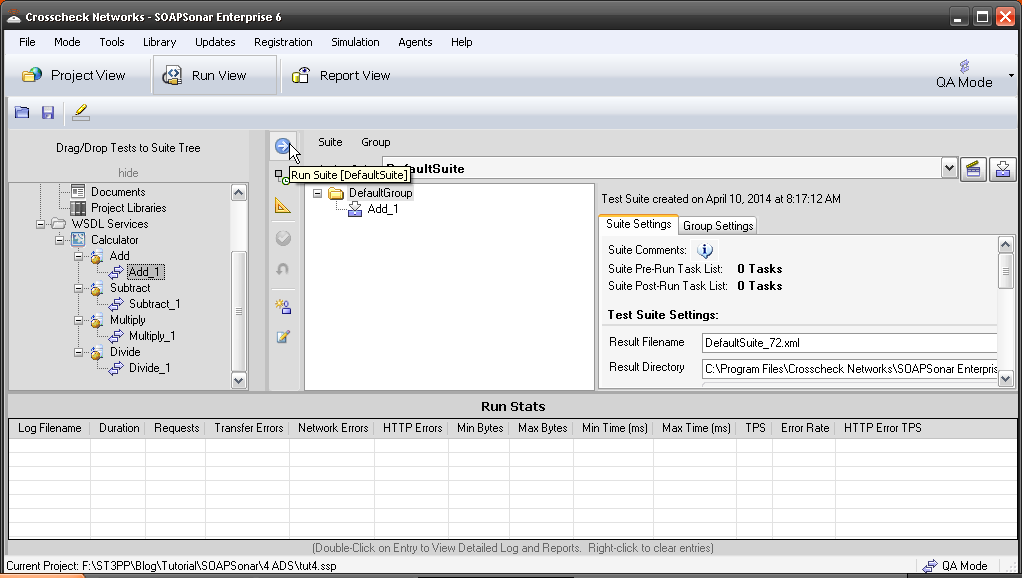
6. Now select Run View, and Drag Add_1, under the DefaultGroup. Commit. How many test case did you expect run? Run Suite to execute the test suite.

6 run view

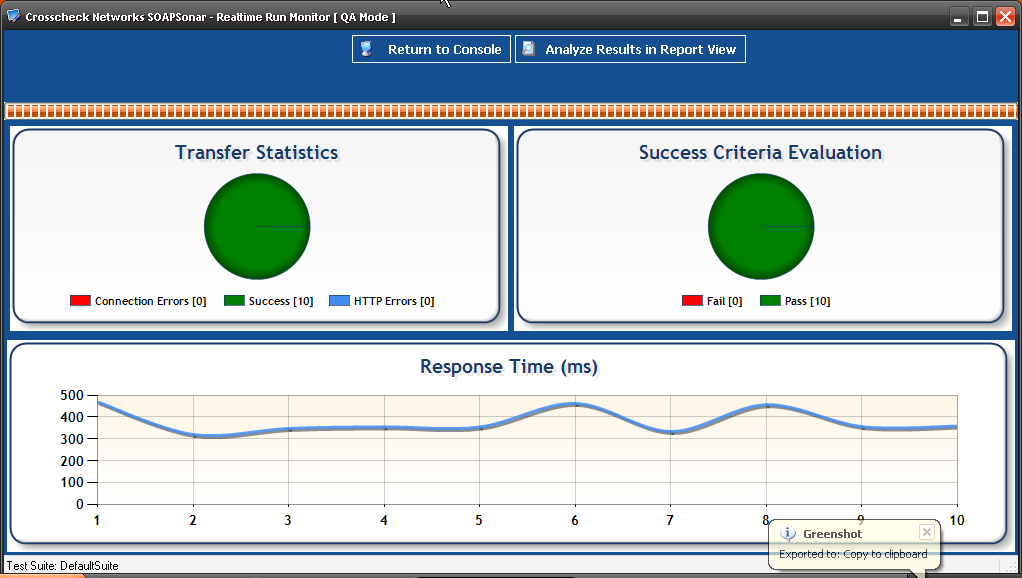
7. You can see I ran through the entire csv file rows, or 10 test cases. You can Analyse These Results in Report View, but we will leave that and Success Criteria for another tutorial.

7. Results

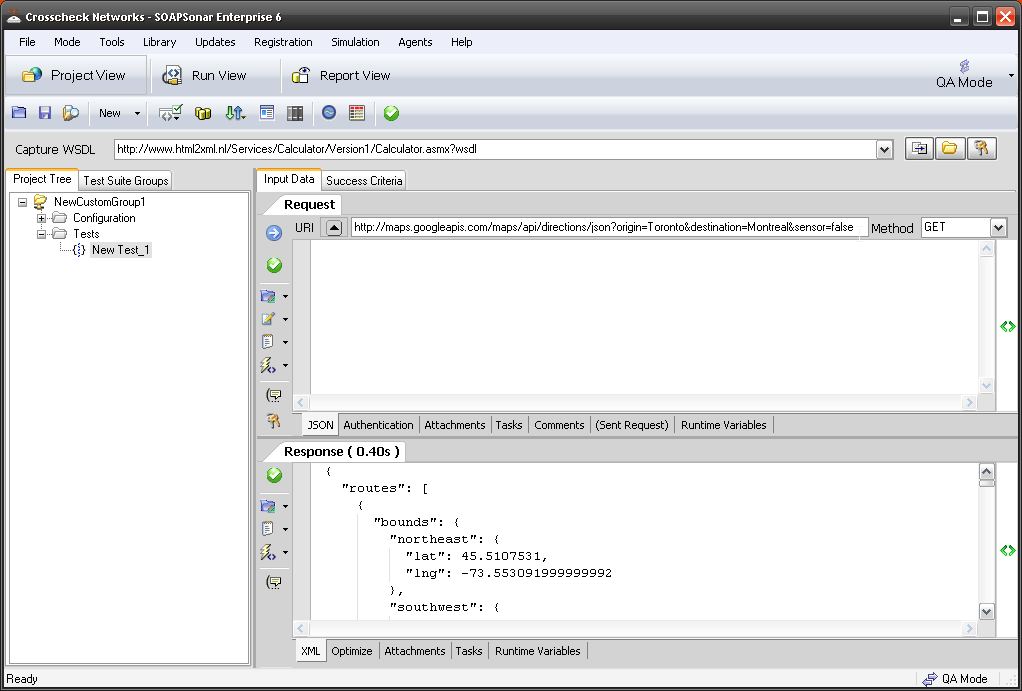
8.Lets try this with JSON. File, New Test Group. File, New JSON Test Case and paste http://maps.googleapis.com/maps/api/directions/json?origin=Toronto&destination=Montreal&sensor=false into the URI and make sure method is GET.

8 Google URI

9. Lets add our data source  Add this googlemaps .csv file to you Data Sources as a file data source. Remember to refresh and check it before saying OK.

8. maps

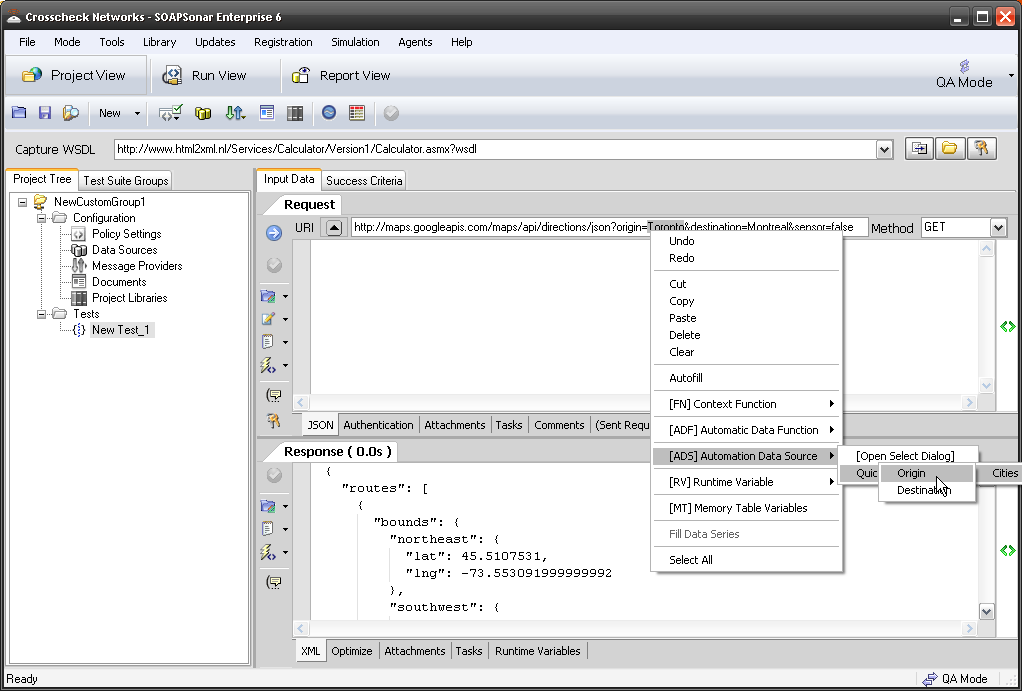
10. Now in the URI highlight (delete) toronto and right-click (insert) and select [ADS] Automation Data Source, Quick Select, Cities, Origin. Do the same for montreal. Commit.

10 insert

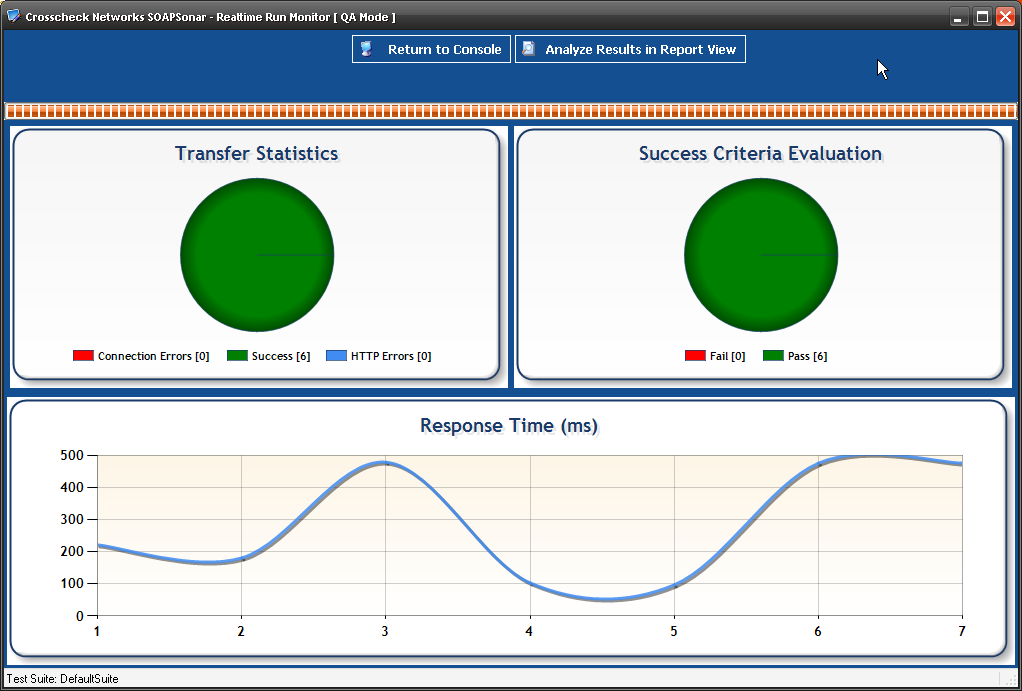
11. Drag your Test case over to Run View and commit and run suite. How many test cases did you run now?

11. run

Conclusion

You have just used a Automation Data Source in both a JSON and  SOAP Service. Running multiple values through a unit test, vs manually entering these same values. What is important to consider here is putting the right values into the CSV file to test as many variables as needed. Using a Tool like SOAPSonar with a Automation Data Source, increases your coverage, and reduces the time taken to run test cases. Whats more, since it is not script bases, there should be little issue if any, running it again on the next code release., further reducing testing time.

Comments?

CloudPort for REST Response Generation

In SOAPSonar tutorial 3 we tested a simple chained service for a mashup. The first being a REST service look-up on google maps for distance between Toronto and Montreal, the second a calculation service to work out how long it would take to ride a bike at your own speed.

Now what if you are required to test the second service, when the first is not available? Does the team sit idle, resulting in project “Dead Hours”? Do you call a meeting, tell them to review test cases documentation, plan, take lunch what? The effect of Dead hours can somewhat be seen in my last post on Service Plan Costing

Why may a service not available? There are many of reasons.

  1. Lab is not available
  2. Network or connectivity is down
  3. You working from home/cottage/travelling
  4. Its a 3rd party’s service, and they have other testing
  5. The service is there, but you need to load test and the service does not allow for that
  6. The service data cannot be corrupted, etc.

Whatever the reason, what you need is something to respond the same way to a the same request, so that other test cases and automation does not fail. Now you could have development hammer out some code, get infrastructure and then installed it on a server, but that will take time and resources. Alternately you can use CloudPort.

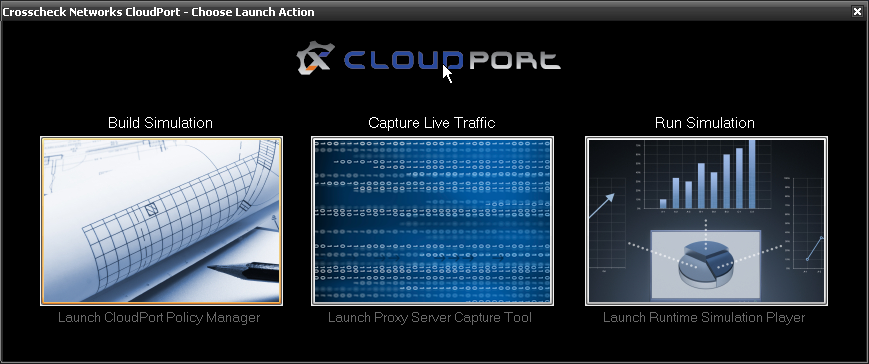
1. Run CloudPort. This example is simple so we will just create a service and not capture one. Select Build Simulation. The proxy capture tool makes capturing more complex services and WSDL much easier.

1 build

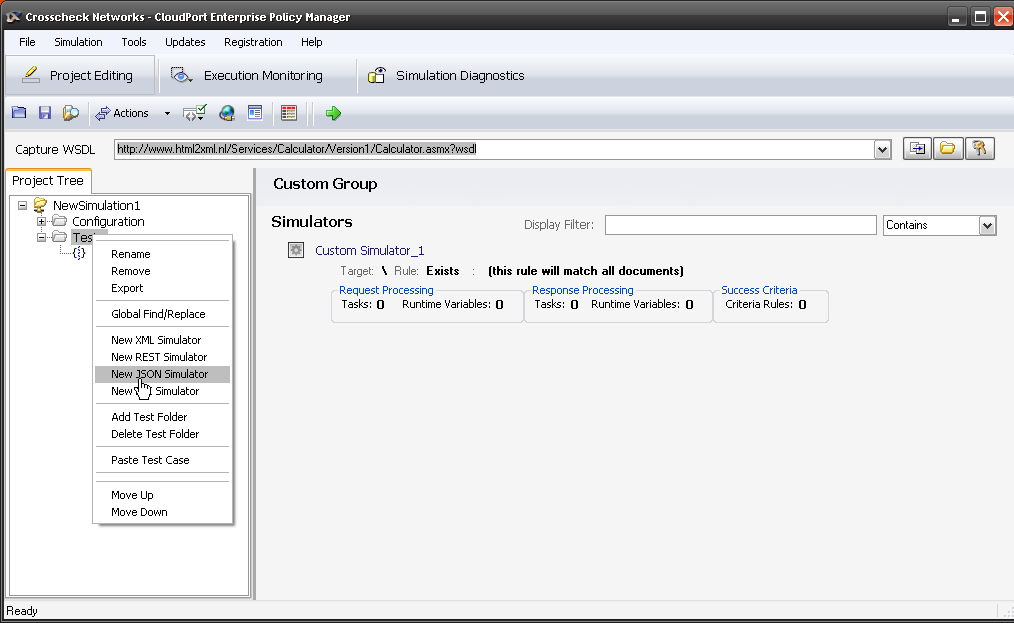
2. File, New, Custom Simulation and then File, New, JSON Simulation Rule. Rename it to Montreal

2. New Service

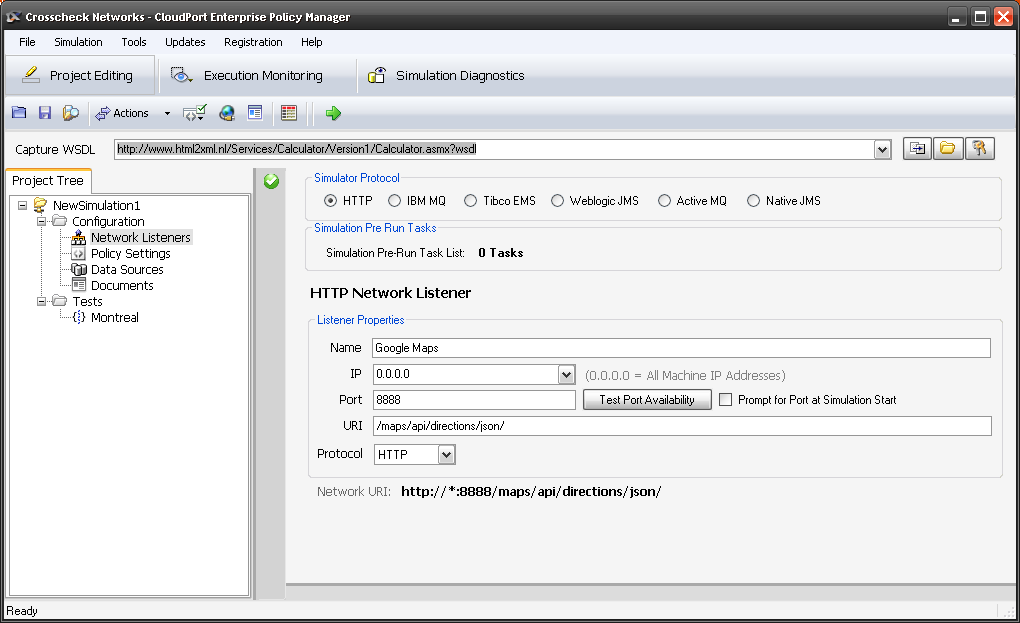
3. Now the first thing we need to do is set up a network listener policy, the port and URI that CloudPort will run on and listen for requests. In Project Tree, select Network Listeners and enter a Name of Google Maps, leave the IP 0.0.0.0 and lets say port 8888. For the URI lets use a similar one, so only the port and machine are different. Enter /maps/api/directions/json/. Select the green check box to commit.

3.  network listener

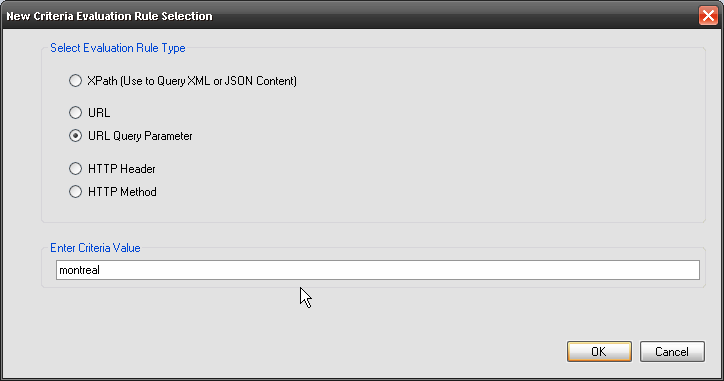
4. Now we need to define request listener policy for a particular request string, URI or parameter. Select Add Manual Rule, URL Query Parameter and enter montreal. We now listening for a JSON query with montreal in it. When CloudPort gets that request, it will send the response we define in the step 6.

4 - New listener

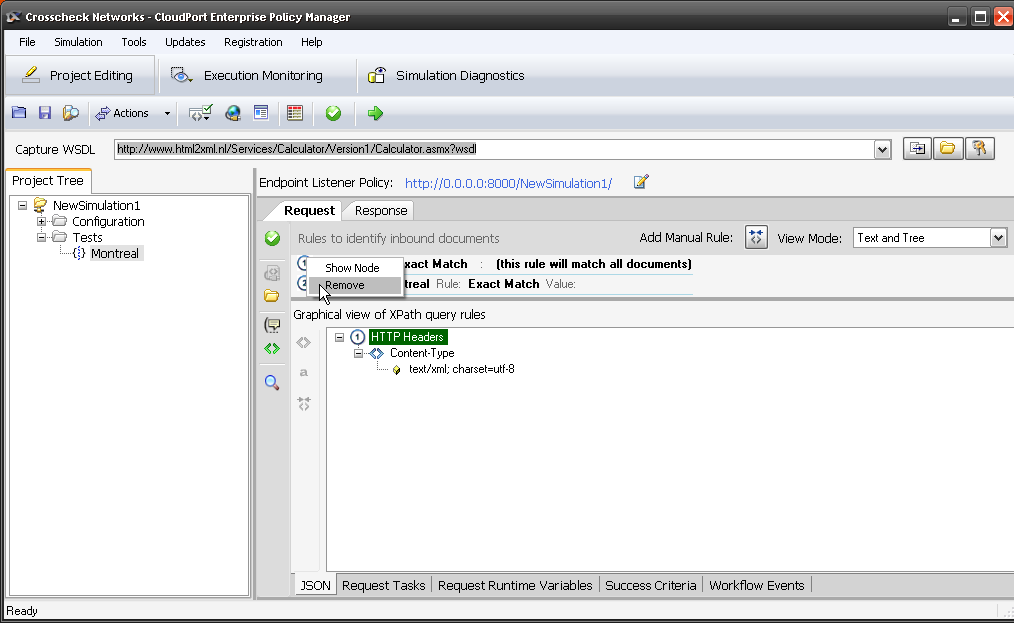
5. Lets remove the default rule that matches all documents. Select the number 1 next to the default rule and select remove.

5 - delete default

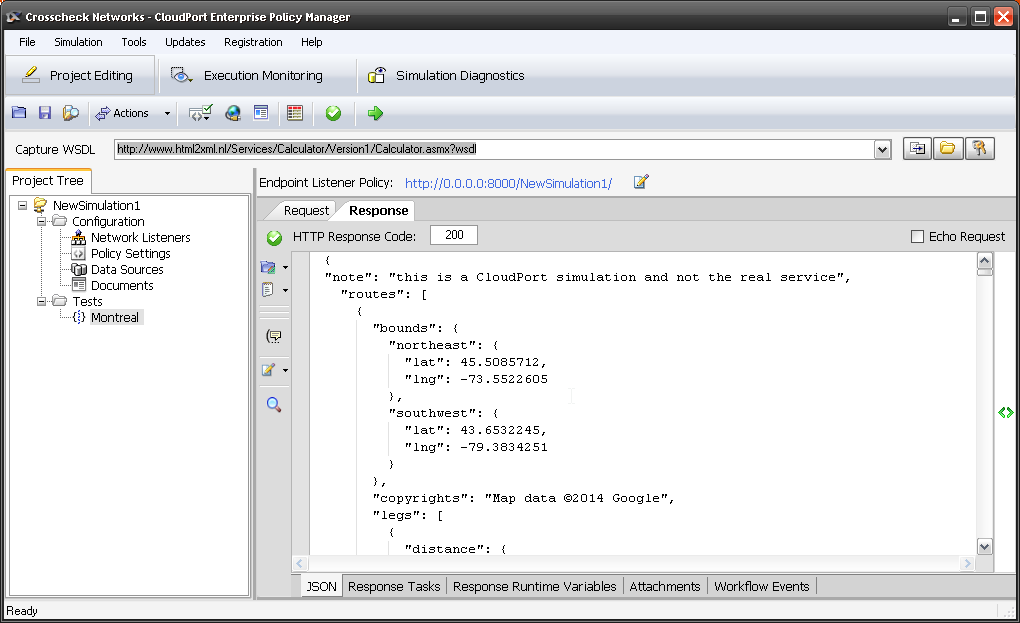
6. Next we flip over the the Response tab. Now you could get creative and put in any response you like, but we do need that field with the distance. So to make this simple, I am just going to copy the response from the real sever into CloudPort. So long as we have the part we need we should be fine.

{
“distance”: {
“text”: “621 km”,
“value”: 621476
}

For fun I added a line at the top “note”: “this is a CloudPort simulation and not the real service”, and left the same as before.

6 response

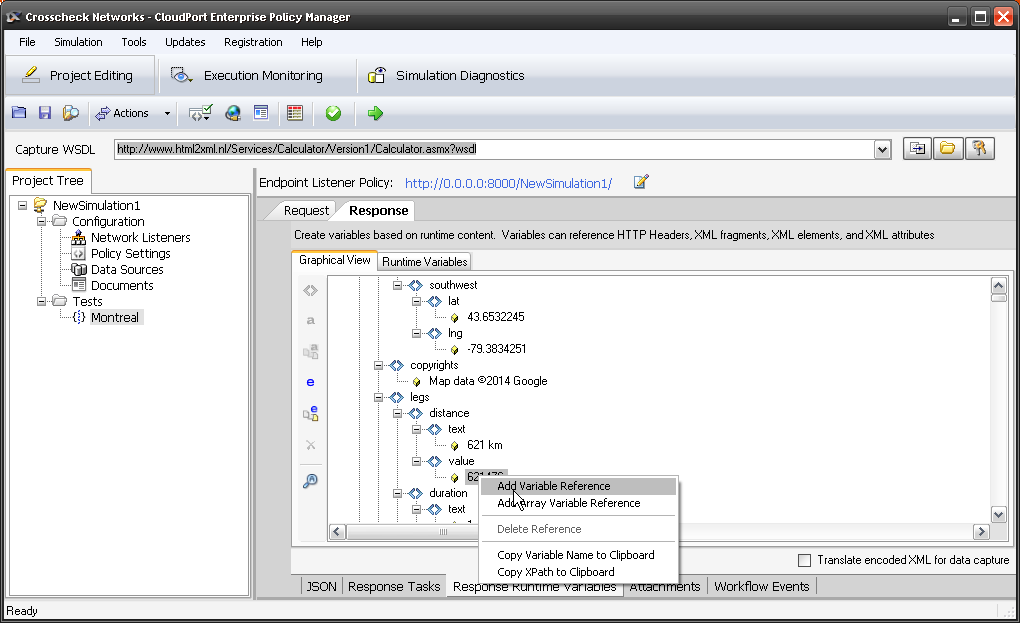
7. Not that we needed it, but just in case, I will define the distance as a variable. Select Response Runtime Variables and scroll down to the value (distance in meters) and right-click, add variable reference.

7 runtime

8. We could now clone this for as many different queries as we need, changing just the query listener and the response.

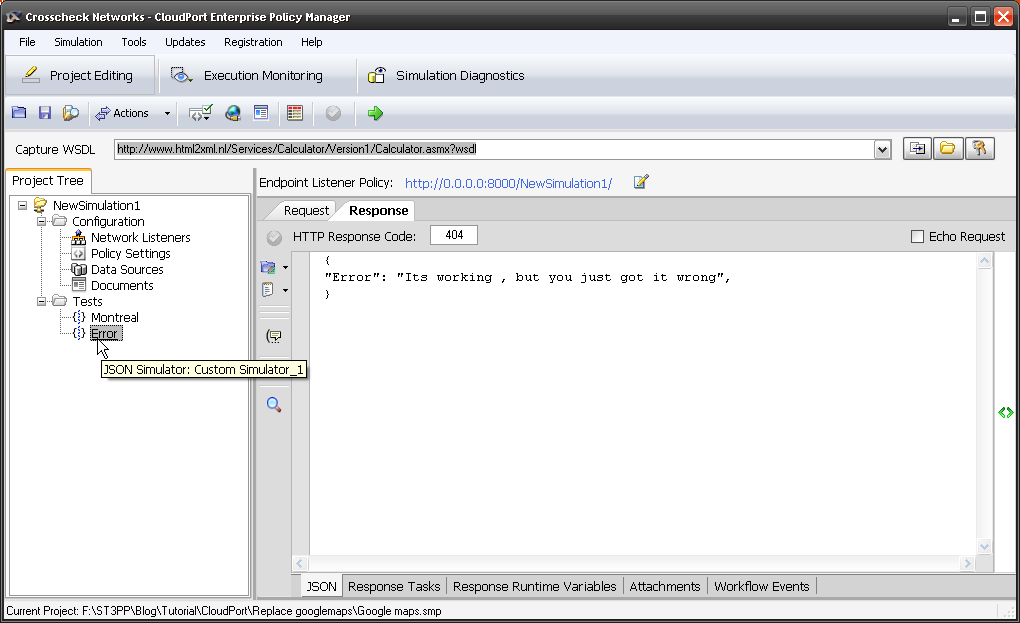
9. Lastly I want to add a error service. Right-click on tests, New JSON Simulator and rename it Error. Since its after the first rule, we will leave the default catch everything, and in the response, I had some fun with the error code and message.

9. error

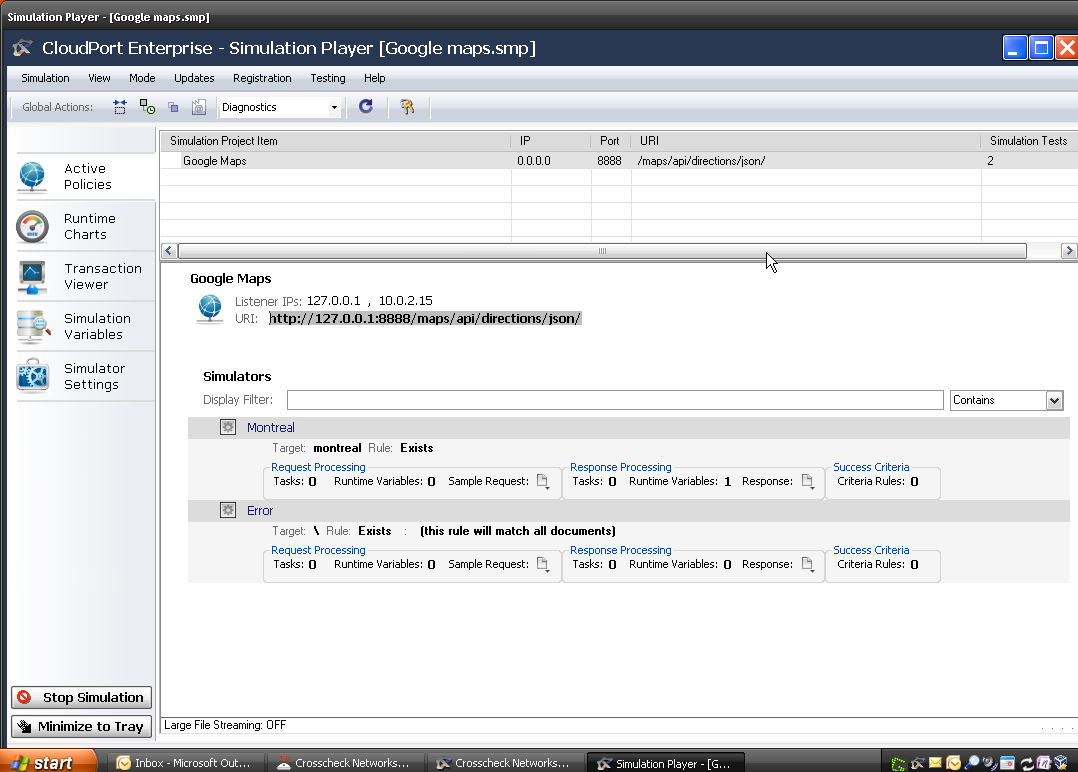
10. Time to test it out. Save your project then start local simulator with project. See the URI for the service is displayed on port localhost:8888?

10 run view

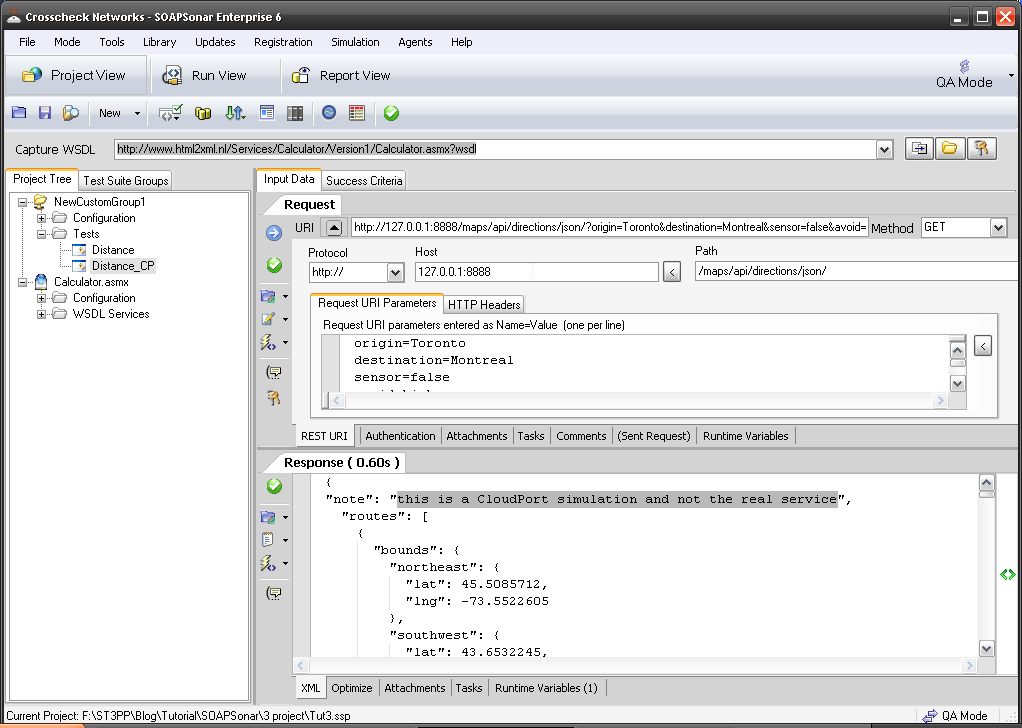
11. In SOAPSonar, lets make a slight change to test case. Clone it and past http://127.0.0.1:8888/maps/api/directions/json/ into the host and path. Leave the query the same. Commit and send. Can you my response. Note my added field? In every other way, this response should be the same. If you replace Montreal with some other city, what do you get?

11 SSonar

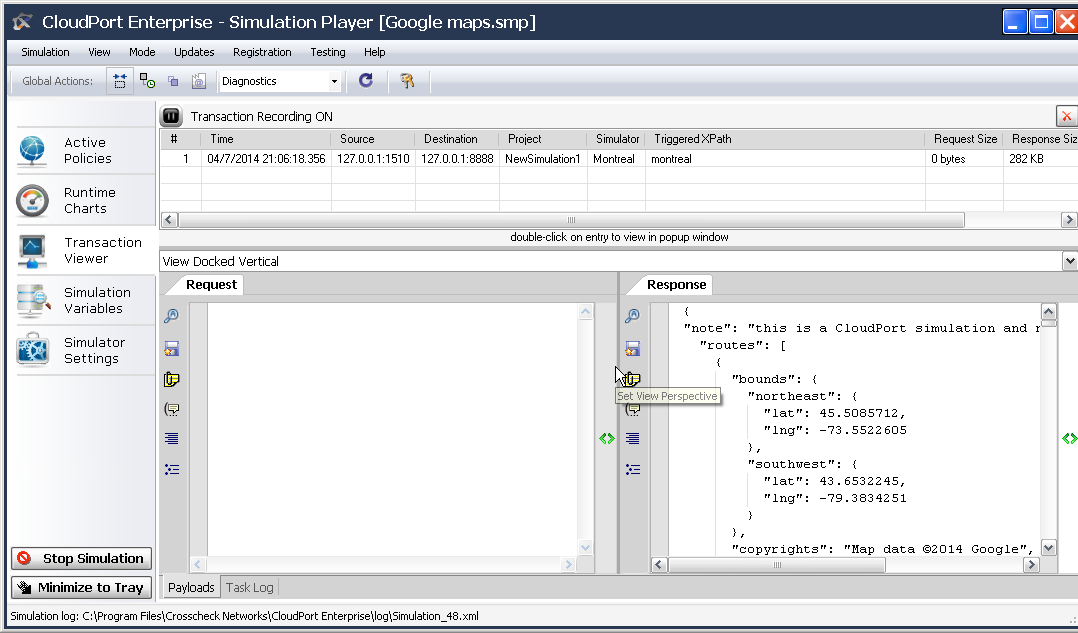
12. Back in CloudPort’s runtime player, you can see the transaction.

12 Runtime

Conclusion

In a few minutes you have ritualized a simple web service. What’s better is that the runtime player is free. That project you created, can be used by as many people in your or outside of your organization as you may wish to share it with.

Virtualizing or simulating a service is a quick way to remove many of the environmental factors that testing has to deal with on a day to day basis. From creating early mock-ups to trouble shooting performance, there are literally hundreds of use cases.

It was pointed out to me that for a single static response like this, you could use the FREE Runtime player and dont need the licensed service creation aspect. That said, the tutorial is valuable if you wish to extend this to multiple requests and responses and more complex workflow.

Comments?