Search for:

3 Ways to Get Started with CloudPort – Using WSDL

As part 3 in this series. In the first we captured a service using CloudPort’s proxy feature, and in the second we created a service copying and pasting mostly. In this tutorial we use a SOAP service that has WSDL. SOAP services currently differ from REST based service in that they include WSDL that defines the structure and parameters if the message header and bodies. In this case, I will use the simple temperature convert SOAP service.

1. Start CloudPort and select Build Simulation. In the Capture WSDL bar enter the URL followed by ?wsdl or in our case paste

http://www.w3schools.com/webservices/tempconvert.asmx?WSDL

1. Capture WSDL
2. Change the Network Listener Policy – in my case I just changing the port to 8888 and will leave it on local machine, and commit.

2 listener

3. Now we can define any specific Request or Response values. You could build a VB script or create a random variable or any of a number of ways to match requests responses. In this case, our test coverage is 3 values.

  • 0 Fahrenheit response expected -17.7777777777778
  • 72 Fahrenheit response expected 22.2222222222222
  • 100 Fahrenheit Response expected 37.7777777777778

So lets start by cloning the FahrenheitToCelsius simulator 3 times and renaming it 0, 72, 100

3. Clone

4. Now we need to change the rules for inbound documents. The default rule recognizes any value. Right click on the actual value and select Add XML Element Value Criteria, Contains Value for each of the 3 cloned services.

4. Rule 1

5. Now selecting the rule allows for entering the value. Enter 0, 72, 100 in each of the clones services and Exact Match.

5. Rule

6. Now Select the Response tab, and enter the desired response value for each of the 3 clones simulators.

6 Response

7. If you want to test Celsius to Fahrenheit you can repeat this process.

8. Now launch your created simulation by selecting the green arrow icon Start Local Simulation. The Free Simulation player will launch and show you the URI and rules available. Select Copy Generated WSDL to Link icon. This is the listener we set up in step 2.

8 copy

9. In SOAPSonar now, paste that WSDL link into the Capture WSDL field and the 2 services are shown in the project tree.

10. Test the 3 services listed in point 3 now. Do you get the expected response?

9 soapsonar


3 Ways to Get Started with CloudPort – Create

In the first in this series, we used an iTunes JSON service and made a request via SOAPSonar while we capture the request and response using CloudPort’s proxy feature. This is great when your service is developed and available, but what if the service you need does not yet exist or needs to be altered?

Since I am not developing a service, I am going to use SOAPSonar to make a request of the real service and get a response. Then I will simply copy this response and paste it into CloudPort (with a small edit) and set up the right listener policies.

1. We going to do a second iTunes JSON GET to list of  albums for a given artist. Starting with SOAPSonar (you can use the same or start a new project) lets Create Two New JSON Tests. Lets rename the first alt-J albums and second Black Keys albums. The queries are

If you wondering were this came from, I read the service description document and too the ID value from the artistic response from the previously used search service. Commit and Send both. Now we have the requests and responses.

1 soapsonar query

2. Open up CloudPort, you can create a new, or use the previous. Right-click on Tests and create 2 New JSON Simulators. Rename them alt-J Albums and Black Keys Albums.

1 New

3. Now we need to establish the end points and queries or listeners. Select Add manual Rule and set the listener Target to URL and the paste the /lookup?id=558262494&entity=album in as the URL. Ensure its set to Exists. Once you created the new rule, delete the old catch all rule. If you wondering were this came from, its everything we sent as a request after the http://itunes.apple.com/

3 Simulator

4. Now do the same for Black Keys setting the target URL this time to match /lookup?id= 5893059&entity=album and Exists. Notice there are a number of ways to identify a incoming request to and hence trigger a response.

4 simulater BK

5. If you are using a new project, you need to also set the Network Listeners. If you using the same project as in the capture tutorial this should exist. Make sure yours looks as below with Name, IP, Port 8888 and URI.

5. Network Listner

6. Now we need to set up the responses. There are two parts to each response the header and the body. Go back to SOAPSonar real query and copy and past the entire response header and body into CloudPort Response tab. Then commit.

6 copy

7. Do the same for the second Black Keys service for both header and response.

7 response

8. Now we could edit these, adding albums, changing structure or renaming things, but the bands may not be happy. So all I will add is a small change above wrapperType

“simulated”: “simulated using CloudPort”, (make sure you have the , for correct JSON notation)

to both. 

11. New service

9. Notice if you look at the Response Runtime Variables tab, if you response is correctly JSON formatted the graphical view will populate. If its is not, the response will still be sent, but you will not be able to use variables and the client may not understand your response.

9 graphical view

10. Lets test our newly created services. Launch the Simulation Player, by selecting the green arrow icon. Notice your listener URI and we now have 4 simulated services.

10 simulation player

11. Now clone the two real SOAPSonar services and change the requests to

Do you see the changes we made?

In this example we added one line or possible variable, but we could just have well created an entire service from scratch. Here is the zipped create simulation.

3 Ways to Get Started with CloudPort – Capture

This is part of a 3 part series on creating simulated services. CloudPort comes with a proxy capture tool to Capture and then replay a simulated version of the service that currently exists. A simulated, response will remain static, and not effect data integrity of the enablers, but can be load or otherwise used for testing. Workflow and tasks allow for some additional intelligence, but we keep this about getting started.

Lets use iTunes RESTful JSON service. Since I have this song in my head, and the documentation for how to use this service is available. As you will see, the response can be quiet lengthy.

1. Lets test the actual service first. Open SOAPSonar, and File, New Test Group, right-click, New JSON Test Case, and rename it Direct. Paste

http://itunes.apple.com/search?term=alt-J

into the URI and method as GET. Commit and send.

1 direct

2. Now in CloudPort, select Tools from the menus bar, then Proxy Server Traffic Capture Tool.  Make the local port 8888 (easy for me to remember) and then paste itunes.apple.com into the remote server and Start Proxy Recording. You now capturing all requests made to your local machine on port 8888, which is then forwarded to itunes.apple.com.

2 Proxy

3. In SOAPSonar now, lets send the request to be captured. Clone Direct test case and rename it Proxy. Now change the URI from itunes.apple.com to 127.0.0.1:8888 which is your local machine running CloudPort on port 8888.  The entire query will look like

http://127.0.0.1:8888/search?term=alt-J.

Commit and send.

3 Capture

4. You can send as many queries to that domain to capture as you need to match with your test cases you will run. Lets add a second. Clone proxy and change the URI to  

http://127.0.0.1:8888/search?term=the+black+keys.

Commit and send.

7 Rename

5. You can see the request (header) and the response in the capture tool. Stop the Proxy and Export Data to File. Give it a name you remember and save it. The close the Proxy tool.

5 export

6. Now we need to import the captured file. File, Import, Proxy Server Traffic Capture. We know its JSON, so lets select that vs. leave as auto detect. Either should work, although some services dont always adhere to all standards. Find your captured file. When you import, CloudPort asks if you would like to keep response timing. If you say yes, the new simulated services will perform at the same response times. Select No.

6 import

7. Now you should have a NewSimulation1 with 2 Tests. If you select the first, you see in the Request tab,  URL /search?term=alt-J Rule: Exists as 1st rule. The second test URL /search?term=the+black+keys Rule: Exists. Rename your Tests to alt-J search and Black_keys search.

7 Rename

8. If you select the Response tab, you can see the JSON response captured. If you wanted to make any changes you could could just edit it here.  At the bottom is a tab for the JSON, but you can also see the Response Runtime Variables in much the same way you see them in SOAPSonar.

8 response

9. lastly, we can set the network listener location and port. Lets name this Listener iTunes Tutorial, leave the IP as 0.0.0.0 (all machines) and change the port to 8888. Lets leave the URI / and commit. Now the simulated service will run on localhost or http://127.0.0.1:8888/

9 listener

10. Now lets run the simulation in the realtime player. Select Start Local Simulation by clicking on the green arrow icon. The Free Simulation Player launches and you can see the iTunes Tutorial Simulated service. Below are the 2 services we captured. Copy the URI.

10. player

11. Now lets “test” these new simulated services. Clone or add 2 new services and use http://127.0.0.1:8888 and then the query for

  • http://127.0.0.1:8888/search?term=alt-J and GET
  • http://127.0.0.1:8888/search?term=the+black+keys and GET

Commit and send each one.

11 Simulated

Did you get a response? Can you tell it is different? Perhaps I need to do another tutorial showing a regression test of a real service vs a virtialized?

Comments/ questions?

CloudPort for REST Response Generation

In SOAPSonar tutorial 3 we tested a simple chained service for a mashup. The first being a REST service look-up on google maps for distance between Toronto and Montreal, the second a calculation service to work out how long it would take to ride a bike at your own speed.

Now what if you are required to test the second service, when the first is not available? Does the team sit idle, resulting in project “Dead Hours”? Do you call a meeting, tell them to review test cases documentation, plan, take lunch what? The effect of Dead hours can somewhat be seen in my last post on Service Plan Costing

Why may a service not available? There are many of reasons.

  1. Lab is not available
  2. Network or connectivity is down
  3. You working from home/cottage/travelling
  4. Its a 3rd party’s service, and they have other testing
  5. The service is there, but you need to load test and the service does not allow for that
  6. The service data cannot be corrupted, etc.

Whatever the reason, what you need is something to respond the same way to a the same request, so that other test cases and automation does not fail. Now you could have development hammer out some code, get infrastructure and then installed it on a server, but that will take time and resources. Alternately you can use CloudPort.

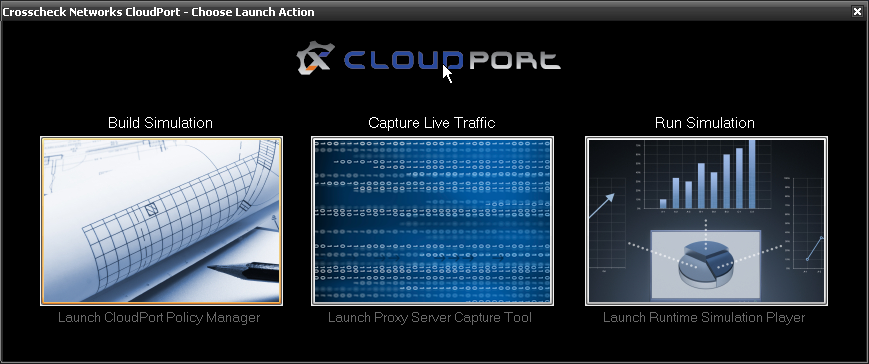
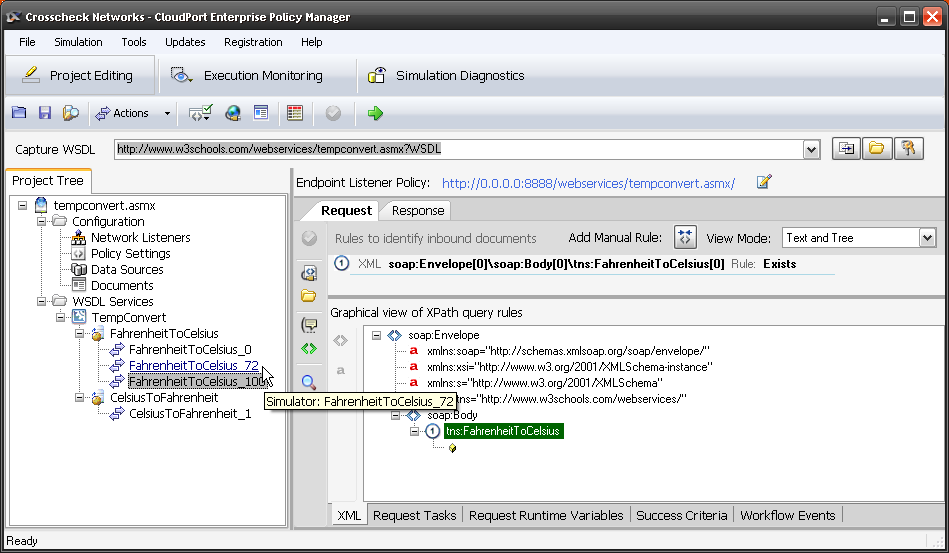
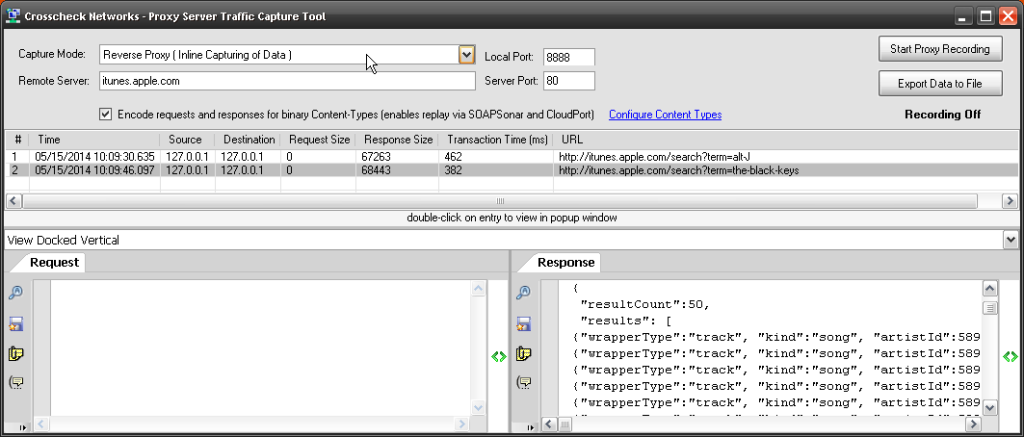
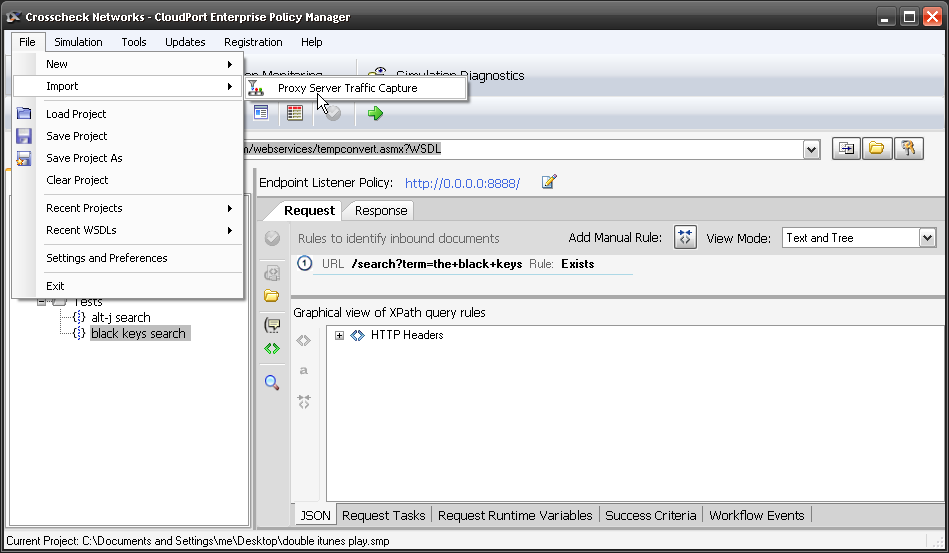
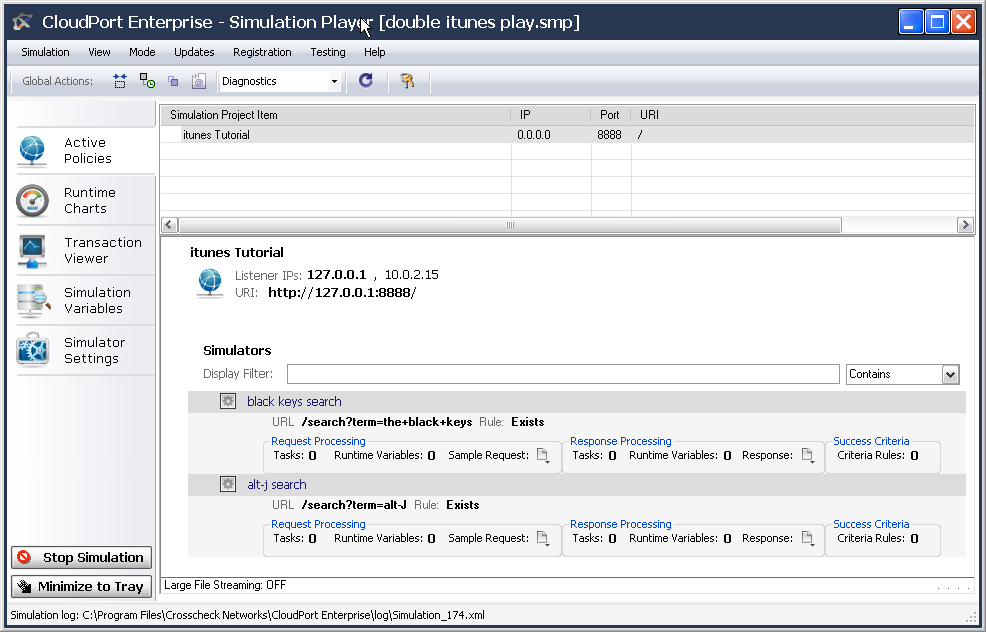
1. Run CloudPort. This example is simple so we will just create a service and not capture one. Select Build Simulation. The proxy capture tool makes capturing more complex services and WSDL much easier.

1 build

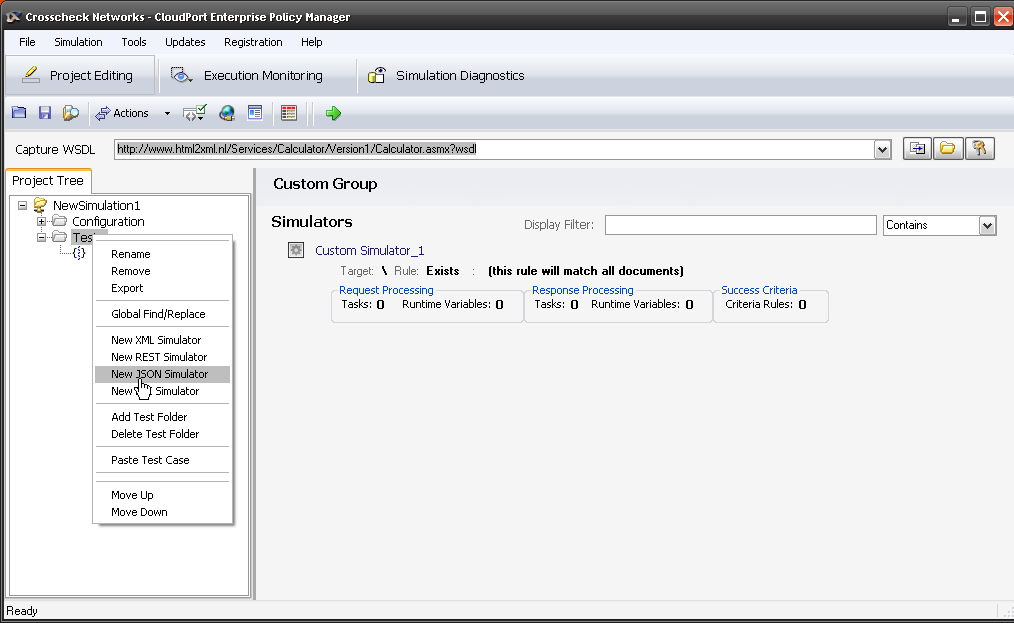
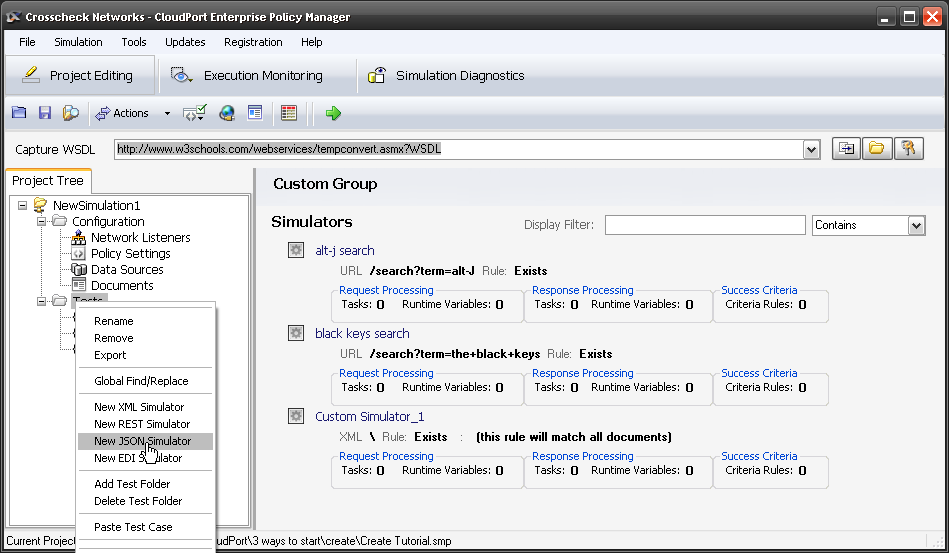
2. File, New, Custom Simulation and then File, New, JSON Simulation Rule. Rename it to Montreal

2. New Service

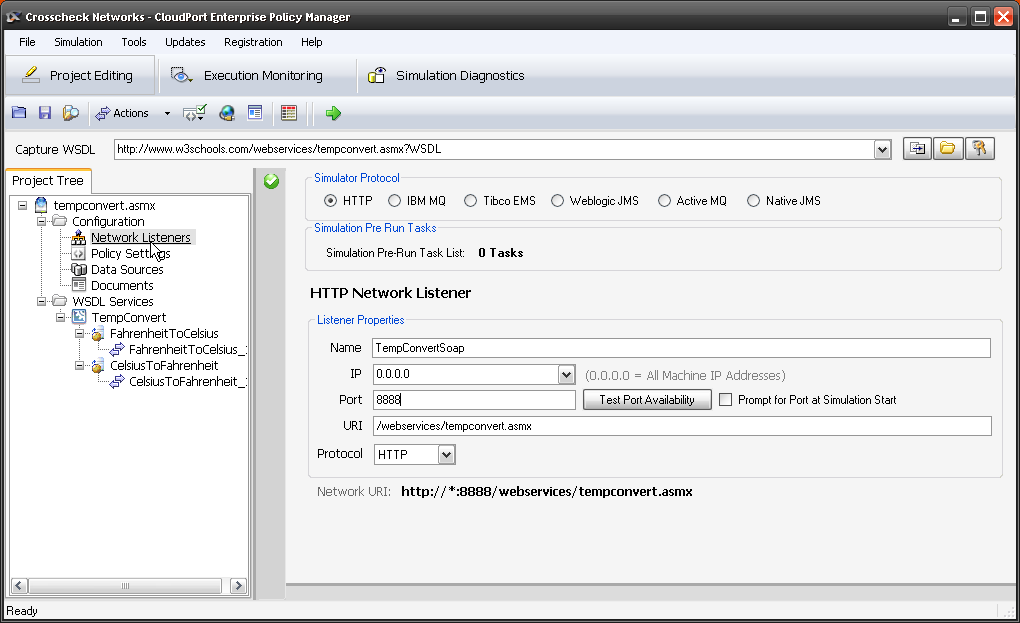
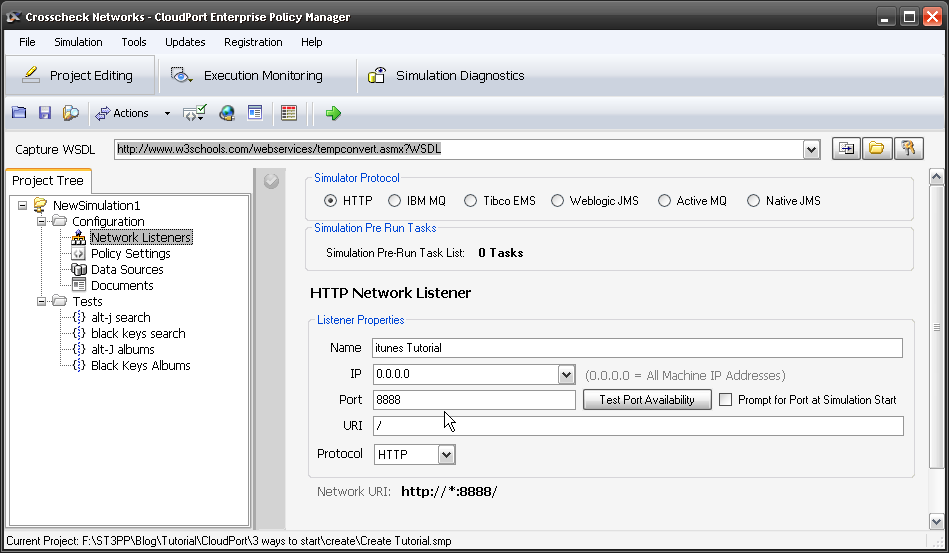
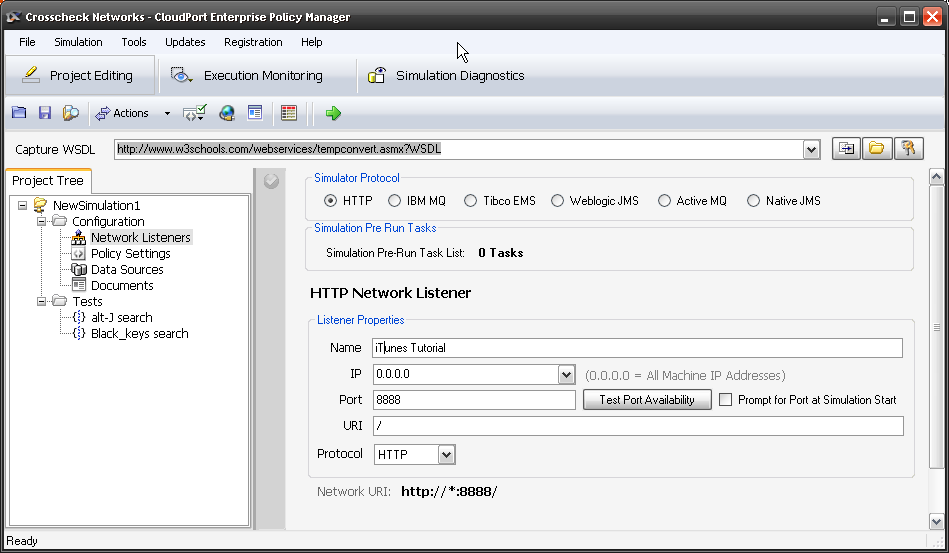
3. Now the first thing we need to do is set up a network listener policy, the port and URI that CloudPort will run on and listen for requests. In Project Tree, select Network Listeners and enter a Name of Google Maps, leave the IP 0.0.0.0 and lets say port 8888. For the URI lets use a similar one, so only the port and machine are different. Enter /maps/api/directions/json/. Select the green check box to commit.

3.  network listener

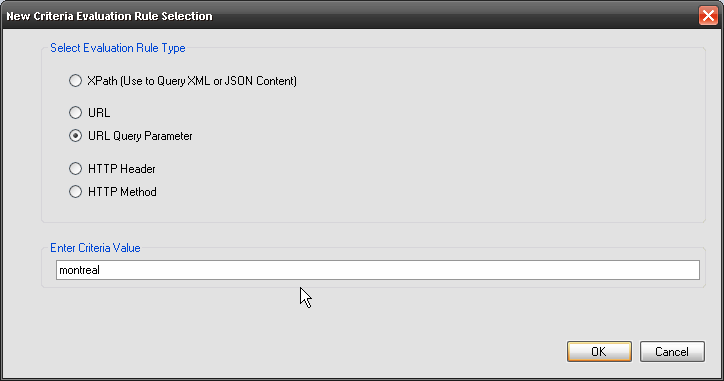
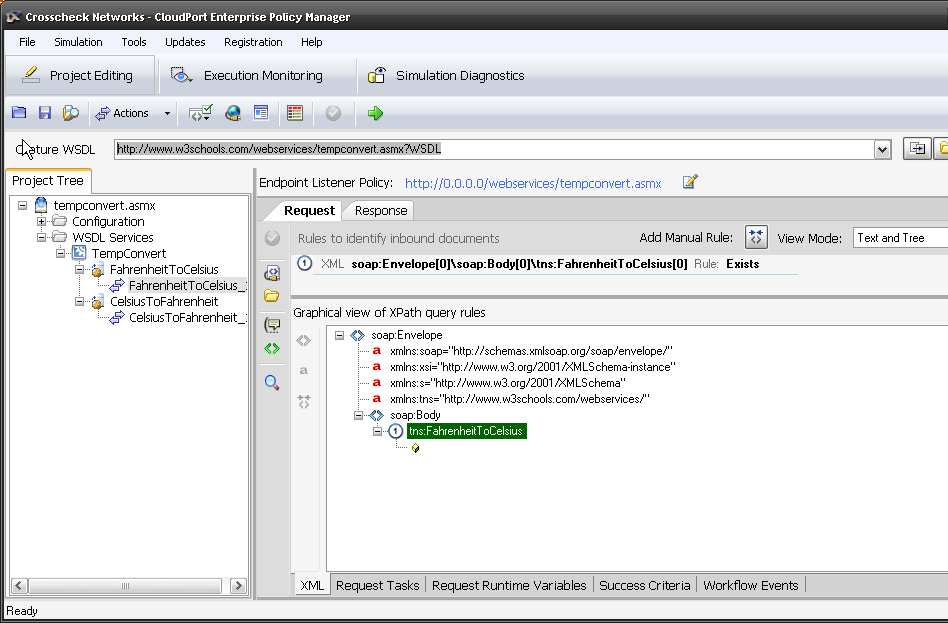
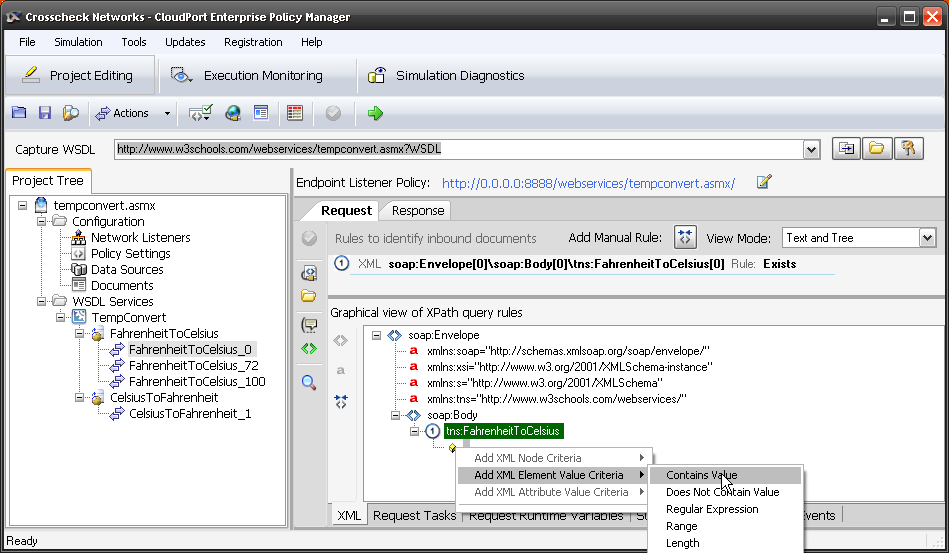
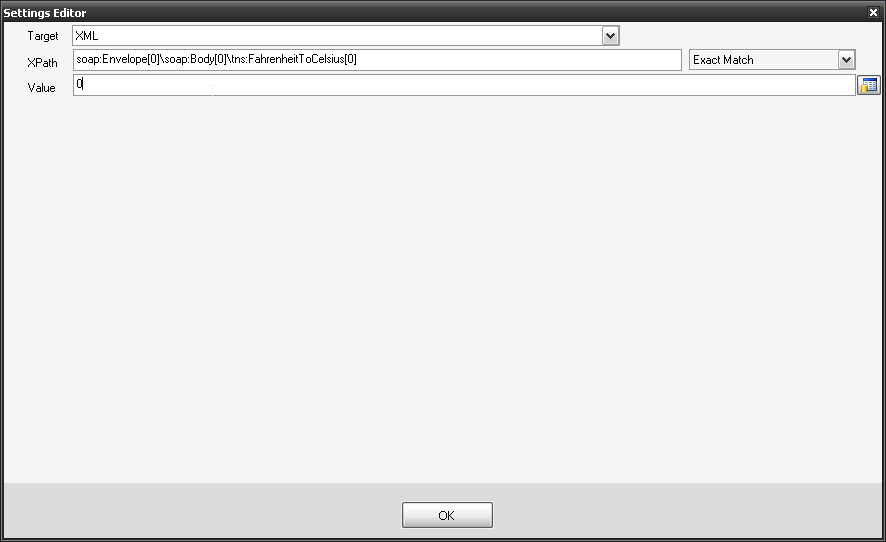
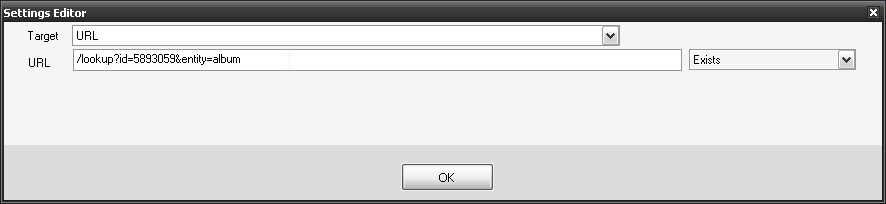
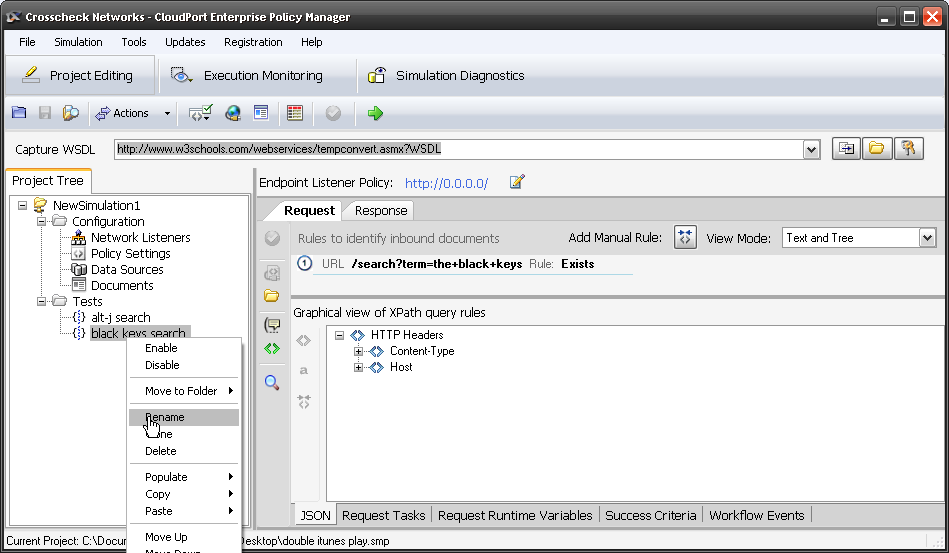
4. Now we need to define request listener policy for a particular request string, URI or parameter. Select Add Manual Rule, URL Query Parameter and enter montreal. We now listening for a JSON query with montreal in it. When CloudPort gets that request, it will send the response we define in the step 6.

4 - New listener

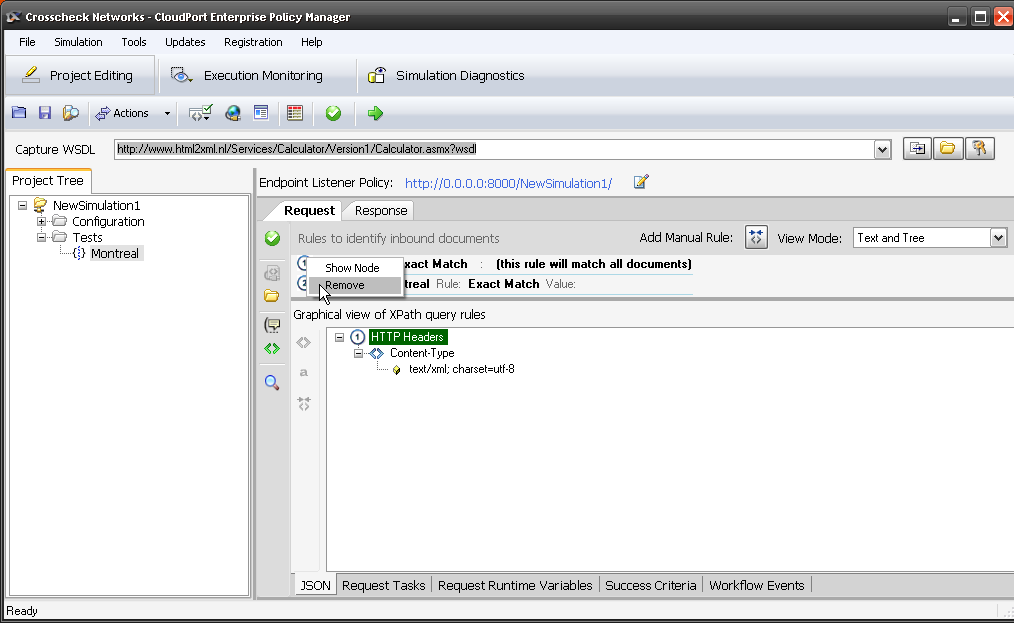
5. Lets remove the default rule that matches all documents. Select the number 1 next to the default rule and select remove.

5 - delete default

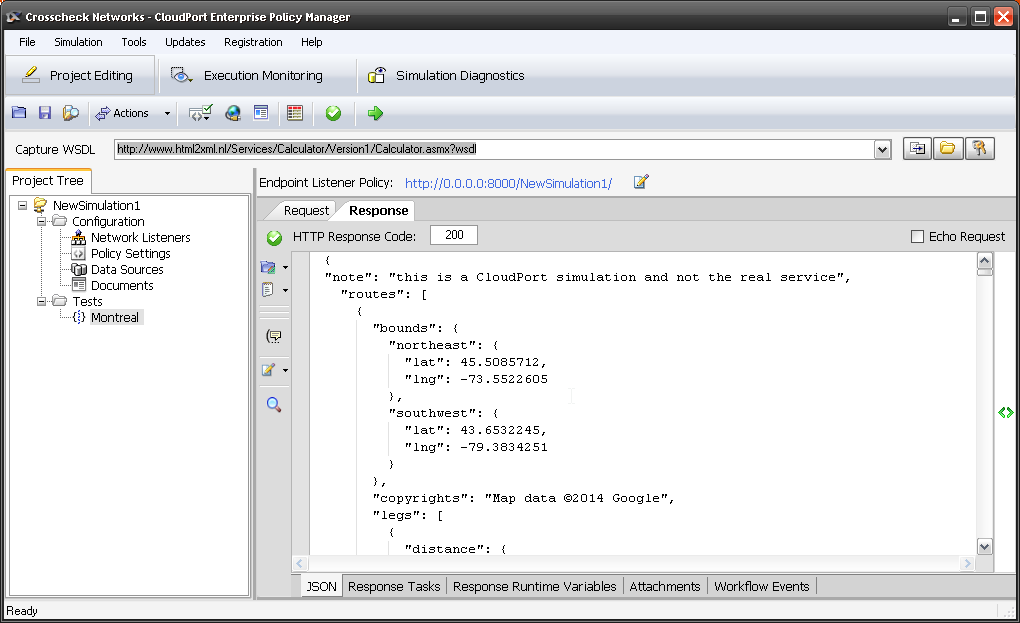
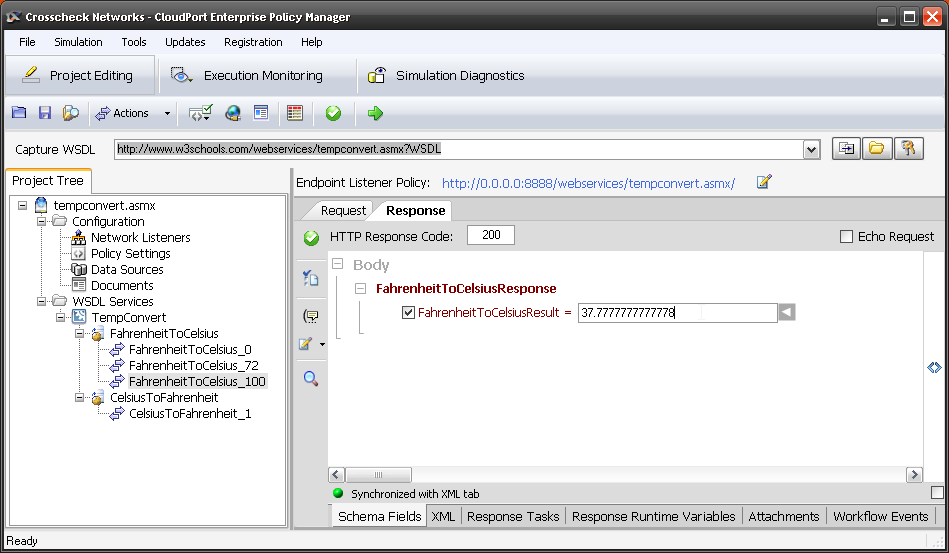
6. Next we flip over the the Response tab. Now you could get creative and put in any response you like, but we do need that field with the distance. So to make this simple, I am just going to copy the response from the real sever into CloudPort. So long as we have the part we need we should be fine.

{
“distance”: {
“text”: “621 km”,
“value”: 621476
}

For fun I added a line at the top “note”: “this is a CloudPort simulation and not the real service”, and left the same as before.

6 response

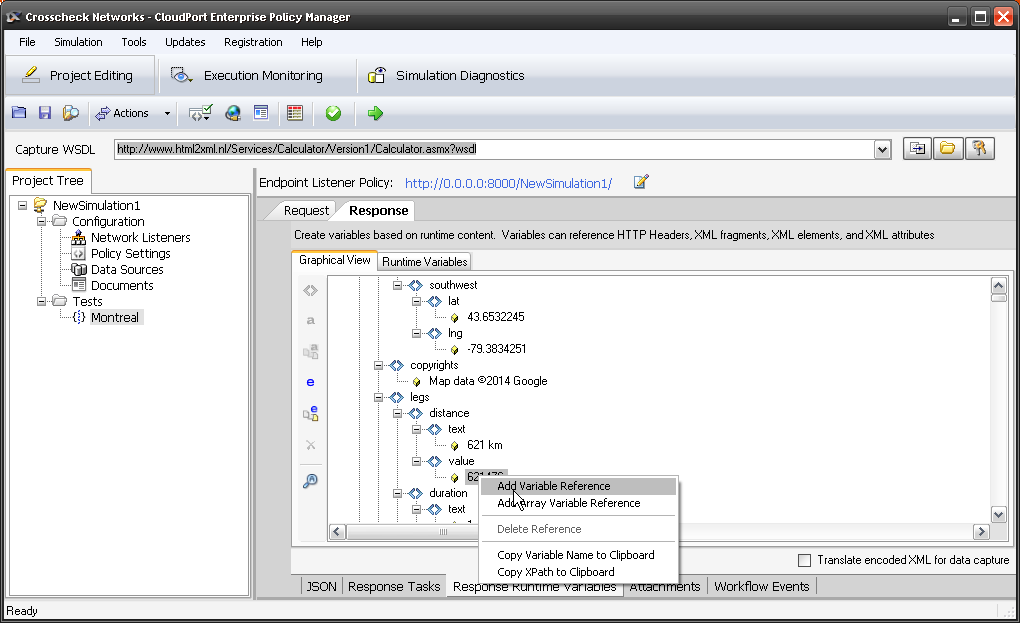
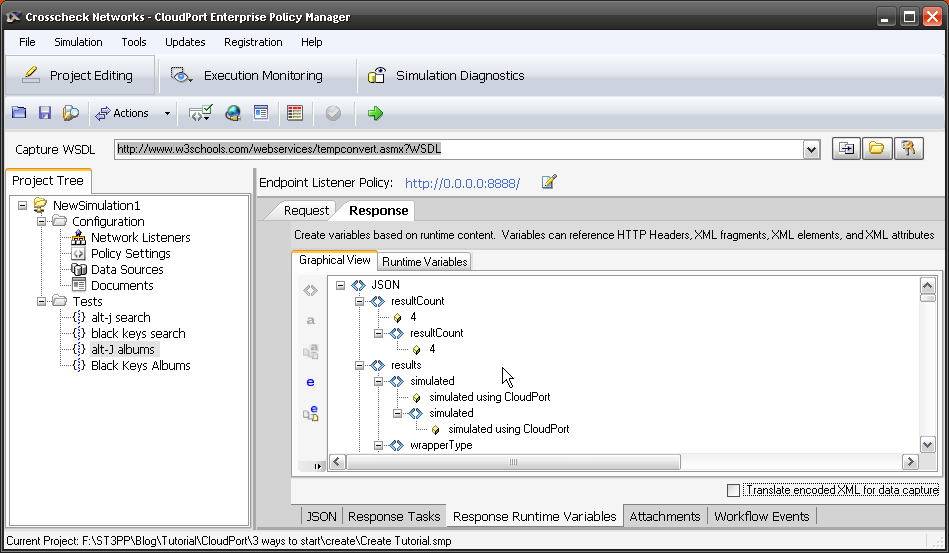
7. Not that we needed it, but just in case, I will define the distance as a variable. Select Response Runtime Variables and scroll down to the value (distance in meters) and right-click, add variable reference.

7 runtime

8. We could now clone this for as many different queries as we need, changing just the query listener and the response.

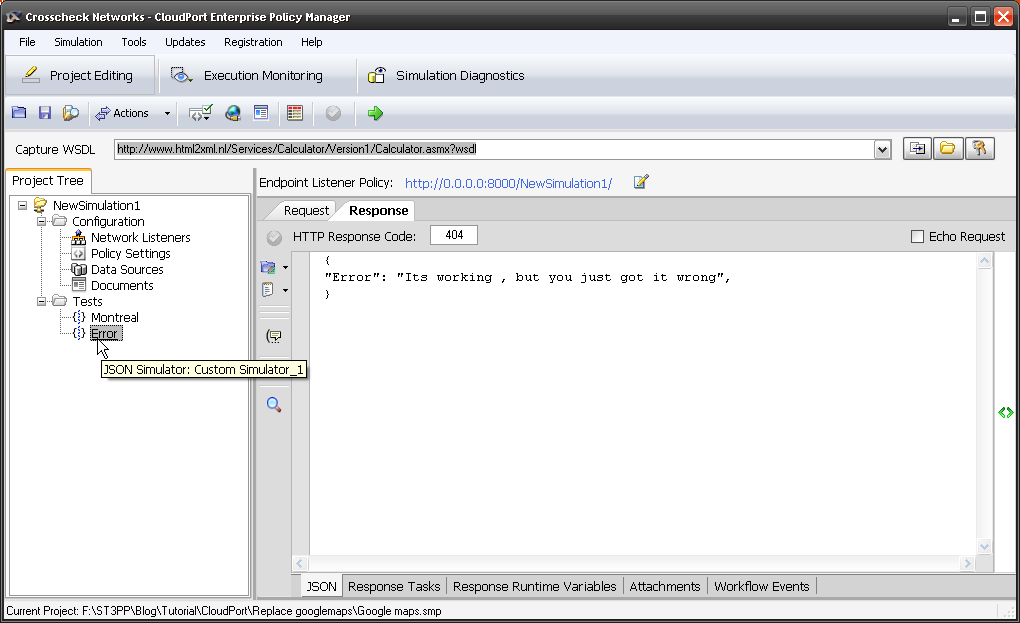
9. Lastly I want to add a error service. Right-click on tests, New JSON Simulator and rename it Error. Since its after the first rule, we will leave the default catch everything, and in the response, I had some fun with the error code and message.

9. error

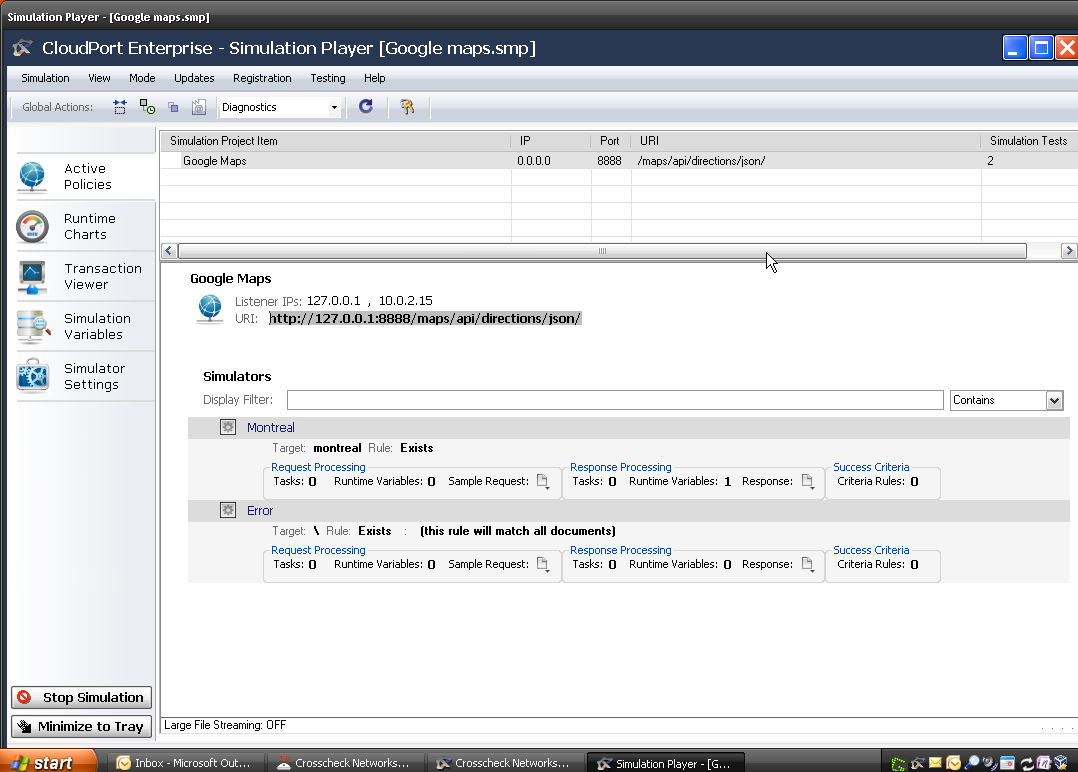
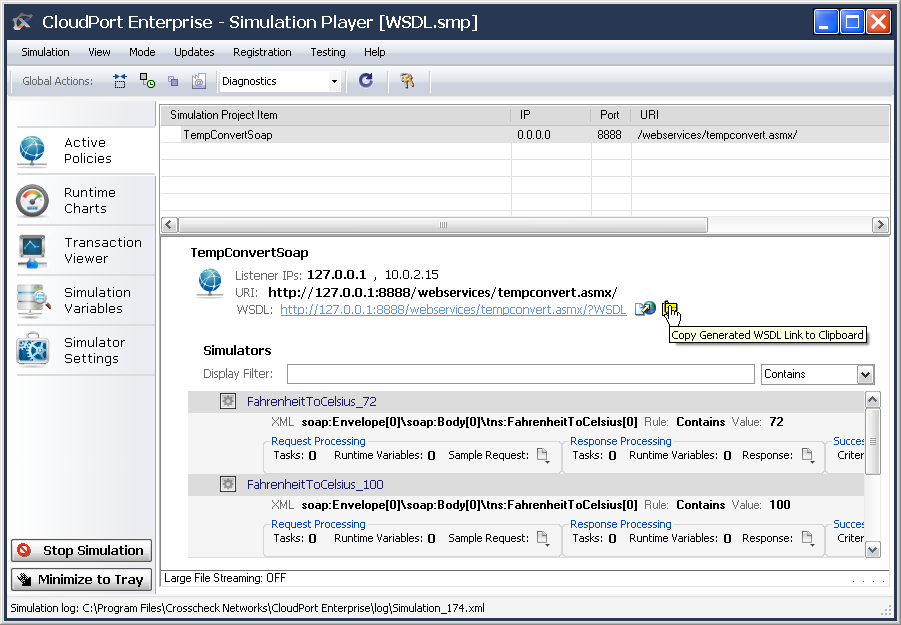
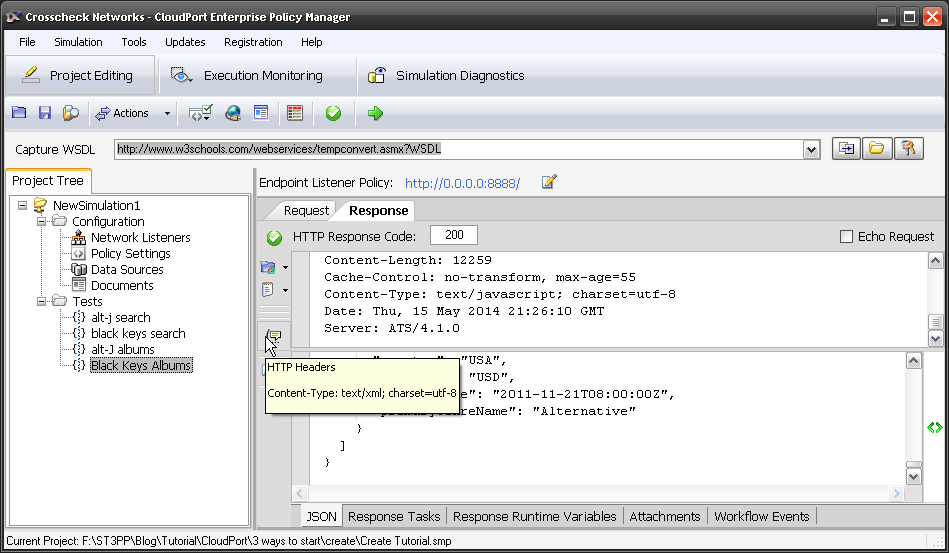
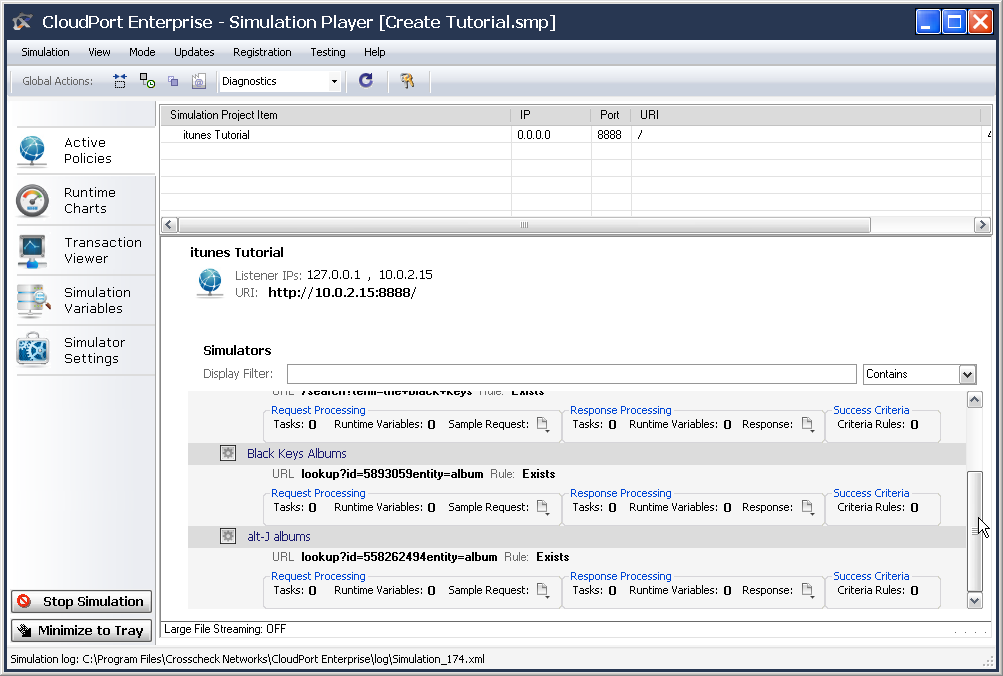
10. Time to test it out. Save your project then start local simulator with project. See the URI for the service is displayed on port localhost:8888?

10 run view

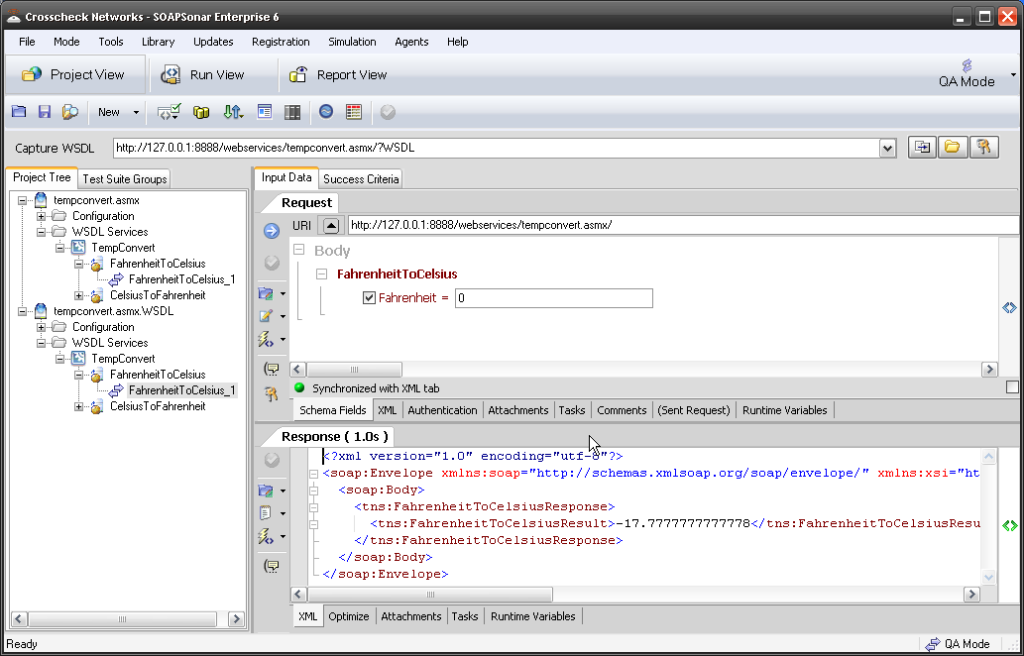
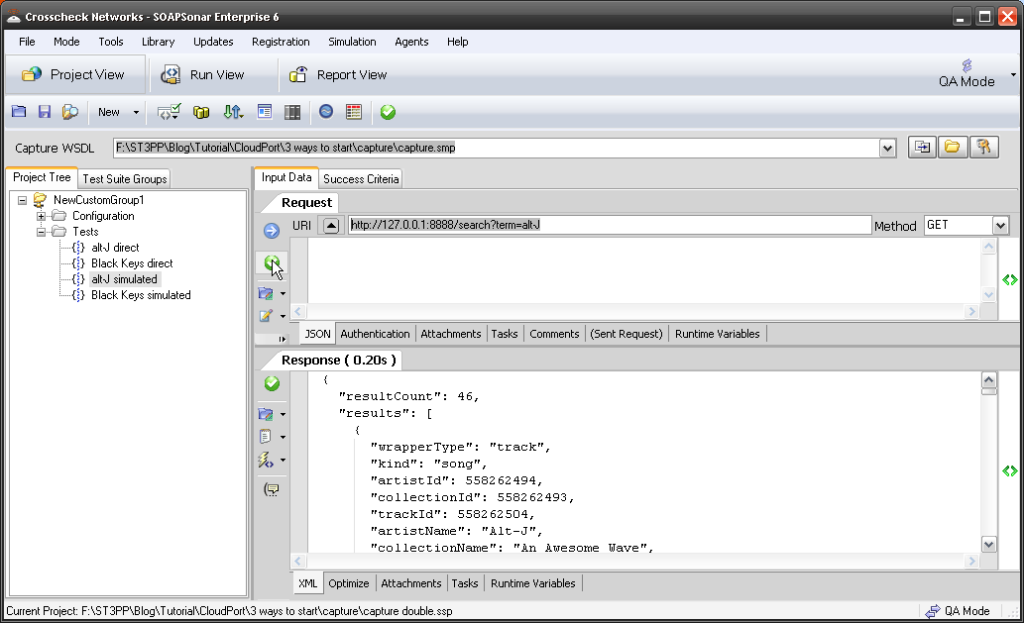
11. In SOAPSonar, lets make a slight change to test case. Clone it and past http://127.0.0.1:8888/maps/api/directions/json/ into the host and path. Leave the query the same. Commit and send. Can you my response. Note my added field? In every other way, this response should be the same. If you replace Montreal with some other city, what do you get?

11 SSonar

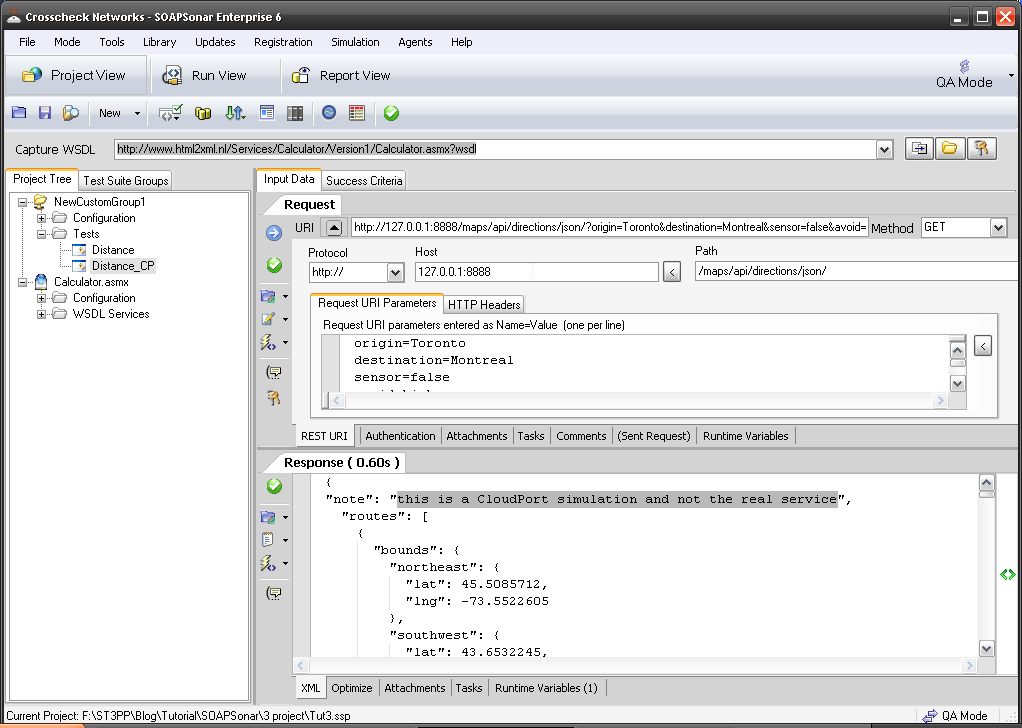
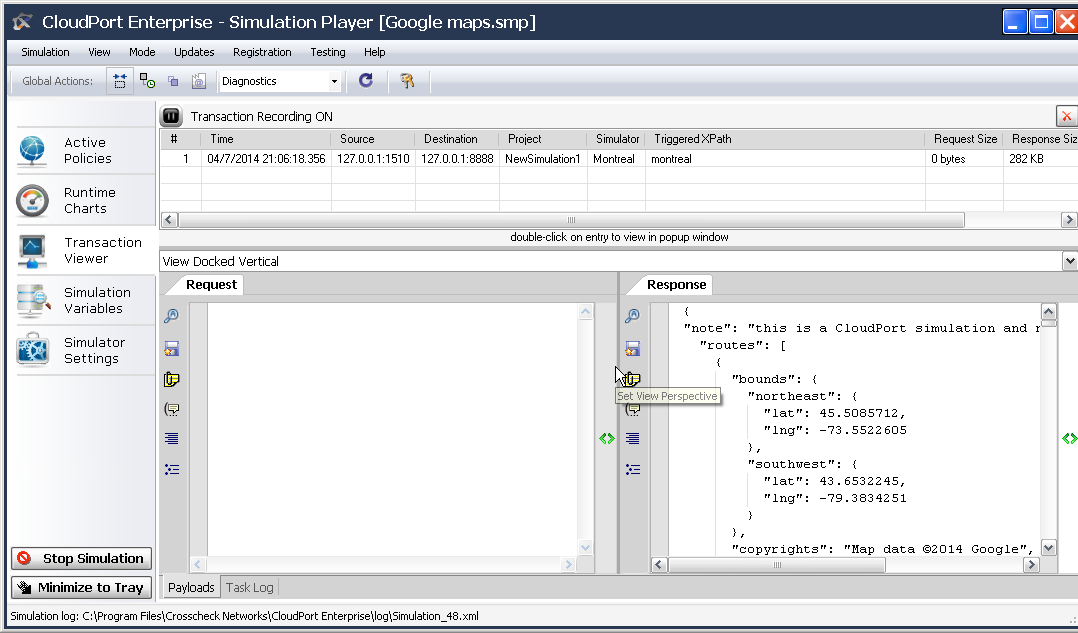
12. Back in CloudPort’s runtime player, you can see the transaction.

12 Runtime

Conclusion

In a few minutes you have ritualized a simple web service. What’s better is that the runtime player is free. That project you created, can be used by as many people in your or outside of your organization as you may wish to share it with.

Virtualizing or simulating a service is a quick way to remove many of the environmental factors that testing has to deal with on a day to day basis. From creating early mock-ups to trouble shooting performance, there are literally hundreds of use cases.

It was pointed out to me that for a single static response like this, you could use the FREE Runtime player and dont need the licensed service creation aspect. That said, the tutorial is valuable if you wish to extend this to multiple requests and responses and more complex workflow.

Comments?

CLOUDPort Free Runtime Player for Troubleshooting

I get a lot of calls from clients having connectivity issues between the client and the services. Connecting between various labs, environments,  instances, sites etc  can be difficult for developers and testers to troubleshoot. Here is a simple free way to confirm connectivity at the web service level.

The CLOUDPort Runtime player is a free tool that can run mock virtualized services to test your client against. While the paid version of CLOUDPort allows you to create the run-times / responses you wish, the Free run-time, comes with 3 embedded solutions. An Echo Service, a Static Response Service and a Fault Service.

The runtime can be used in a variety of ways. The echo service is often used to check field mapping through a XML gateway or some transformation device, since the request is sent back as a response, you can confirm any manipulation of the request or response message. CLOUDPort Runtime also support load testing, providing real time performance information, using either echo or static response. I don’t want to try list all the possible uses cases of the free runtime, as I am sure many of you will come up with new ways.

Read More