Search for:

3 Ways to Get Started with CloudPort – Capture

This is part of a 3 part series on creating simulated services. CloudPort comes with a proxy capture tool to Capture and then replay a simulated version of the service that currently exists. A simulated, response will remain static, and not effect data integrity of the enablers, but can be load or otherwise used for testing. Workflow and tasks allow for some additional intelligence, but we keep this about getting started.

Lets use iTunes RESTful JSON service. Since I have this song in my head, and the documentation for how to use this service is available. As you will see, the response can be quiet lengthy.

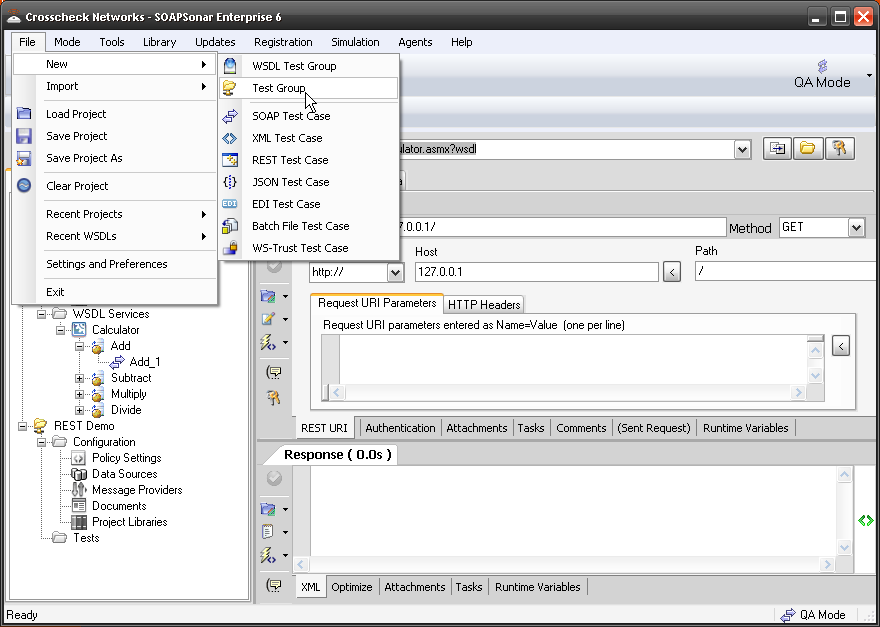
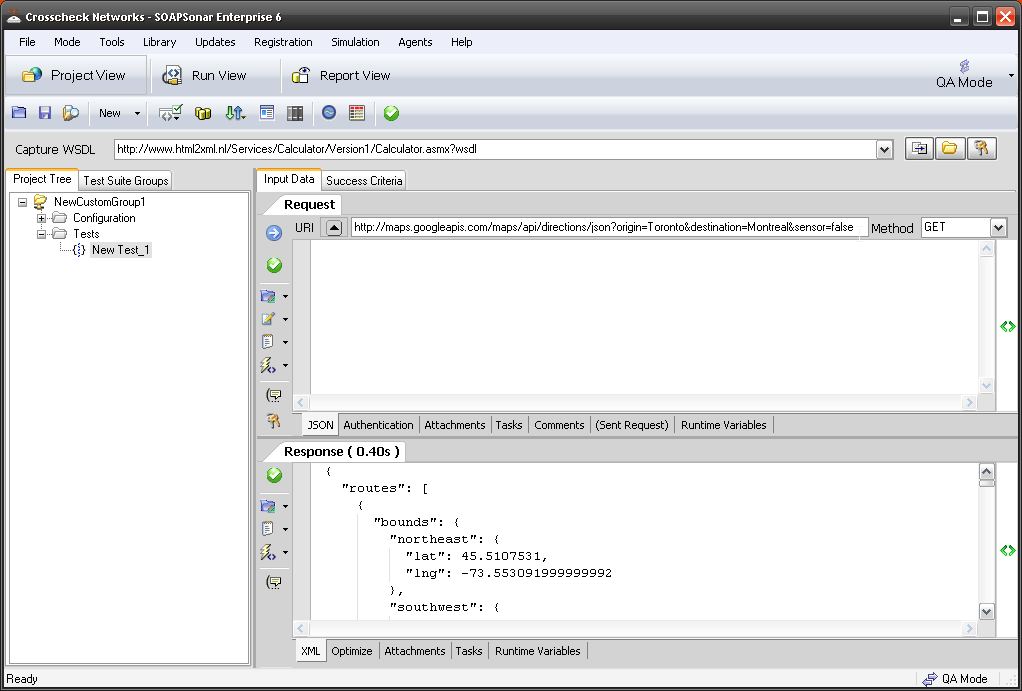
1. Lets test the actual service first. Open SOAPSonar, and File, New Test Group, right-click, New JSON Test Case, and rename it Direct. Paste

http://itunes.apple.com/search?term=alt-J

into the URI and method as GET. Commit and send.

1 direct

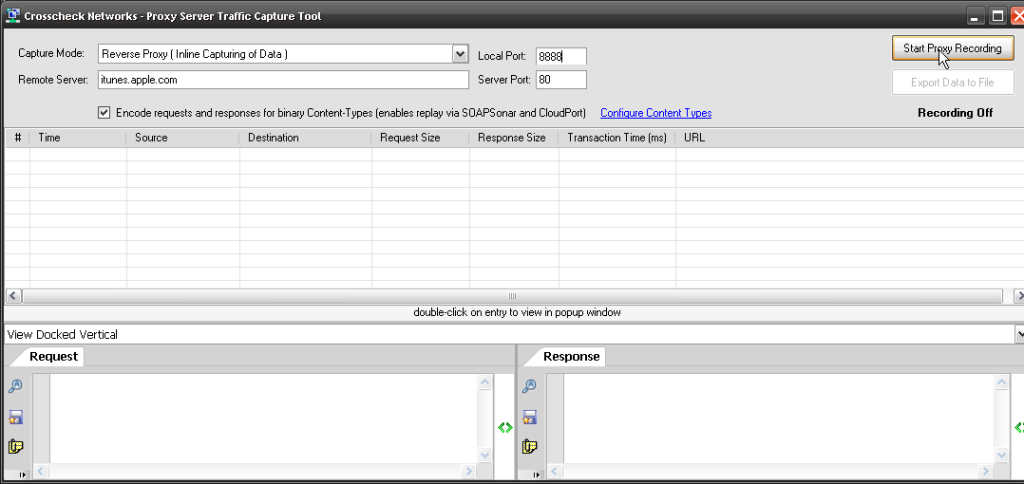
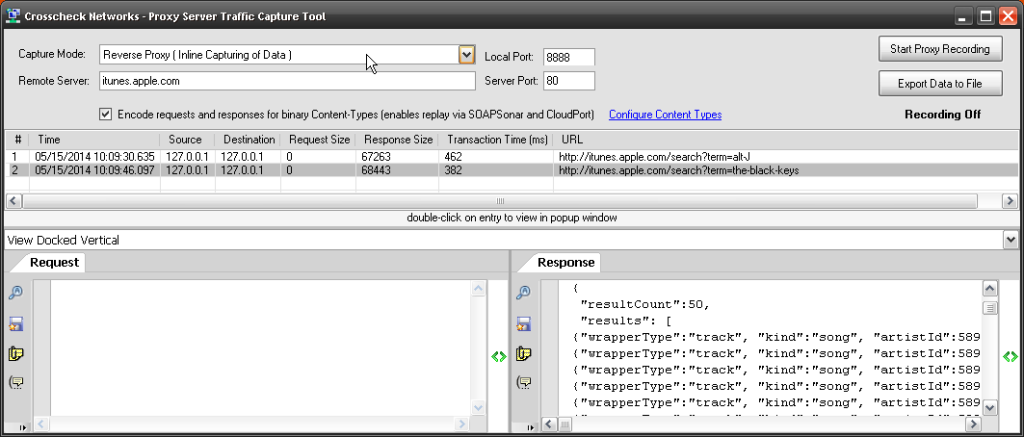
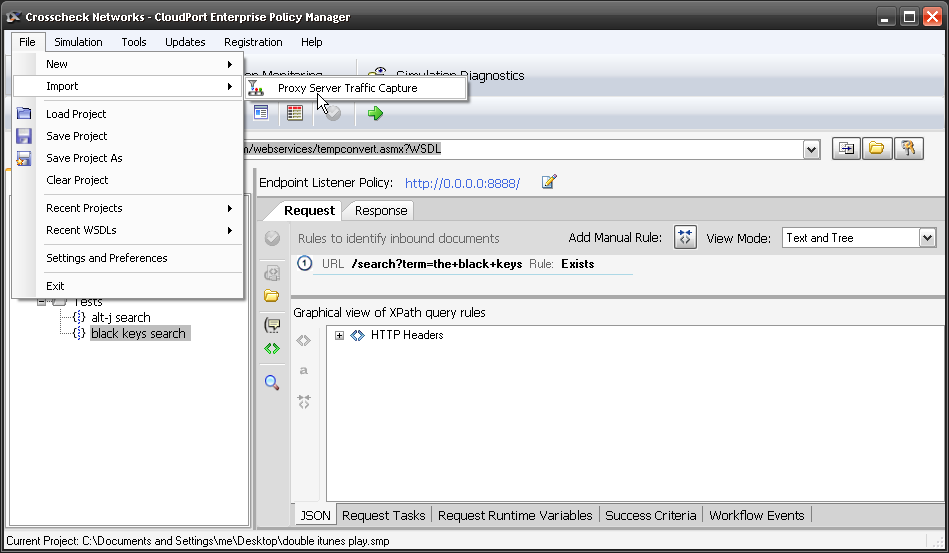
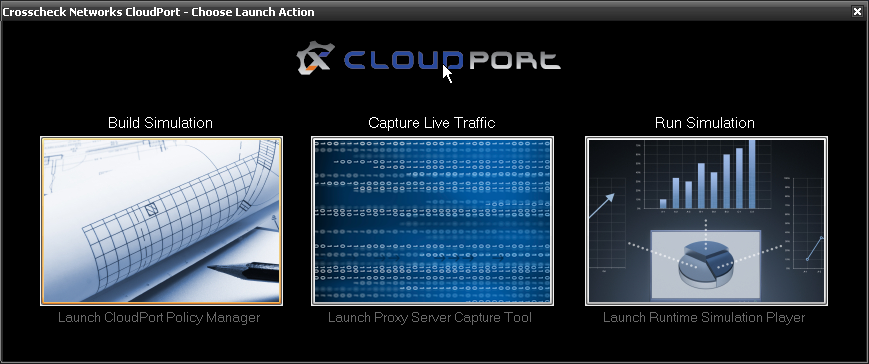
2. Now in CloudPort, select Tools from the menus bar, then Proxy Server Traffic Capture Tool.  Make the local port 8888 (easy for me to remember) and then paste itunes.apple.com into the remote server and Start Proxy Recording. You now capturing all requests made to your local machine on port 8888, which is then forwarded to itunes.apple.com.

2 Proxy

3. In SOAPSonar now, lets send the request to be captured. Clone Direct test case and rename it Proxy. Now change the URI from itunes.apple.com to 127.0.0.1:8888 which is your local machine running CloudPort on port 8888.  The entire query will look like

http://127.0.0.1:8888/search?term=alt-J.

Commit and send.

3 Capture

4. You can send as many queries to that domain to capture as you need to match with your test cases you will run. Lets add a second. Clone proxy and change the URI to  

http://127.0.0.1:8888/search?term=the+black+keys.

Commit and send.

7 Rename

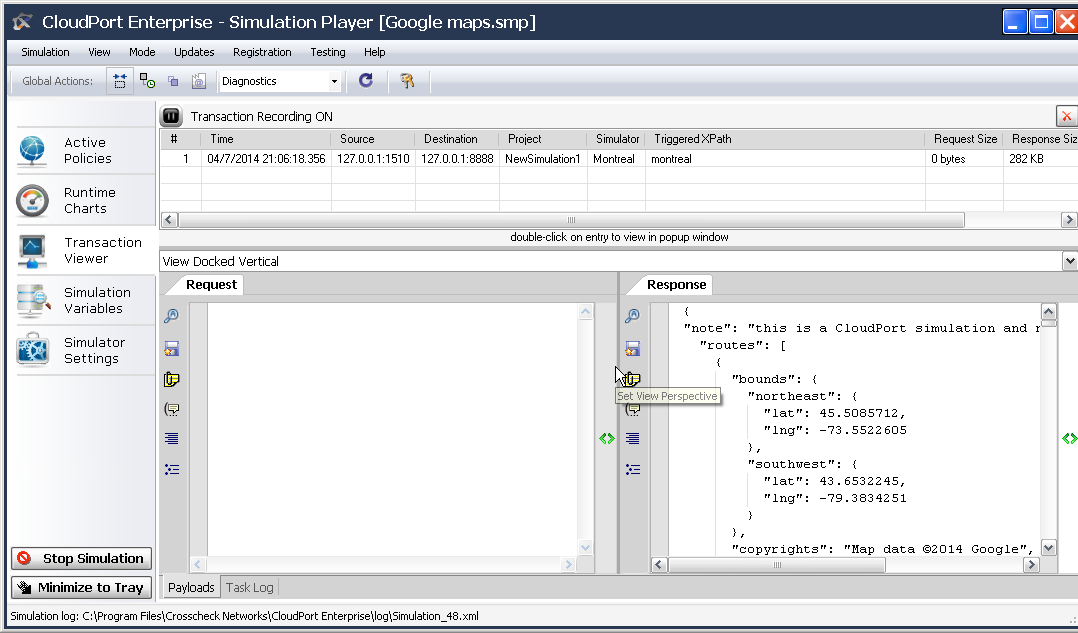
5. You can see the request (header) and the response in the capture tool. Stop the Proxy and Export Data to File. Give it a name you remember and save it. The close the Proxy tool.

5 export

6. Now we need to import the captured file. File, Import, Proxy Server Traffic Capture. We know its JSON, so lets select that vs. leave as auto detect. Either should work, although some services dont always adhere to all standards. Find your captured file. When you import, CloudPort asks if you would like to keep response timing. If you say yes, the new simulated services will perform at the same response times. Select No.

6 import

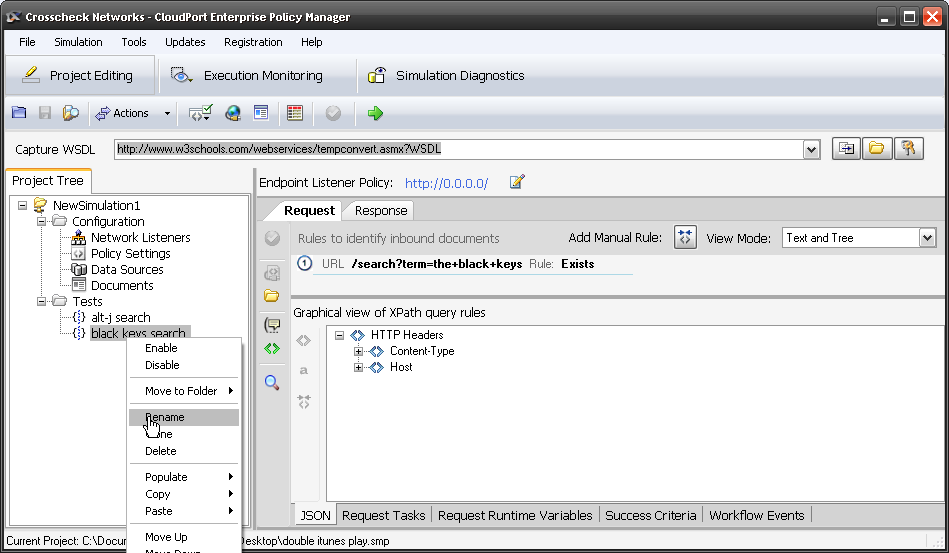
7. Now you should have a NewSimulation1 with 2 Tests. If you select the first, you see in the Request tab,  URL /search?term=alt-J Rule: Exists as 1st rule. The second test URL /search?term=the+black+keys Rule: Exists. Rename your Tests to alt-J search and Black_keys search.

7 Rename

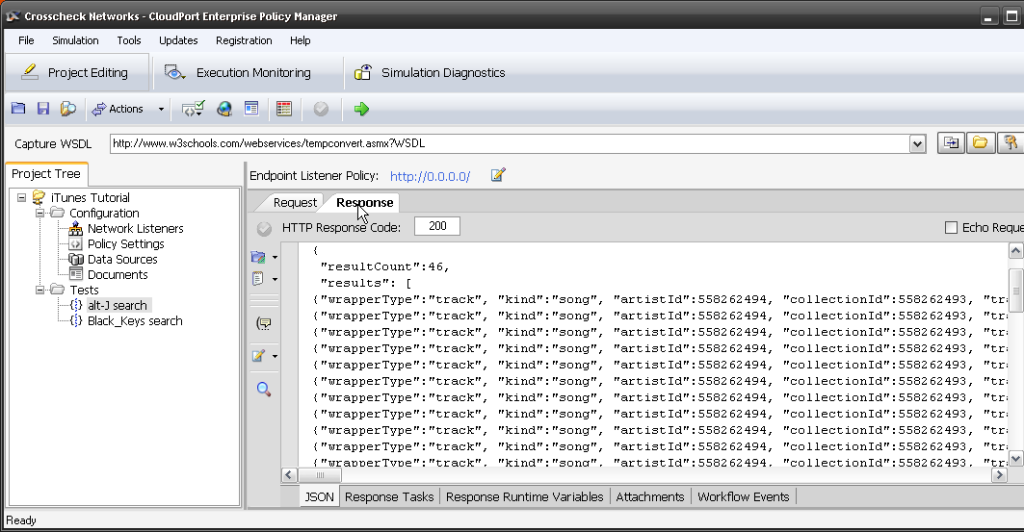
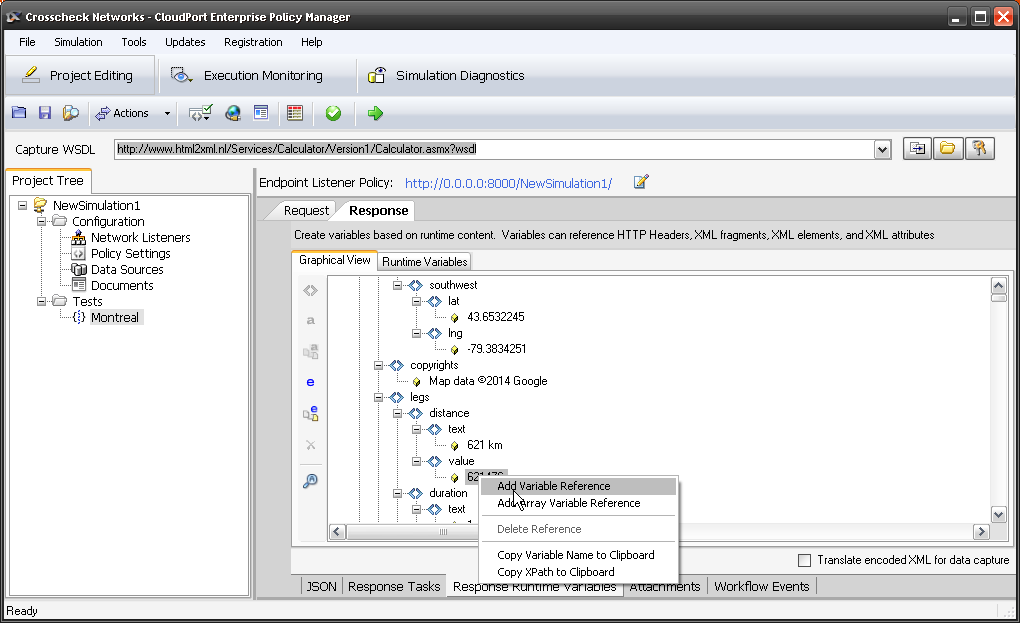
8. If you select the Response tab, you can see the JSON response captured. If you wanted to make any changes you could could just edit it here.  At the bottom is a tab for the JSON, but you can also see the Response Runtime Variables in much the same way you see them in SOAPSonar.

8 response

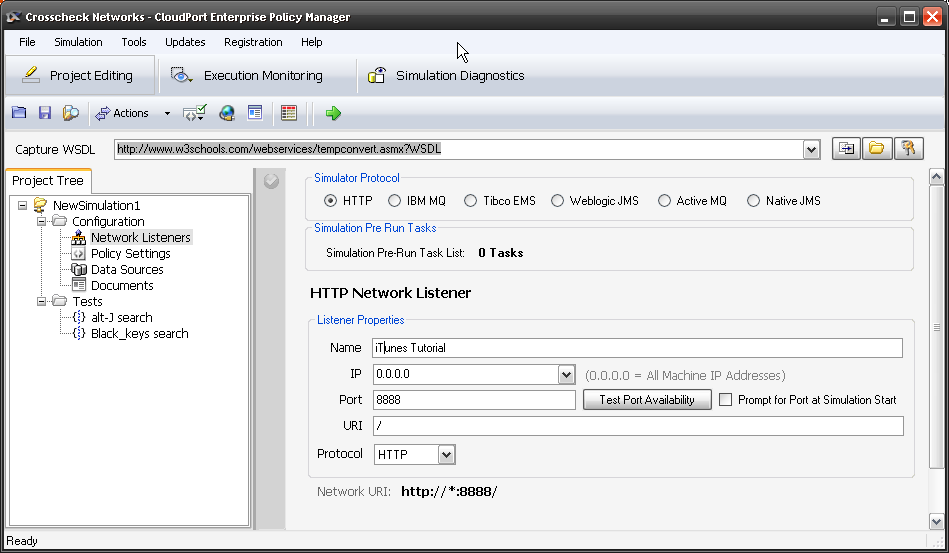
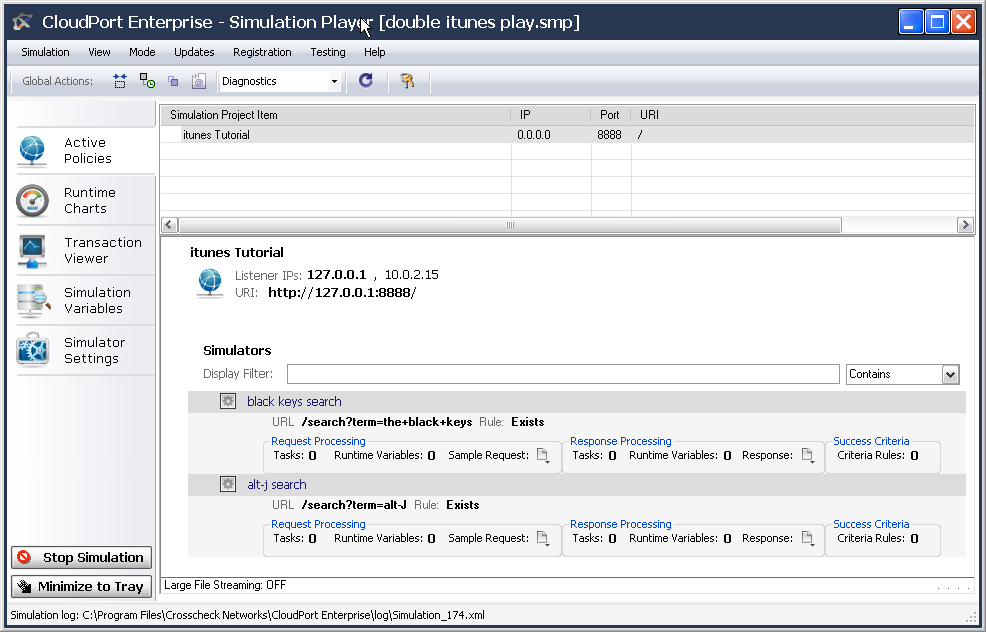
9. lastly, we can set the network listener location and port. Lets name this Listener iTunes Tutorial, leave the IP as 0.0.0.0 (all machines) and change the port to 8888. Lets leave the URI / and commit. Now the simulated service will run on localhost or http://127.0.0.1:8888/

9 listener

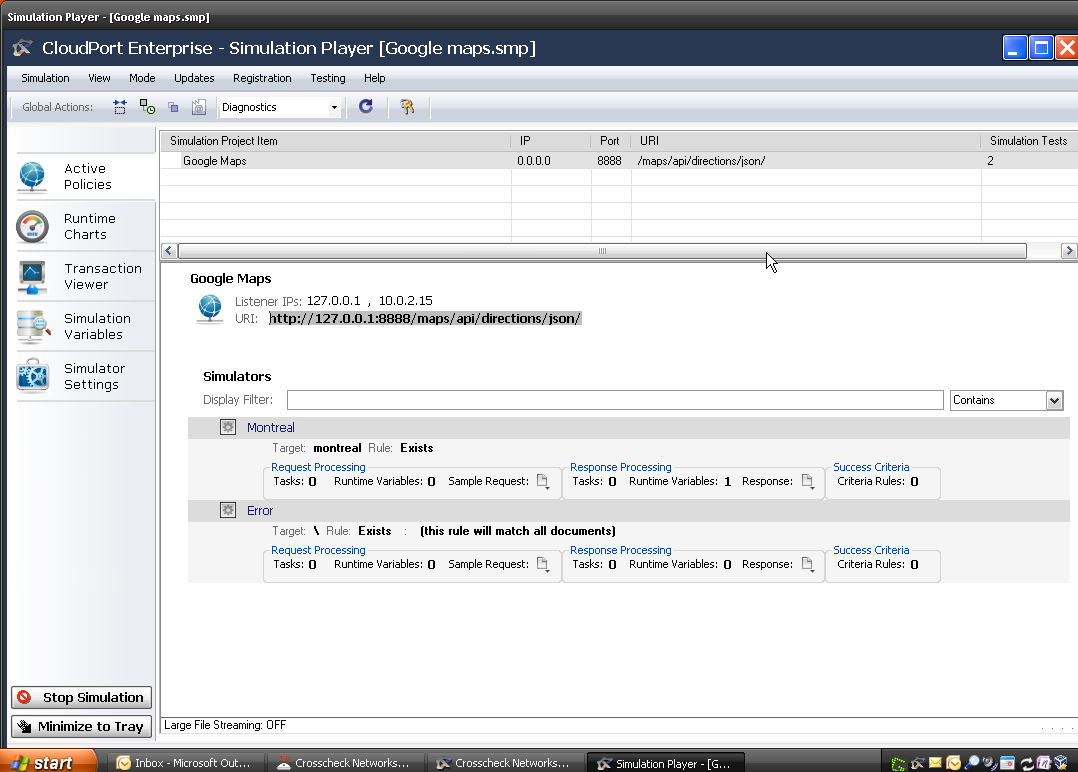
10. Now lets run the simulation in the realtime player. Select Start Local Simulation by clicking on the green arrow icon. The Free Simulation Player launches and you can see the iTunes Tutorial Simulated service. Below are the 2 services we captured. Copy the URI.

10. player

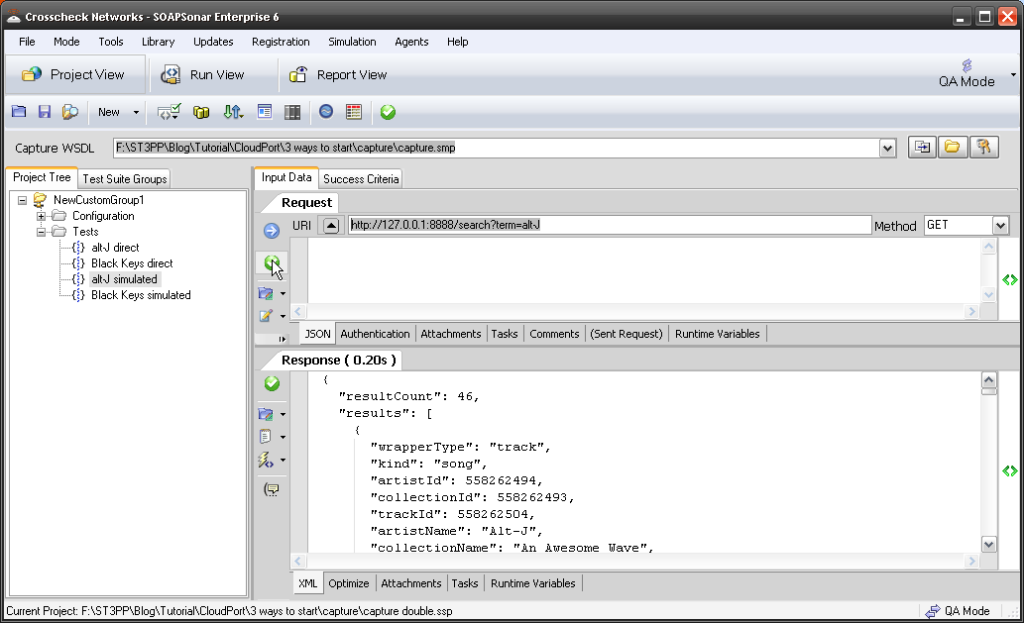
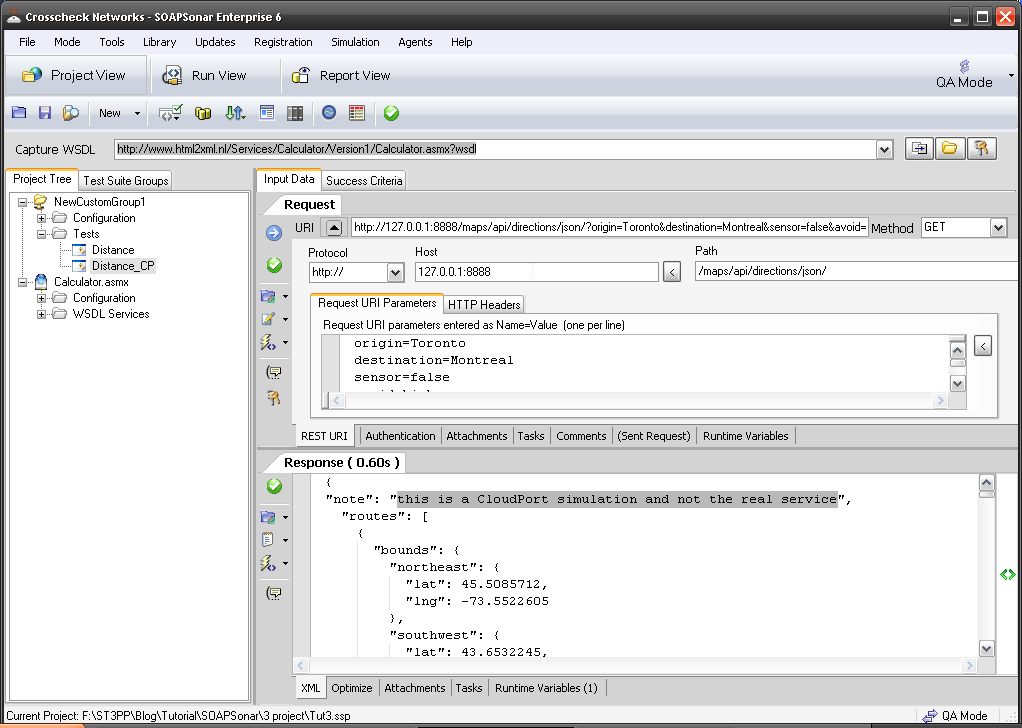
11. Now lets “test” these new simulated services. Clone or add 2 new services and use http://127.0.0.1:8888 and then the query for

  • http://127.0.0.1:8888/search?term=alt-J and GET
  • http://127.0.0.1:8888/search?term=the+black+keys and GET

Commit and send each one.

11 Simulated

Did you get a response? Can you tell it is different? Perhaps I need to do another tutorial showing a regression test of a real service vs a virtialized?

Comments/ questions?

Continuous Testing in Agile

Along with performance testing, there were 2 other themes that continually came up in conversations during STAR Canada.

  1. How should QA integrate in a Agile environment
  2. The need for “Continuous Testing”.

While there are thousands of articles about Continuous Testing, and hundreds of thousands on Agile, there seems little on both. Perhaps due to some apparent conflicts.

Lets look at a theoretical QA in an agile environment. Say your organization Sprints are 2 weeks in length, each scrum having 8-10 members for manageability. Due to project time constraints,  there are 5 scrums working concurrently, each focussed on a different component of development of your application. What test cycles are done as part of the sprint and what cycles are done outside or as cross functional teams?

Agile Testing Levels

It was pointed out that although common, doing only unit tests and integration testing on your Sprints code, then jumping to acceptance testing of that sprint, is not Agile. Agile should in fact have all test stages built into the Sprint. Many companies ignore various test cycles like load, integration and security testing of the end to end system as there simply is not time in each Sprint.

An alternate approach is to created independent teams outside of the Agile development. Their role is to test integration, load, security and systems in integrated environments. Defects identified are then fed back into the scrum meetings and allocated to particular Sprint. This also is not really Agile, falling into some kind of hybrid. The challenge here is that issues are often identified after sprints are finished and so not really continuous testing either.

A second approach, was to create cross functional roles were the scrum masters and one or more members of each sprint were allocated to doing systems level testing and possibly fixes. These cross functional teams, would near the end of each sprint, break out of their old scrum into the new role. The challenge with this approach is that on shorter sprints, and large systems, they can land up spending more time in the cross functional role than in their own scrum.

Continuous Testing

Continuous Testing is somewhat the same as Baseline and Regression Testing, but need not only testing against a Baseline. Its about continually testing while developing through the entire SDLC. The benefit that issues can be identified far earlier (Shift Left approach) resulting in lower costs to address. Agile environments at first glance, seem to favour continuous testing, but does that include, regression, integration and systems testing across Sprints? If each test case takes 9 minutes to complete, 1 tester can only run 53 test cases in a day or 533 tests in a Sprint. This is simply not enough coverage to test all systems and other tests continuously. The result, is partial or low test coverage.

Enter Automation

If as part of each Sprint, a fully developed set of test cases are developed by each Sprint in the same application (eg SOAPSonar) covering their development efforts. The incremental work to role these up into test cases for integration, load etc would be minimal. Each sprint then shares a set of Integration, performance, load and regression etc tests that they simply run as part of their sprint. Being automated, these can even run after hours. The result is continuous testing of both at the Systems level and the Sprint level, without the heavy resource requirements of manual testing. issues be the system wide, or sprint level can then be addressed in Sprint.

Conclusion

The concern with this is the same as with any automation project, “Will The Development of the Automation Scripts Not Take More Time than the Resulting Benefit.” This is a tool selection question. Finding the right tool for your team to use to minimize the time taken developing and maintaining various test cases from function through load and regression, to acceptance testing.

Would you like to weigh in with your thoughts or comments on the subject?

4 SOAPSonar – Using Automation Data Sources

In Tutorial 2 we got started with REST and SOAP service, using design view and doing a unit test. In Tutorial 3 we chained the response from one service to be a request for a second service, creating a mash-up test between REST and SOAP services to run in Run View. In this tutorial we going to show how to use an external source like a .csv file for automating a range of values. This is represented in the test cycle by variables and data sources. 

Why use Automation Data Sources? Well lets say you need to test a range of users, or values. Take Canadian postal codes as an example. There are 845,990 Canadian postal codes. Yet when testing, you may not need to test all of them. However each province, has 1 or more letters that start the postal code for the region. All BC postal codes starting with V. There is 18 possible start letters, each mapped to a given area. If your percentage coverage requires validation of address by checking postal code to province and includes testing negative scenarios, you could be required to run the same test case through 20 or more unit tests. If you have read more detailed service plan costing, you can see that 20 unit tests through many test iterations can add significantly to testing costs. The challenge however is to do this, without spending too long on the test creation or maintenance. If each release requires new scripting, the value of automation greatly decreases.

I am going to first use the SOAP calculate service, but show a JSON service example afterwards.

1. Lets first create our data source. There are many places on the web to find already created data sources, but in this case, I will use MS Excel to create one and save it as a CSV. I created 6 columns, input A, Input B and then the expected results for each service. I have only 10 lines, but you can make these much longer. Here is the calculate csv file for you to download.

1 Create csv

2. Run SOAPSonar (with Admin Rights) and in the capture WSDL bar paste http://www.html2xml.nl/Services/Calculator/Version1/Calculator.asmx?wsdl. and press enter. Select Configure Project Data Sources. Here we define any Automation Data Sources we may use.

2. Config data sources

3. Now select Add Automation Data Source. You can see that ODBC, SQL, Oracle, Excel or File bases data sources are supported. Select File Data Source for .csv.

3 Add data souce

4. Give your Data source a Alias, Locate the .csv file you downloaded and ensure its still Iteration, and Data Series in rows. On the right of Data Variables field (were my curser is), select the option to refresh data and view data. Do you now see your .csv file? Select OK.

4. Refresh

5. Now lets use that Data Source on the Add_1 function. Make sure you are in Project View, and QA mode and Select Add_1. Right-click in a= field and select [ADS] Automation Data Source, Quick Select, Your Alias (mine is calculate), Input A column. do the same in b= field selecting Input B. Commit the test settings.

5. Project view

6. Now select Run View, and Drag Add_1, under the DefaultGroup. Commit. How many test case did you expect run? Run Suite to execute the test suite.

6 run view

7. You can see I ran through the entire csv file rows, or 10 test cases. You can Analyse These Results in Report View, but we will leave that and Success Criteria for another tutorial.

7. Results

8.Lets try this with JSON. File, New Test Group. File, New JSON Test Case and paste http://maps.googleapis.com/maps/api/directions/json?origin=Toronto&destination=Montreal&sensor=false into the URI and make sure method is GET.

8 Google URI

9. Lets add our data source  Add this googlemaps .csv file to you Data Sources as a file data source. Remember to refresh and check it before saying OK.

8. maps

10. Now in the URI highlight (delete) toronto and right-click (insert) and select [ADS] Automation Data Source, Quick Select, Cities, Origin. Do the same for montreal. Commit.

10 insert

11. Drag your Test case over to Run View and commit and run suite. How many test cases did you run now?

11. run

Conclusion

You have just used a Automation Data Source in both a JSON and  SOAP Service. Running multiple values through a unit test, vs manually entering these same values. What is important to consider here is putting the right values into the CSV file to test as many variables as needed. Using a Tool like SOAPSonar with a Automation Data Source, increases your coverage, and reduces the time taken to run test cases. Whats more, since it is not script bases, there should be little issue if any, running it again on the next code release., further reducing testing time.

Comments?

CloudPort for REST Response Generation

In SOAPSonar tutorial 3 we tested a simple chained service for a mashup. The first being a REST service look-up on google maps for distance between Toronto and Montreal, the second a calculation service to work out how long it would take to ride a bike at your own speed.

Now what if you are required to test the second service, when the first is not available? Does the team sit idle, resulting in project “Dead Hours”? Do you call a meeting, tell them to review test cases documentation, plan, take lunch what? The effect of Dead hours can somewhat be seen in my last post on Service Plan Costing

Why may a service not available? There are many of reasons.

  1. Lab is not available
  2. Network or connectivity is down
  3. You working from home/cottage/travelling
  4. Its a 3rd party’s service, and they have other testing
  5. The service is there, but you need to load test and the service does not allow for that
  6. The service data cannot be corrupted, etc.

Whatever the reason, what you need is something to respond the same way to a the same request, so that other test cases and automation does not fail. Now you could have development hammer out some code, get infrastructure and then installed it on a server, but that will take time and resources. Alternately you can use CloudPort.

1. Run CloudPort. This example is simple so we will just create a service and not capture one. Select Build Simulation. The proxy capture tool makes capturing more complex services and WSDL much easier.

1 build

2. File, New, Custom Simulation and then File, New, JSON Simulation Rule. Rename it to Montreal

2. New Service

3. Now the first thing we need to do is set up a network listener policy, the port and URI that CloudPort will run on and listen for requests. In Project Tree, select Network Listeners and enter a Name of Google Maps, leave the IP 0.0.0.0 and lets say port 8888. For the URI lets use a similar one, so only the port and machine are different. Enter /maps/api/directions/json/. Select the green check box to commit.

3.  network listener

4. Now we need to define request listener policy for a particular request string, URI or parameter. Select Add Manual Rule, URL Query Parameter and enter montreal. We now listening for a JSON query with montreal in it. When CloudPort gets that request, it will send the response we define in the step 6.

4 - New listener

5. Lets remove the default rule that matches all documents. Select the number 1 next to the default rule and select remove.

5 - delete default

6. Next we flip over the the Response tab. Now you could get creative and put in any response you like, but we do need that field with the distance. So to make this simple, I am just going to copy the response from the real sever into CloudPort. So long as we have the part we need we should be fine.

{
“distance”: {
“text”: “621 km”,
“value”: 621476
}

For fun I added a line at the top “note”: “this is a CloudPort simulation and not the real service”, and left the same as before.

6 response

7. Not that we needed it, but just in case, I will define the distance as a variable. Select Response Runtime Variables and scroll down to the value (distance in meters) and right-click, add variable reference.

7 runtime

8. We could now clone this for as many different queries as we need, changing just the query listener and the response.

9. Lastly I want to add a error service. Right-click on tests, New JSON Simulator and rename it Error. Since its after the first rule, we will leave the default catch everything, and in the response, I had some fun with the error code and message.

9. error

10. Time to test it out. Save your project then start local simulator with project. See the URI for the service is displayed on port localhost:8888?

10 run view

11. In SOAPSonar, lets make a slight change to test case. Clone it and past http://127.0.0.1:8888/maps/api/directions/json/ into the host and path. Leave the query the same. Commit and send. Can you my response. Note my added field? In every other way, this response should be the same. If you replace Montreal with some other city, what do you get?

11 SSonar

12. Back in CloudPort’s runtime player, you can see the transaction.

12 Runtime

Conclusion

In a few minutes you have ritualized a simple web service. What’s better is that the runtime player is free. That project you created, can be used by as many people in your or outside of your organization as you may wish to share it with.

Virtualizing or simulating a service is a quick way to remove many of the environmental factors that testing has to deal with on a day to day basis. From creating early mock-ups to trouble shooting performance, there are literally hundreds of use cases.

It was pointed out to me that for a single static response like this, you could use the FREE Runtime player and dont need the licensed service creation aspect. That said, the tutorial is valuable if you wish to extend this to multiple requests and responses and more complex workflow.

Comments?

MORE DETAILED LOOK AT SERVICE PLANNING COSTING PART 2

For those of you who attended my TASSQ presentation, this post is not new, but for those that did not, I wanted to so a post to give you some background.

The example we used at TASSQ was;

“If you have an assignment to test 500 services, each service has 10 functions and each function requires 4 tests, upper boundary, lower boundary, and 2 negatives. Using service plan costing, the total number of test cases you would need to test is then 500 x 10 x 4 = 20,000.”

Now before you say, there hundreds of ways to reduce that number, let me agree and say, yes there are many ways we could. But lets leave that discussion for other posts, or another presentation (was actually something I was going to speak to) and pretend that this number is is the result AFTER all optimization is done. The Reducing Amount of Test Coverage series of posts will address ways this can be done.

Service Plan Costsing

The TASSQ numbers were numbers in the second column, I got polling the audience, and I believe are pretty conservative.

  1. Number of Release Iterations – This is how many times you get a code drop from Development that is tested by QA. Each time, QA runs through a series of tests, be the manual or automated.
  2. Integration Testing is testing integration with Identity systems, 3rd parties and existing systems.
  3. System Testing includes testing the system as deployed. Testing the environment. Load vs performance, DR, preproduction, and production etc.
  4. Time per test case, is a breakdown of time taken to run a single test
  5. Hourly Rate all in, needs no introduction – we tend to have a slavish focus on this number which often translate into salary cuts.
  6. Tools and Infrastructure costs is the capital expense for buying software etc. to test
  7. Training – far to often Zero
  8. Additional overhead, any number not previously in there, like recruiting costs etc.

The result is a project cost of $1,473,500 which would take 10 resources at 8 hours a day 450 days to test.

Now for the not so obvious Truth about Testing.

  1. In Column 3, we changed 1 number, test time, to understand the effects it has. If you could save 1 minute a test case, the multiplier effect translates this into $160,000 savings or some 11%. How do you like that for a reason for optimization or Automation. Time and Time again I am told, “but we can do the same thing in-house without buying tools” and time and time again, I ask, “but does it take more or less time”. I heard QA staff complaining about no training, and yet, a course would be cheap in comparison. More Importantly for some we cut 50 days off testing time!
  2. In Column 4 we dropped one test cycle for a saving of $120,000 or 8% or 37 days. Remember the last time development gave a code drop that was not fully baked? Why do people use different tools and test case’s for functional and performance tests, when they could wrap them into one?
  3. In Column 5 we reduced the hourly wage by $5/hour. The effect, $180,000 or 12%, yet time remains constant…. Not as much effect as you thought perhaps?
  4. Column 6 we tripled tool costs, in an effort to reduce testing time or release cycles. The effect is some 4%

Conclusion

So regardless of if your business uses service plan costing or not, it is a valuable tool for understanding and dissecting QA costs. For focussing attention on the matters that really effect costs. In fact, I believe KPI and pareto analysis of these KPI is important for any QA manager. I always like to hear ideas that reduce testing time or test cycles, so please, feel free to share your thoughts.

2. SOAPSonar – Starting with SOAP and REST

So you have installed SOAPSonar and it’s registered as is detailed in this earlier tutorial. Were now do you start? First let me explain how SOAPSonar works. SOAPSonar is device independent, and requires no client or client application in order to test the Web Services API. It sends requests directly to the Web Services API, and receives the response.

SOAPSonar Test Cycle

The SOAPSonar Interface is divided at the top into 3 Views. Project View, Run View and Report View. In Project View we create the individual test cases, defining data source, variables and success criteria. In Run View we combine these test cases into automated test scenarios, by dragging or linking the independent test cases created.We can also define virtual agents, for load testing and logging option. In Report view we see the results of the independent test cases that are run, compared against the success criteria we established. The logs provide addition detail on for further trouble shooting errors. On the right is 4 modes to run the tests in.

SOAPSonar headings
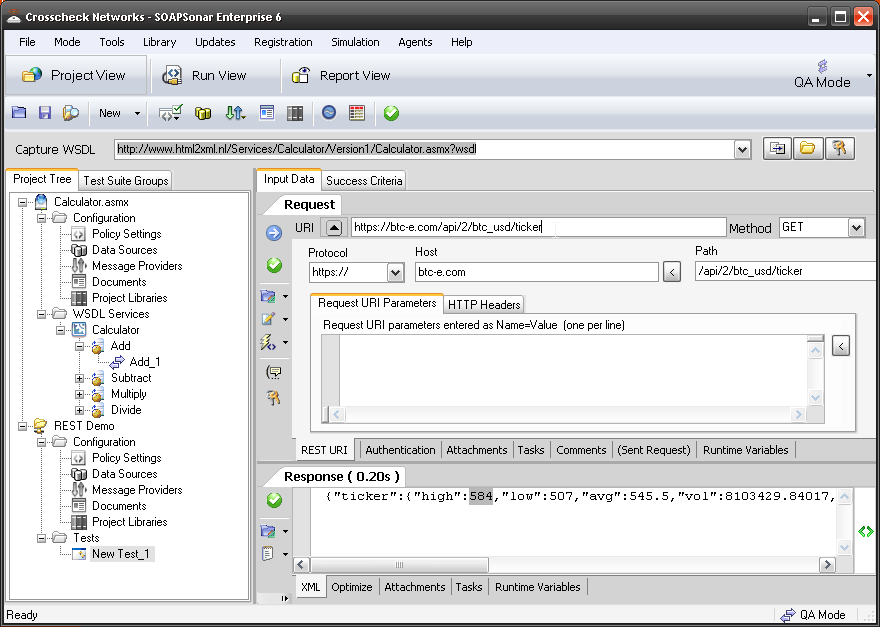
QA Mode, Performance, Compliance and Vulnerability. SOAPSonar uses the same test cases created in Project View, and Test Scenarios in Run View, to run in any of these modes, yet provides different reports.

A SOAP Based API

SOAP Web Services API, provide a WSDL, which can be captured by SOAPSonar and used to automatically generate a UI. For example if you put http://www.html2xml.nl/Services/Calculator/Version1/Calculator.asmx into your browser, you will see a free basic SOAP service example for calculation.

If thiis service seems to be down try http://www.w3schools.com/webservices/tempconvert.asmx?wsdl

1. Make sure you are in project view and QA mode. Place that same link into SOAPSonar’s Capture WSDL bar and add ?wsdl afterwards or paste http://www.html2xml.nl/Services/Calculator/Version1/Calculator.asmx?wsdl Then select Capture WSDL or press enter, you can automatically import the available services. If you look on the left, in the project Tree, you will now see a service called Calculator.asmx which has 4 services, Add, Subtract, Multiply and Divide.

Capture SOAP WSDL

2. If you select Documents you can view the WSDL and Embedded Schema.

View Schema

3. Now lets see the automatic UI for the Add service. Select Add_1 service. In the main section, there is a Request section on top, and under that a Response section. Lets start simple and enter a= 2 and b= 2 then the green check mark to commit the test settings and the blue arrow to send current request to server. If you look at the Response section, you should see the result is 4.

send test

4. If you select the XML tab at underneath the Request Section, you can view the XML Request that was sent. Changes in the Schema Fields or here are mirrored. Change the a field in the XML by changing the 2 to a 3 in <tns:a>3</tns:a> then then the green check mark to commit the test settings and the blue arrow to send current request to server. Does the response now read 5?

XML send

REST Based API

REST based API do not provide a WSDL that can be captured. Their lightweight nature, requiring a bit more knowledge or documentation.

1. To start a REST test, select File, New, Test Group. You should then get NewCustomGroup1 in the project Tree. If you right click in it you can rename it REST Demo.

New Rest Test

2. If you Select Tests, then right click and and select New REST Test, you will see a similar but slightly different Request and Response section.

3. Lets Check the Bitcoin price. In the URI in the rest section, paste https://btc-e.com/api/2/btc_usd/ticker and leave the method as GET. then the green check mark to commit the test settings and the blue arrow to send current request to server. What did you for a response? My high I got was US$584 today.

Bitcoin Request

4. Notice that by pasting in the URI, it is then broken down into Protocol, Host, and Path. Right click on the New Test_1 and rename it BTC_Bitcoin.

5. Please save your test plan at this point for the next Tutorial on Run View.

Conclusion

Well now that you have some idea how to start a REST or SOAP Test case development, take a few minutes to try a few additional service or services from your own environment. Try a BBC Music artist

http://www.bbc.co.uk/music/artists/ada7a83c-e3e1-40f1-93f9-3e73dbc9298a

or SOAP Soccer information service

http://www.xmlsoccer.com/FootballData.asmx?WSDL.

For that matter, Facebook, twitter and many other companies offer API’s that can be used, although some require a developer registration and key first. Perhaps you have a service you familiar with you would like to try?

We now have some idea of project view and how to start with a SOAPSonar project. next we will look at Run View and how to use some of these unit tests.

Comments and question below will help others learn.